Introduction to the Network Scanning Phase

The next phase after doing passive reconnaissance using freely available information is to start actively engaging with the target. This is referred to as scanning.

TCP/IP Revision
I know, I know, you want to dive into scanning networks, finding open ports and seeing the shiny cool terminal tools. But trust me, this knowledge is essential to understand not only how these tools operate but also key to interpreting the results you receive back or why you don’t get results back.
In order to be able to appreciate the security issues affecting computer networks and provide mitigations against the, it is essential to understand how networking actually work - i.e. the TCP/IP model.
Open Systems Interconnection Model
I have covered the OSI model in more detail in this post. However, I will cover it very quickly here just as a baseline. Feel free to read more about it.
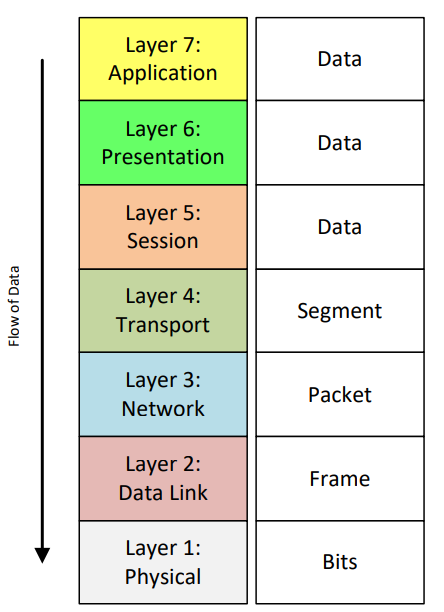
The OSI model is an abstract, 7 layer model that defines a communication system. Each layer provides a clear and defined functionality, independent from the other layers.
Information flows from the application layer to the physical layer. As the data goes through the layers, it is processed according to services and protocols specific to each layer.
Data is eventually transmitted physically through wires or through air. Once it arrives at destination, the inverse process applies.

As the information travels from layer to layer, a header is appended to the actual data to hide the functionality of the upper layer - called encapsulation.
The data transmitted is referred to as the Protocol Data Unit (PDU). Since each layer does a unique task, the PDU is defined using different names for each layer.
The data package at the Application Layer is called a message or simply data, while the same data package at Transport Layer is called a segment.
THE TCP/IP MODEL
The TCP/IP model is the standard used for communication. It is a real implementation of network communications and is completely transparent to the user.
If two systems support the TCP/IP stack, and their protocols implementation is consistent, then they can communicate with each other regardless of their underlying hardware architecture.

The Network Access layer is where the actual TCP/IP protocols running at higher layers interface to the local network. It's the equivalent of the data link layer in the OSI mode.
Many do not consider it as part of the TCP/IP suite because on many TCP/IP networks, there is no TCP/IP protocol running at all on this layer.
For example, if you run TCP/IP over Ethernet, then Ethernet handles the layer functions. However, the TCP/IP standard defines some protocols such as Point-to-Point Protocol (PPP).
The Internet Layer corresponds to the Network Layer on the OSI model. It is responsible for logical device addressing, delivery and routing. The IP is available at this layer as well as ICMP and routing protocols like RIP, OSPF, BGP, etc..
The Transport Layer primary job is to facilitate end-to-end communication over a network and corresponds to the Transport Layer of the OSI model. It is in charge of allowing logical connections to be made between devices to allow data to be sent either reliably or unreliably.
It is also here that source and destination applications are identified. The TCP and UDP are examples of protocols at this layer.
The Application Layer encompasses layers 5-7 in the OSI model. Numerous protocols reside here including HTTP, FTP, SMTP, DHCP, etc...
COMMUNICATION WITHIN THE INTERNET
Each device connected to the Internet is capable of speaking TCP/IP to other devices. No matter the underlying technology and the number of interconnected devices, as long as they are all able to use TCP/IP protocols, they can communicate.
The Internet is made up of a vast amount of interconnected networks, each with its own hardware and Network Access protocol. This interconnection is hierarchical with the lowest tier being individual users and computers connected in home or corporate LANs.
These are linked together by the next tier formed mostly by ISPs. The ISPs are connected to the next tier which is composed of telecommunications companies. They own what is referred to as the backbone of the Internet.

HOW DOES DATA TRAVEL AROUND THE INTERNET?
Information that is sent over the Internet is divided by TCP into chunks of data (segments). These are assigned a source and destination IP address (packets) which can be used by routers to deliver them to the target.
Once there, the receiving computer can reassemble the data and present it to the user via the appropriate application. One of the key aspects of this process is the fact that these chunks of data do not rely on a specific device to get to destination.
Every packet could take a different route and arrive at different times. If a packet goes missing or is damaged during transfer, TCP is capable of requestsing its retransmission.
Revision on the TCP/IP Protocol Suite
It is important to revise some of the most common network communication protocols. By studying how they work, it is possible to understand how some attacks are performed.
ADDRESS RESOLUTION PROTOCOL
ARP is a protocol that helps resolving known IP addresses to unknown MAC addresses. It allows the communication between devices in a Local Area Network (LAN).

When Host A needs to communication with the Server, it requires the MAC address of the Server. This is what ARP is used for.
To begin with, the host checks its ARP cache, searching for an entry with the IP address of the server. If the entry is not found, Host A uses ARP to request the MAC address of the server
Host A sends an ARP broadcast asking every host in the network the question "who has IP address 192.168.56.101"
Upon receiving that request, the Server replies with an ARP reply indicating its MAC address
Host A saves this information in the ARP table for future use and starts sending data
There is a crucial deficiency in this. Every host in the network has total trust towards every ARP message received. ARP is so trustworthy that even if a host receives an unsolicited ARP reply, it will accept it as true.
A malicious user could spoof an ARP reply, combining a legitimate IP address of a device in the LAN, with the MAC address of its own device. This ensures any traffic sent to that IP goes through the attacker - known as ARP poisoning.
DOMAIN NAME SYSTEMS
DNS serves a critical function where it converts domain names into IP addresses or vice versa. When you type in a URL, a request is sent to a Domain Name server asking for the IP address corresponding to the above address.
If the DNS server has that information, a reply is sent with the requested information. If not, it may ask for the information to another server until an answer is found.
DNS is a large distributed hierarchical database of web addresses, divided into zones. Each zone is a collection of structured resource records.
Similiar to ARP, DNS is inherently insecure as, by default, it trusts every request as being legitimate and does not use authentication amongst servers. Therefore, an attacker could pretend to be an authoritative server and modify information located on legitimate DNS servers - called DNS poisoning.
TCP
TCP is one of the main protocols of the TCP/IP suite. It is also one of the most complex, but performs a critical function for the operation of network communicatiion.
TCP allows two devices in a network to establish a connection and exchange data. TCP is referred to as connection oriented indicating that, before data exchange begins, a full connection is established.
In addition, TCP guarantees the delivery of data, meaning that if a PDU gets lost during transit, TCP handles its retransmission.
Sometimes, the data sent is not guaranteed to arrive in the same order it was delivered. TCP ensures that data is reassembled correctly, in the same order as the source.
The header for TCP is as follows:

Source Port - port used by the host that opened a connection, normally a random value above 1023
Destination Port - port used to identify the upper layer protocol or application on the remote host site. The values in the range 0-1023 are the well known ports and are associated with popular services and applications (Telnet, FTP, HTTP, HTTPS)
Sequence Number - specifies the number of the last octet in a segment
Acknowledgement Number - specifies the next octet expected by the receiver
Flags - has a special meaning in session management and in the treatment of segments.
Windows - a value that defines how many octets can be sent before waiting for an acknowledgement
Urgent Pointer - only used in conjunction with an URG flag when the sender needs to send urgent data
Options - only option defined is the maximum TCP segment size
Some of the flags that can be used include:
ACK - Acknowledgement of a segment receipt
SYN - Synchronize, only set when a new TCP session is negotiated during the TCP 3-way handshake
FIN - Finish, request to close TCP session
RST - Reset flag. Used when a segment arrives that is not intended for current connection. If a connection request for a service was sent by a host and no service was available at the remote host, the connection would be rejected using RST
URG - Urgent. Incoming segments are processed immediately
PSH - Push. Similiar to urgent flag. It ensures that data is given priority. With flag set, segments are transmitted prompty bypassing the TCP buffer
To establish a connection, TCP uses a 3-way handshake. The principle is simple:
When a client attempts to connect to a server, it sends a signal to the server with the SYN flag on
Upon receiving the SYN message, the server replies with a SYN/ACK
To conclude the connection, the client sends an ACK back to the server
At this point, both the client and server have received an ACK of the connection:

UDP
UDP is a connectionless protocol. Since it contains fewer bytes, UDP is used for faster communication but it does NOT provide reliability, flow control and error recovery functions.
UDP has only four fields:

Source port - same as TCP, used by host that opens a connection
Destination port - same as TCP, port used to identify the network application
Length - length of the UDP header and data
Checksum - an integrity check on the UDP header and data to make sure the segment was not damaged or modified during transit.
PORT NUMBERS
A network end point may run multiple network applications simultaneously such as email clients, web browsers and instant messaging.
The end poinf PC needs a mechanism to distinguish one type of application connection from another. Any client application processes must keep track of what connections they have to application servers on the network.
The TCP/IP transport layer protocols (TCP/UDP) manage connections at the application layer using port numbers, which allow data segments contained within TCP and UDP packets to be passed along to the correct application.
TCP and UDP utilize destination ports and source ports to distinguish which application layer processes they must transport their data to and receive their data from, respectively.

The following describes different types of port numbers:

Finally, ports can have three main states:
Open - target accepts incoming request on that port
Closed/Unfiltered - not accepting connectivity
Filtered - a firewall, filter or other network device is preventing the port from being probed.

Scanning
Once the passive reconnaissance phase is over, a penetration tester can initiate the Scanning phase.
The Scanning phase is the active attempt to connect to a system to elicit a response and determine the services running on it. It typically enables the attacker to establish information about IP addresses, services running on a computer and operating systems.
The main objective is to probe ports, keeping track of open TCP/IP ports that would be receptive to hacking and establish applications vulnerable to hacking.
It is a 3-step sequence process:
Locating a live system in a network
Scanning the system for open ports and running services
Scanning the system for vulnerabilities
It can also be used to identify/detect the target OS (fingerprinting).
The three steps are defined as follows:
Network Scanning - checks live IP addresses. Procedure for identifying active hosts on a network
Port Scanning - determines open ports and active services in each of the identified live hosts. A series of messages are sent to a computer to learn which services and associated "well-known" ports are running.
Vulnerability Scanning - active services are scanned for vulnerabilities to determine the presence of known flaws.
Network Scanning - Identifying Live Hosts
The scanning methodology begins by trying to identify and detect active hosts on the target network. This is used to provide an accurate map of the network and to create a list of accessible systems.
Ping is a useful utility that can be used to identify active machines and to measure the speed at which packets are moved from one host to another. It can also be used for resolving hostnames.
Ping sends out an ICPM echo request to a host and waits for the target to send an echo reply back. If the target device is unreachable, a request time out is returned.
However, the usefulness of ping for scanning is limited, due to firewalls and other devices blocking ICMP echo requests. Most modern networks and devices block ICMP packets by default.
When a large number of ICMP echo requests are detected, a firewall or IDS can easily recognize the ping sweep and block it immediately. Therefore, just because a ping sweep does not return active hosts on the network does NOT mean they are not available - alternative methods should be used.
To use a ping sweep on nmap, the syntax is:
nmap [-PE | -PP | -PM]
TCP SYN PING
One method is the TCP SYN Ping. This is a scan that sends a TCP packet (generally empty) with the SYN flag set, addressed to a selected port.
If the port is open, the target should reply with SYN/ACK or if closed, the target should reply with a RST flag.
Either way, it's possible to assume that the target is alive. On the downside, this scan is well known and can be easily spotted by modern systems and often blocked.
The nmap syntax is:
nmap -PS [port list]
UDP PING
This uses a UDP packet sent to a port that is hoped to be closed. The reason is that if the port is closed, an ICMP port unreachable packet is returned, otherwise no response is given.
For this to work, a closed port is essential, therefore a port from high range is often used.
The nmap syntax is:
nmap -PU [port list]
LIST SCAN
Another method is to simply scan a DNS server to identify which hosts are registered to it. By using a reverse-DNS resolution to perform this scan, it is possible to list every host on the network without sending any packets to the target.
This has the advantage of being stealthy. Additionally, the hostname of the target may hint at the role of the device. The big disadvantage is that the scan is not really an active scan.
It does not show availability, meaning that the host registered to the DNS server may not actually be alive at the time of the scan.
ARP PING
If you need to scan for a live host within a LAN, use an ARP Ping. ARP is an essential protocol which must be enabled to allow communication between hosts in a LAN.
Therefore, whenever an ARP request is sent for a specific host, if the host is active, a reply must be delivered.
nmap -PR [port list]
IPv6
Due to the larger size of IPv6 subnets, it becomes less feasible for traditional network scanning methods to detect open services for attacks.
If admins number their IPv6 subnets in random, non-predictable ways, attackers will need to make use of different approaches to determine IPv6 host addresses to target.
Port Scanning - Identifying Open Ports and Services
With knowledge of the network range and a list of active devices, the next step is to locate any open ports and access points, and identify the services running.
Port scanning is the method used to check for open ports. The process involves probing each port to determine which ports are open, by sending a data packet to a port to identify the state of the port and the services and applications running on it.
TCP ports can have three states:
Open - the target accepts incoming requests
Closed/Unfiltered - not accepting connectivity
Filtered - some filter is applied that is preventing the port from being probed.
NOTE: A port scan is like ringing a doorbell. The police cannot do anything about it. However, the policy might give it more consideration if the doorbell is repeatedly rung causing harassment.
Sometimes, if a computer system is affected too much by a port scan, one can argue that the port scan was a DoS attack, which is an offense.
Many types of scans exist. The particular methodology depends on the objective of the attack and the target. Scans should often be intended to be stealthy.
TCP scans exploit either the TCP handshake or the TCP connection maintenance process. Every TCP connection MUST first be established with a 3-way handshake.
TCP CONNECT SCAN
TCP Connect scan is where a full connection is opened to the target by a 3 way TCP/IP handshake. It is the most basic and reliable but is easily detected and blocked by firewalls.
The handshake establishes connection from both ends and likewise can be terminated from both ends individually.
If a port is listening, the connection will succeed, but if it is closed, the server responds with a RST/ACK flag.
TCP SYN SCAN
This scan can send connection requests to the target and waits for its response. If a port is open, the target replies with a SYN/ACK, and then the client sends a RST flag back.
If no response is received, the port is probably filtered.
Used to be used to evade detection but not so much anymore. It can be spotted by firewalls, IDS and IPS systems.

XMAS SCAN
Sets the FIN, PSH and URG flags. This exploits a subtle loophole in the TCP RFC to differentiate between open and closed ports.
If a port is closed, it responds to a XMAS tree scan with a RST, while an open port remains silent and normally marked as open|Filtered.

FIN SCAN
These behave exactly the same as the XMAS scan, except for the TCP flags set in the probe packets. A FIN is sent to the server.
If a RST packet is received, the port is considered closed, while no response means it is Open|Filtered.

NULL SCAN
Same as previously, this scan takes advantage of the same loophole in the TCP RFC. In this case, the server is probed with no flags set. The server should return an RST packet when the port is closed, while no response is sent when open.

UDP SCANNING
UDP represents the most evasive service ports because they respond in a different manner as a system is not required to respond to packets sent to an open UDP port.
To find UDP ports, an attacker generally sends empty UDP datagrams. If the port is listening, the server should send back an error message or ignore the incoming frame.
If the port is closed, then most OS send back an "ICMP Port Unreachable" message.
ADVANCED TECHNIQUES
One problem is that services listening on these ports log scans. They see an incoming connection, but no data, so an error is logged.
Port scanners scan a host rapidly by firing off packets at different ports. Scanning very slowly becomes a stealth scan.
There exists a number of stealth scan techniques to avoid this.
Scanning Tools
NMAP
Nmap is an open source utility for network discovery and scanning, which uses raw IP packets to determine what hosts are available on a network.
It is capable of discovering, amongst other things, what services those hosts are offering, what operating systems they are running, and what type of packet filters/firewalls are in use.
HPING
Hping is a tool that allows the crafting of TCP/IP packets. One of its main features is the capability to forge packets from scratch using CLI.
Any fields within the TCP/IP PDU can be modified. This could be used to simulate, for instance, spoofing attacks. In generaly, Hping is a tool that can be used for security auditing and testing of networks.
Banner Grabbing
Banners are the welcome screens that divulge software version numbers and other host information to a network host.
Banner information identifies the OS, version number, and specific service packs, enabling vulnerabilities to establish.
Once active nodes are discovered, the easiest method to discover this information is by banner grabbing. This involves establishing a raw connection to an open port and documenting its response.
Information sources can include:
Telnet
FTP
Netcat
Operating System Fingerprinting
Fingerprinting is a technique used to interpret the responses of a system in order to establish the OS that is running. The advantage of fingerprinting is that it is less detectable.
Fingerprinting exploits the fact that OS implement the TCP stack differently, meaning that specific systems respond in unique ways.
The two different types are:
Passive Fingerprinting - act of identifying systems without injecting traffic or packets into the network
Active Fingerprinting - sending malformed packets to the target in hope of eliciting a repsonse that will identify it
PASSIVE FINGERPRINTING
Passive banner grabbing refers to indirectly scanning a system to reveal its server's OS. Passive fingerprinting is based on the differential implementation of the stack and the various ways an OS responds to it.
Instead of relying on scanning the target, it captures packets from the target host and studies it for signs that can reveal the OS. It is less accurate than active but is more stealthy.
ACTIVE FINGERPRINTING
Active stack fingerprinting is also based on the fact that OS vendors implement the TCP stack differently. However, it actively sends packets to the target and checks for their response.
It is more powerful and accurate but it it not as stealthy.
Countermeasures
To minimize exposure to the dangers of port scanning, using the principle of least privilege is an important concept.
All unnecessary services should be disabled. Only needed ports should be kept open and the rest should be filtered or blocked.
It is also possible to implement tool sets to detect and possibly thwart an attacker from acquiring information:
implementing firewalls that prevent internal systems from being scanned by blocking ping sweeps and port scanning tools
implementing IDS and IPS in order to detect and alert an admin to a ping sweep or scan taking place

Practical Examples
Most networks are designed to offer some form of communication in and out of their boundaries. Services such as Web, email or databases are mandatory for enterprises offering their business on the Internet.
These are some of the services that, if not properly maintained, a hacker could exploit to obtain access.
Network Scanning is a delicate phase of a penetration test. If performed correctly, it can provide useful information and almost assuring access to a target.
However, if carelessly executed, scans could be easily spotted by IPS and IDS, which is NOT the desired outcome.
HOST DISCOVERY WITH NMAP
Before starting a scan, we can read the help for nmap:
nmap --help
Reading through there are some interesting options. Some used for host discovery are:
-sL - list scan that accepts a list of targets
-sn - ping scan
Next, we can execute the ping scan for Nmap on the network subnet. The subnet for this lab is 192.168.95.0/24.
nmap -sn 192.168.95.0/24

Another interesting option is the List Scan which simply list each host on the network without sending any packets to the target. It uses reverse-DNS resolution to perform its scan:
nmap -sL 192.168.95.0/24

The reason more appear is that no packets are sent to the target host. The "-sL" option simply performs a host name lookup.

Before starting a full scan, a list scan may provide useful information to choose the right target. It is very unlikely that the target would notice all the reverse-DNS requests.
If this is a concern, the scan can be performed using anonymous recursive DNS servers using the "--dns-servers" option.
Another interesting way of performing host discovery is by using a TCP SYN Ping. This is achieved via the "-PS" option followed by the port numbers.
When using this option, nmap sends an empty TCP PDU with SYN flag set. If active, the remote host replies with a TCP RST PDU on a closed port. Otherwise, it replies with a SYN ACK.
In both cases, it can be assumed the host is alive.
If no ports are specified, nmap will only scan port 80 by default:
nmap -PS 192.168.95.0/24

In Wireshark, it looks like the following:

As you can see, port 445 on the target (192.168.95.10) sent back a SYN/ACK packet indicating that the host is alive and that the port is open.
In order for the next technique to work, we need to switch to the eth1 interface. First, we disconnect the eth0 interface:
nmcli connection down id Outside
Next, we need to activate the eth1 interface which has been configured with an IP address that is part of an internal subnet and a profile named Inside:
nmcli connection up id Inside
Next, we can check the IP configuration:
ip addr

Now, we can run a Ping Scan but with the verbose option (-v):
nmap -sn -v 192.168.95.0/24

Since we targeting host on the same subnet, nmap automatically performs the scan using only ARP requests. In scanning terminology, this is referred to as an ARP Ping.

NOTE: This picture was taken before changing the IP address range so the IP addresses will be different
ARP scan is much faster and more reliable than any other IP scan. Because of this, it is done by default when scanning hosts that Nmap detects being on a LAN.
Even if different scan types are specified, Nmap uses ARP Ping instead. In case ARP scan needs to be disabled, the option "--disable-arp-ping" should be used.
NETDISCOVER
Netdiscover is an ARP based tool for network scanning and is ideal for performing host discovery on a LAN.
Netdiscover can be used in Passive and Active mode. In passive, the tool listens to the network communication without sending an ARP PDU.
In active mode, it uses ARP requests to find hosts.
By running Netdiscover in passive mode, the software sniffs ARP PDU from other hosts.
As an example, we can open a terminal and execute:
netdiscover -p -i eth1
Where:
-p indicates passive
-i eth1 indicates the interface

Next, we can swap to Windows XP and check the ARP cache via "arp -a":
arp -a

To clear the ARP cache, we can enter "arp -d *"
arp -d *
Next, on Windows XP, we can ping the server at 192.168.95.100. Once finished, we can check Netdiscover and see some entries for XP (.11) and the server (.100)

Additionally, Netdiscover provides a help feature by pressing "h":

Pressing r and a displays the list for ARP Request and Reply:

To use the Active mode, type:
netdiscover -i eth1 -r 192.168.95.0/24

PORT SCANNING WITH NMAP
One of Nmap's most efficient features is port scanning. Port scanning is the process of remotely scanning TCP and UDP ports to determine their state.
Starting with the TCP SYN scan (-sS) which is the default and most popular scan. It is often classified as the half-open scan because it asks to open a connection and if answered, the connection is reset.
To execute a SYN scan:
nmap -sS 192.168.207.101

Looking at the SYN Scan in Wireshark, we can see the client sends a SYN packet, the server responds with a SYN/ACK and then the client responds with an RST packet to NOT initiate a full connection.

Another popular scan is the TCP Connect scan specified by the "-sT" option:
nmap -sT 192.168.207.101

Looking in Wireshark for the same port (139), the client sends a SYN, server sends back a SYN/ACK and then we send an ACK completing the 3-way handshake.

The difference between the two scans is that a TCP Connect scan will complete a full 3-way handshake whereas the TCP SYN Scan will not complete the handshake but instead send a RST packet before completion.
The TCP Connect scan is used by default if the user does not have admin privileges or if scanning an IPv6 network. Instead of writing raw packets, nmap asks the underlying OS to establish a connection with the remote target.
When possible, a SYN scan is preferable as Nmap has full control.
Nmap is also capable of executing a scan to detect the OS running on the target machine via the "-O" option:
nmap -O 192.168.95.100 -vv
nmap -O 192.168.207.101 -vv

As practice, to run a UDP scan against the Windows Server (192.168.95.100), use the "-sU" option:
nmap -sU 192.168.95.100

Finally, we can try running a FIN scan against the Linux Server (192.168.207.101):
nmap -sF 192.168.207.101
Looking at the Wireshark output for the FIN scan, we can see that a FIN is sent to the server. If a RST packet is received, the port is considered closed, while no response means it is Open|Filtered:

Next, we can try a Decoy Scan. This adds other hosts to the scan to confuse the network admins when checking the source of the scan.
The "-D" option makes it look to the target that the hosts you specify as decoys are scanning the network too. Therefore, an admin might not be able to know which IP was scanning them and which were innocent decoys.
While it can be easily overcome, it can be an effective technique to hiding the real source IP.
When entering the command, you can separate each decoy IP with commas, and you can optionally use ME instead of typing the localhost IP.
If you put ME in the 6th position or later, some common port scan detectors are unlikely to show your IP address at all. If you don't use ME, nmap will put the Kali address in a random position.
Make sure you use hosts that are live so that your target is able to reach them. Otherwise, you might accidentally SYN flood your target and it would be fairly easy to determine which host is scanning if only one is actually up.
The syntax would be:
nmap -D 192.168.95.10,192.168.95.100,192.168.95.11,ME -Pn 192.168.207.101

NETWORK SCANNING WITH HPING
Hping is a command line tool for crafting TCP/IP packets. It is used for security auditing and testing of networks. It was used to exploit the Idle Scan technique now in Nmap.
To see the help file, use the "-h" option:
hping3 -h

Hping is capable of crafting any TCP/IP PDU. This is done quickly by specifying the desired TCP/IP field, a destination port and a target IP.
To try it, use the following syntax:
hping3 -I eth0 -S 192.168.95.100 -p 80
The -S flag means SYN.

Looking at Wireshark, it performs a TCP SYN scan as it sends a RST flag after receiving a SYN/ACK flag back from the target:

One of the most known features of hping is that it allows the user to quickly forge packets. The next command uses the same scan as above but the source IP is modified.
The IP address of the Windows XP VM is being used as the source:
hping3 -I eth0 -a 192.168.95.10 -S 192.168.95.100 -p 80
Notice from the capture that the server replies to the IP of Windows XP.

The "-c" option could be used to send only a limited number of packets.
Hping also uses the "--scan" option to check a port or port range and report its state:
hping3 -I eth0 --scan 20-80 -S 192.168.95.100 -V

As a final example, we can use hping3 to spoof a random source IP using "--rand-source" with the SYN flag set via "-S", and scanning only ports 21 and 25 via "--scan 21,25":
sudo hping3 -I eth0 --rand-source -S --scan 21,25 192.168.95.100
UNICORNSCAN
Unicornscan is an information gathering engine. It is designed to be fairly simple to use. However, it is also designed to perform better when close to target machine.
Also, avoid using Unicornscan through a NAT or firewalls as results may not be accurate.
To use it, the syntax is:
unicornscan 192.168.95.100

By default, it is a basic TCP SYN scan. Like many scanning tools, options can be added to perform other scans.
For example, to execute a SYN scan, enter:
unicornscan -r200 -mT 192.168.95.0/25:80,443
Where:
-r200 specifies 200 packets per second
-mT specifies a TCP SYN scan

To execute a FIN scan, enter:
unicorn -mTsF -v -E 192.168.95.0/25:80
Where:
-mTsF specifies a TCP FIN scan
-v for verbose
-E enables processing of errors

Finally, we can execute a TCP Connect scan using the "-msf -Iv" option:
unicornscan -msf -Iv 192.168.95.0/25

BANNER GRABBING
Banner grabbing is an enumeration technique useful to obtain information from open services running in computer systems.
Information includes the version of the service running on a system. Hackers may take advantage of this by using known exploits on these services.
For example, netcat can be used to connect to a port. In this example, port 80:
nc 192.168.95.100 80

It appears to hang. However, it has established a connection with the server and is waiting for user input. Since this is an HTTP connection, HTTP commands will need to be issued to retrieve the web server banner.
Typing "GET / HTTP/1.0" and then pressing Enter twice, marks the end of an HTTP request:
GET / HTTP/1.0

Notice Netcat is able to retrieve the server type running (Microsoft IIS/6.0) and the HTML code used to create the page.
Other HTTP commands can be used to retrieve data. For example, the "HEAD" option is used to return the same data but without the body:
HEAD / HTTP/1.0

It also works on Linux servers:


Conclusion
Thank you for reading this page and I sincerely hope you learned a lot or at least something new about the scanning phase of the penetration testing methodology. I hope it was enjoyable to get your hands dirty and see some commands in action via the CLI and how they worked by sniffing them with Wireshark.
I wish you the best of luck on your cyber security journey and have a great day/evening wherever you are!