PortSwigger: Apprentice Level Cross Site Scripting

In this post, I will cover the Apprentice level Cross Site Scripting labs located at PortSwigger Academy as well as providing some context regarding what XSS is and the vulnerabilities associated with the vulnerability.

Cross-Site Scripting Vulnerabilities
Cross-site scripting is a web security vulnerability that allows an attacker to compromise the interactions that users have with a vulnerable app. It allows an attacker to circumvent the same origin policy, which is designed to segregate different websites from each other.
XSS vulnerabilities normally allow an attacker to masquerade as a victim user to carry out any actions that the user is able to perform, and to access any of the user’s data. If the victim user has privileged access within the application, then the attacker might be able to gain full control over all of the app’s functionality and data.
How Does XSS Work?
XSS works by manipulating a vulnerable site so that it returns malicious JavaScript to users. When the malicious code executes inside a victim’s browser, the attacker can fully compromise their interaction with the app.

Lab 1 - Reflected XSS into HTML context with nothing encoded
As before with every other lab, we start by spawning the lab and navigating to the provided link:

As we can see, there is a simple blog page that allows us to search for a specific blog post on the main page using a search box. Additionally, if we scroll down, we can see the blog posts and can click into them:

From here, if we scroll down to the bottom of the blog posts, there is a comments section which should peak our interest - especially for XSS vulnerabilities:

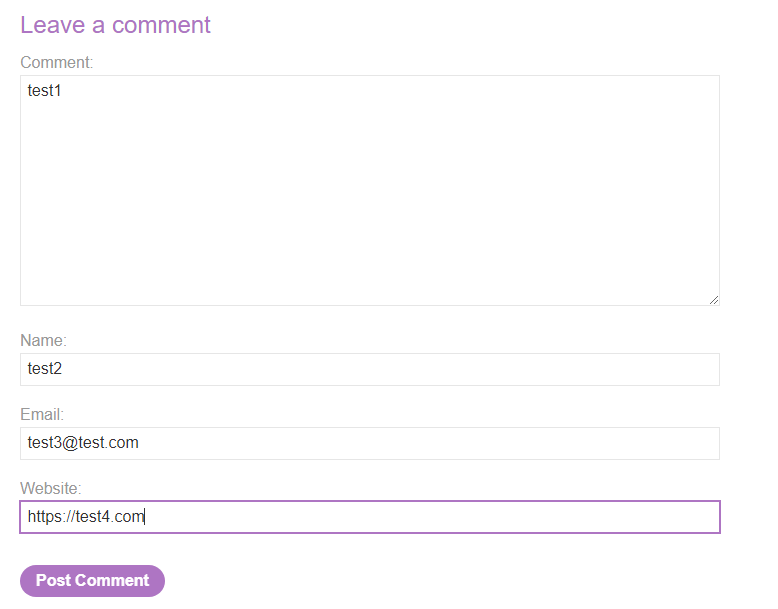
To get an idea of what is happening, we can leave a simple comment for now with no evil payloads and just observe the normal functionality. We need to provide our comment, our name, a valid email and a website:
Once submitted, we can see a message stating that our comment has been submitted:

With this in mind, we can click the "Back to blog" button and be taken back to the blog post we just commented on. Scrolling down, we see that our comment does indeed get posted right away:

Just as a side of precaution, we can observe this same functionality in Burp Suite. First, we see our POST request made to /post/comment including all the parameters we entered like our name and comment:

Once we send that request forward, we get a 302 Found redirection response. If we follow it, we can observe the following request:
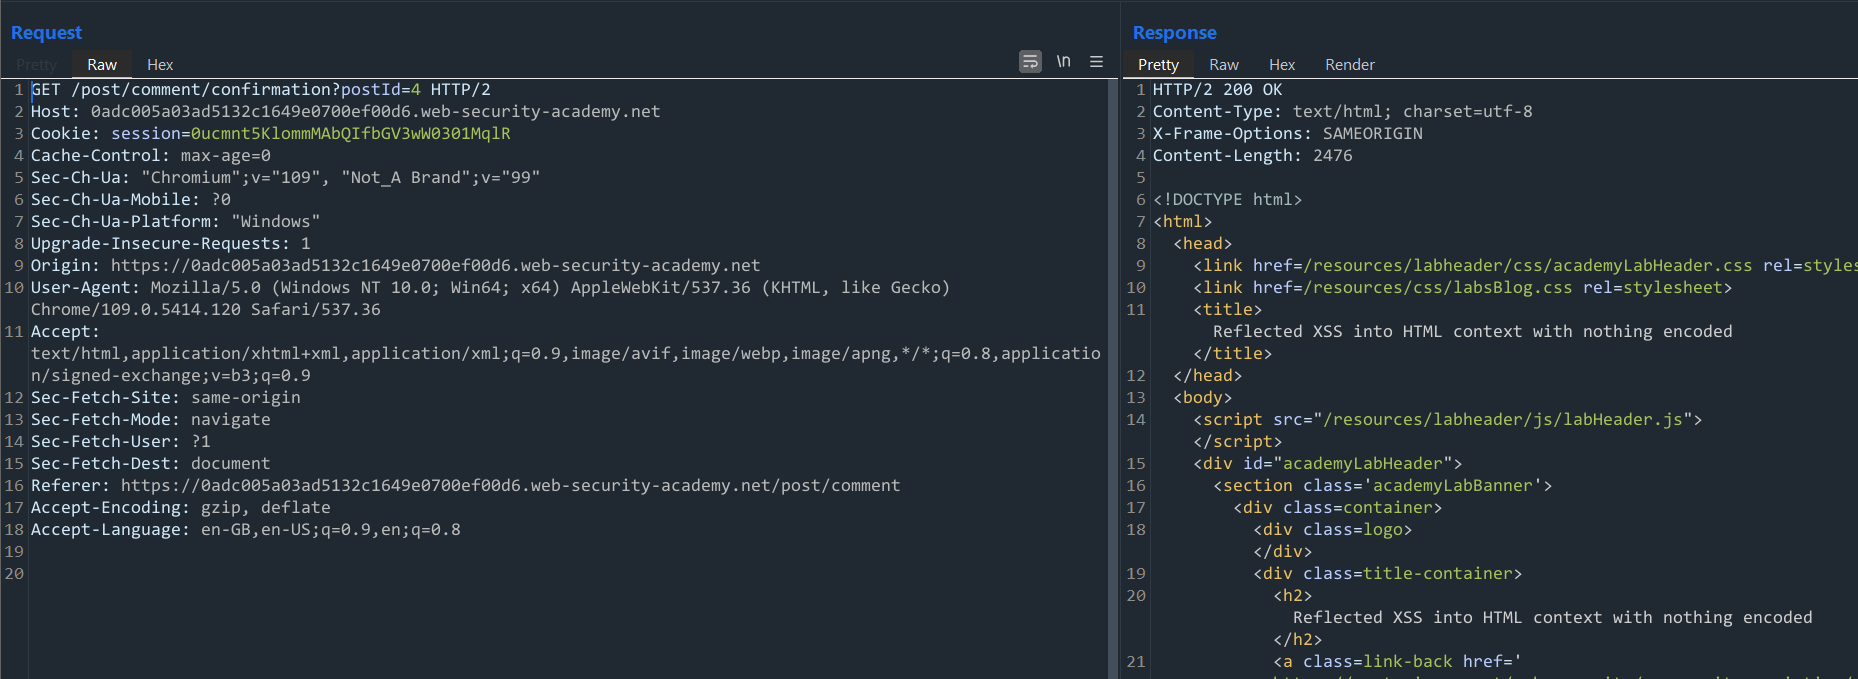
It returns a 200 OK response and takes us to a page that confirms our comment was submitted with the link /post/comment/confirmation?postId=4.
Now, we could test this parameter for other vulnerabilities, but let's focus on XSS for now. After observing these requests, we want to see where our parameters ended up.
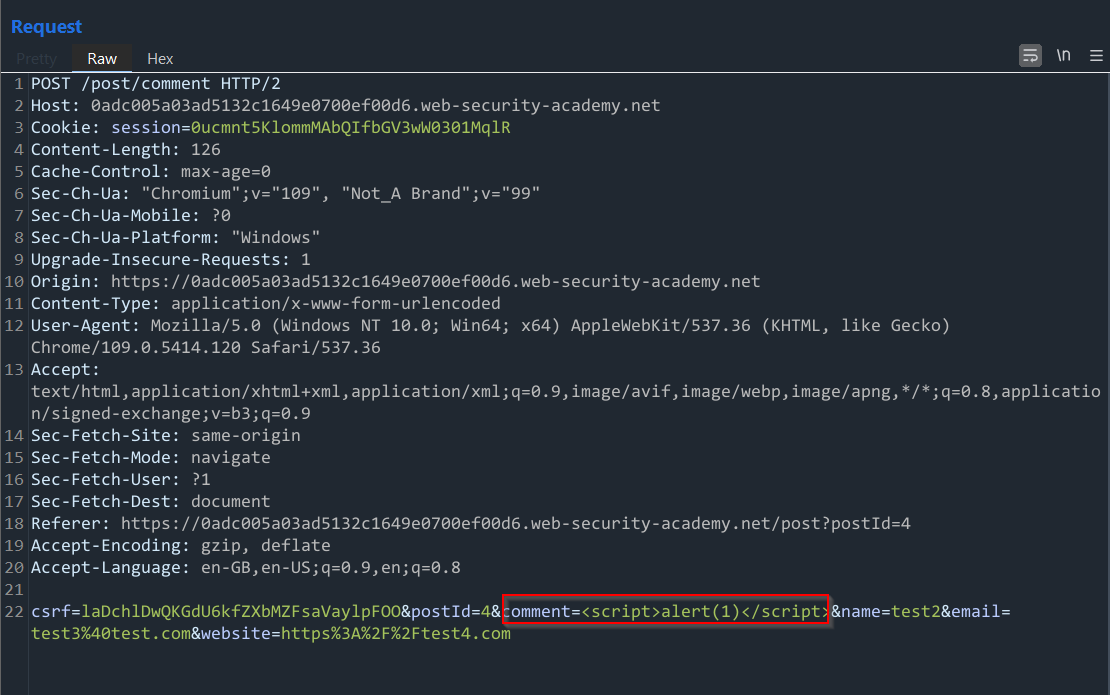
For starters, we can observe where our comment parameter (test1) is getting placed in the HTML source code by simply searching for it in Burp Suite:

As we can see, it appears inside a simple paragraph HTML element. With this in mind, we can try submitting a very simple PoC XSS code to create a popup alert box with the message "1" and seeing if that works:
Once we have modified the request, we can send it forward in Burp Suite:

As we can see, the normal response is given to us - the 302 Found response. Let's follow this redirection and observe the source code of the response to see what happened to our payload:

Ah, it seems like some encoding happened to our payload as our angle brackets are getting encoded. However, it is not the end of the world as we only tested one of the fields. As confirmation, we can check the code on the web page itself and observe the full payload, but it does not produce a popup box:
Next, we can try a different parameter, such as the name parameter and enter the same payload again:

Once again, we follow the redirection and take a look at the source code returned to us for our payload:

As before, our payload is encoded and no popup box would appear on the page - it simply gets displayed on the page as normal text:
Now, you might try and put this payload into the email and website boxes, but it requires valid email and website syntax (such as @ and http://) so it's a little advanced for this lab. Moving on, we can remember that there was a search functionality on the main page:

Let's enter a word and see what happens when we do:

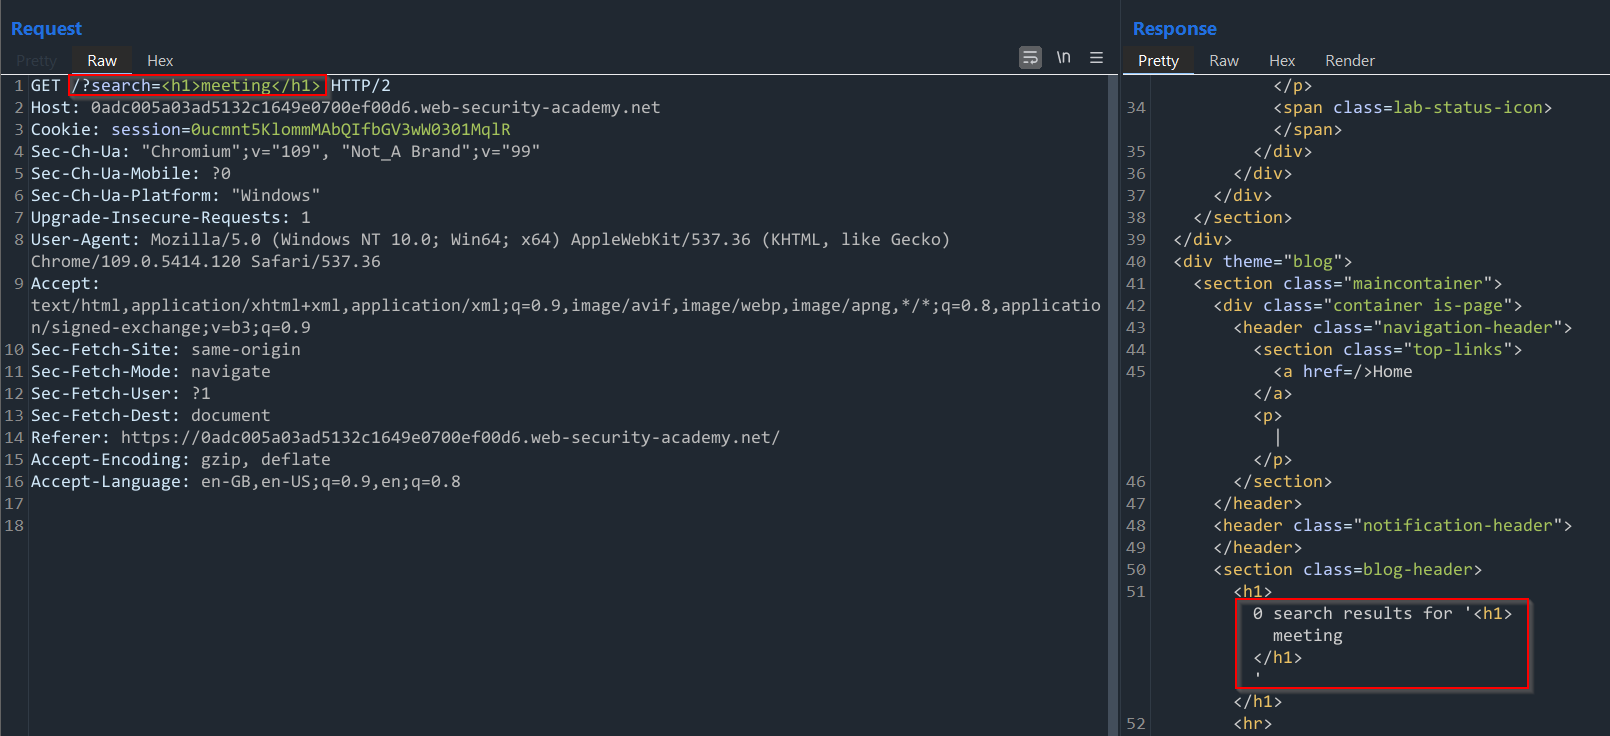
Here, we can see that our word gets reflected back onto the home page after we submit the search request - this could be a good thing to test for reflected XSS. With this in mind, we can observe the request and response made in Burp Suite and see that it gets reflected between two h1 tags:

With this in mind, what happens if we inject our own h1 tags for our search parameter? Does anything change? Let's test it:
The source code seems a bit different - our h1 tags do not get encoded at all and seem to be executed as valid HTML code. To verify this, we can go back to the main page and see if our search terms reflected back onto the page looks any different:

It does! This almost confirms that it is vulnerable to simple XSS. As proof, we can check the developer tools and check the source code:
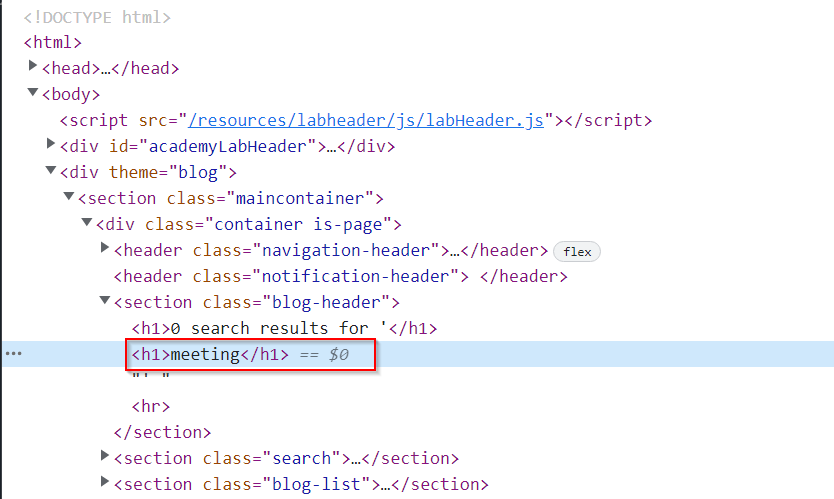
Here, we see that the meeting keyword is inside its own h1 tags - this means our injection was successful!
From here, we can try our simple PoC XSS payload once again:
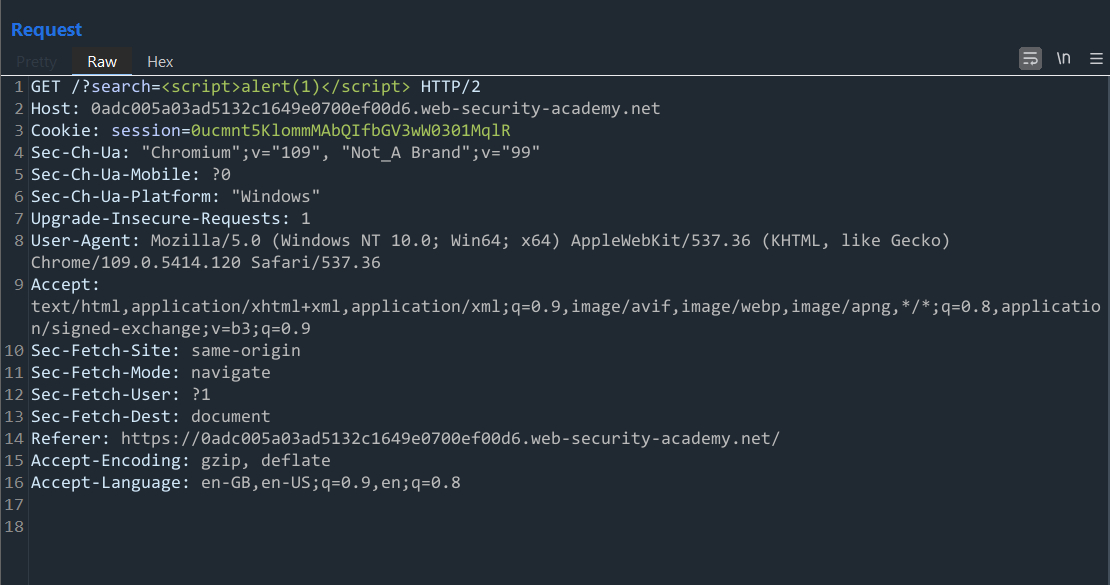
Let's observe the results below:

As you can see, our script tags do not get encoded this time at all and seem to be executed as valid HTML.
If they are getting executed as valid HTML, the alert box should popup as the JavaScript inside the script tags should be getting executed. Let's navigate to the page in the browser, try our payload again and observe if that occurs:

It does! We have successfully exploited a reflected XSS vulnerability in the search parameter. With this, once we close the popup box, we complete the lab and can move on:


Lab 2 - Stored XSS into HTML context with nothing encoded
As always, we start the lab and are taken to the simple blog page again:

Let’s observe normal functionality and try clicking into a blog post and seeing what we can see:

We can see above a simple blog post. However, more interesting is that if we scroll down to the bottom, we see the same comment section we saw in the previous lab section:

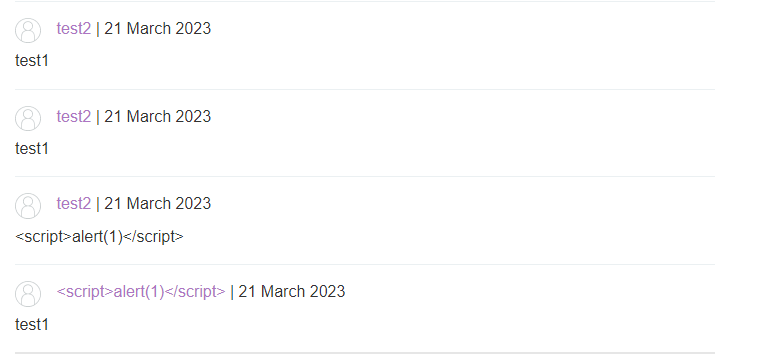
With this in mind, we should test this comment functionality for any potential XSS vulnerabilities. To do this, we can first send a legitimate comment to get an idea of what is happening. In this case, I filled it in with the following:
Comment - test1
Name - test2
Email - test3@test3.com
Website - https://test4.com

Once we have filled in the boxes, we can send the comment forward and see what happens:

We get a simple message telling us that our comment was submitted. With this in mind, let’s click the “Back to blog” button to get taken back to the blog page. Once there, let’s scroll down to the comments section and see if our comment is visible or not:

Here, we can clearly see the first two parameters we sent which were the username and comment. With this in mind, what happened to the other parameters like the email and website?
Well, if we hover over the name “test”, we can see in the bottom right that it actually links to an external website - the site we specified:

Now that we observed normal functionality, it is time to play around with the parameters and see if we can exploit this in any way. First, we can take a look at the request for posting a comment in Burp Suite so it’s easier to play around with:

Above, we see the same 4 parameters we saw on the web page. With this in mind, let’s first try injecting a simple PoC XSS payload into the comment field since we know that it gets stored and appears on the main blog page.
For this, the simple payload used was:
<script>alert(1)</script>

Once configured, let’s send it forward and observe the response carefully:

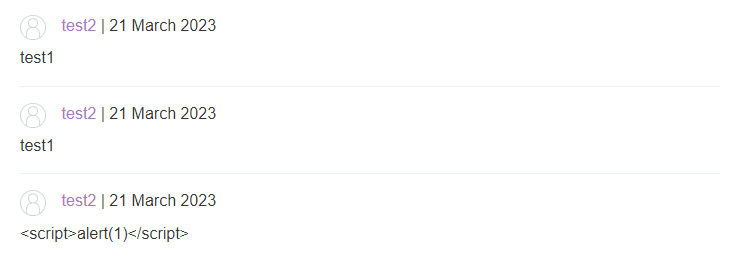
We see that our script tag seems to be getting interpreted as valid HTML code inside a paragraph element <p> in the source HTML code and does not seem to get encoded at all. With this in mind, let’s observe this in the web browser to see if the alert does pop up:

It does! Our malicious XSS comment gets executed every time we navigate to the page that contains that comment. With this in mind, once we go back to the home page, we get the completion banner telling us we solved the lab:


Lab 3 - DOM XSS in document.write sink using source location.search
Once we spawn the lab, we are greeted with a search functionality immediately for the blog:
Let’s perform a simple test to determine how the search function works. For this case, I simply inputted the search term “complexsecurity”:

Now obviously no blog post appear with this provided string. However, it’s important to note that this query does get returned onto the page itself and tells us exactly what we entered - keep this in mind.
As an additional step, we can take a look at the source code:

Before going any further, when we open the Inspector/Elements tab, we are looking at the DOM browser. We are looking at the Document Object Model. The DOM is NOT JavaScript but it can be manipulated by JavaScript.
Let’s say a page is set up to manipulate the DOM in a certain way and by our input, we can corrupt the way that JavaScript is manipulating the DOM, we know have a DOM-based XSS attack.
Now, nothing appears right away. However, to make things quicker, we can hit CTRL+F and search for the parameter we searched for which should show us all results of where it appears in the source code:

Here, our search term appears twice as part of the DOM. The first occurrence appears inside an h1 tag - likely returned as part of the direct HTTP response from the page. The second occurrence is actually inside an image tag, before the closure of this specific tag.
However, how did it get here? Well, notice above the img tag there is a script tag. Let’s expand it:

Here, we can see some JavaScript code. But what does it do?
First of all, it defines a function called trackSearch that receives a parameter called “query”. This function calls document.write - this is part of a way that JavaScript manipulates the DOM. It writes whatever is in the parameter for document.write to the DOM.
Here, it is writing an img tag (what we just saw) with an additional parameter of searchTerms with the query. Where is this query from? Well, it gets defined on the next line where the variable query is equal to URLSearchParams which is a built-in JavaScript class.
It then calls its constructor function with the parameter window.location.search - this is anything after the question mark in the URL bar at the top of the browser. At the minute, that would just read “search=complexsecurity”.
URLSearchParams is going to take that string - complexsecurity - and break it down into key value pairs. We can then take that newly constructed JavaScript URL search params object and call the “.get” method on it.
This asks the object to find the value that has the key “search” - in this case the result is complexsecurity. The end result is that the variable "query” is assigned to the string “complexsecurity”.
There is then a conditional that states if query exists, it is going to call trackSearch and pass the param query which is the string complexsecurity.
So, we know that both occurrences of “complexsecurity” have arrived as part of the page in different ways. The first instance was sent as part of the direct HTTP response to our request. The second first gets written to the DOM using the document.write function.
If we attack the response as part of the direct HTTP response, it will be reflected XSS. If we attack the way the JavaScript is manipulating the DOM, that would be a DOM-based XSS attack.
The first step in this is to consider the context. Where in the DOM is complexsecurity being displayed? It is part of the src attribute of the img tag. What if we can break out of that source attribute and give the img tag a second attribute - i.e. onload=alert(1)?
To try this, we can include a double quote to break out and then define a new attribute called onload=”alert(1) - no closing double quote is needed as it is still there:
complexsecurity” onload=”alert(1)

Immediately, once we send this, we get an alert popup on the page indicating a successful XSS attack:

For more context, let’s take a look at what is happened to the DOM. Looking at the source code, we have the img tag again with the src attribute that ends at "complexsecurity”. After that, we have another attribute to the img tag via the document.write function:

Looking further, if we have a look at the page source and search for complexsecurity, we can see that the mention is still there inside the h1 tags - this is part of the direct HTTP response from the server. However, we do not see the second mention of complexsecurity as part of the page:

Why is this? This is because page source does not show DOM manipulations. It simply shows the original HTML that is sent from the server. The changes are tracked in the DOM but are not reflected to the HTML of the page when we view source.
Finally, we can verify that the congratulatory banner comes down, allowing us to successfully complete the lab:


Lab 4 - DOM XSS in innerHTML sink using source location.search
Once again, we start the lab up and see the search functionality on the main page:

With this, we can right away start playing around with the search function and get a feel for how it works. To do this, we can enter an easy to find search term such as “complexsecurity” which should return no results:

And it does. This allows us to easily search for this string in the source code. If we open up the Inspector in the browser and search for our term, we can see that it appears:

Above, we can see that it appears between a span tag that has an ID of “searchMessage”. As before, we have some JavaScript running between some script tags. Let’s expand these and take a look at the JavaScript and what it is doing:

It defines a function called “doSearchQuery” which takes a parameter called “query”. This function calls document.getElementById and looks for the element with the ID of “searchMessage” - we just found this inside the spam tag above.
The JavaScript grabs that element and calls .innerHTML function on that element - this sets the inner HTML of that element. In other words, we can now pass in valid HTML and it will appear inside that span element.
The question is, where does it get that query from so that it can inject it as part of the inner HTML? It sets that variable on the next line and it uses the URLSearchParams class, looking at the window.location.search (everything in the URL after the question mark) and then it calls .get on that newly created URLSearchParams object.
Next, it pulls the value of the key “search” - in this case search=complexsecurity. Then it says that if the query exists (in this case complexsecurity), it runs that particular function, passing that query as a parameter.
In short, it takes our search term and injects it into the span element which we could see above. The next question is what else can we inject into that element?
The first reaction might be to try and pass some kind of simple PoC payload into it such as:
<script>alert(1)</script>

No JavaScript gets executed so let’s take a look at the span element and see what happened:

Interestingly, we see our script tag - it has been injected but did not execute. Why not? This is where you need to know the difference between the different sinks. This sink is an innerHTML sink.
It’s important to be aware that if we pass a script tag to an innerHTML sink, it will not be executed. It is part of the security of the way the browser works. But, can we pass something else? For example, what happens if we pass an image tag with a source we know will error out and attach the onerror attribute to pop an alert such as:
<img src=’0’ onerror=’alert(1)’>

Now, if we submit that, an alert does pop up once we search for it:

Let’s check our modified DOM and see what happened:

Here, we can see that the span includes an img tag with a src of 0. Now, because this source does not exist, it will produce an error. With the onerror attribute, we have stated that if an error occurs, then an alert should pop up, which coincidentally it does.
Finally, once we do this, we can see the banner drops down and we successfully complete the lab.


Lab 5 - DOM XSS in jQuery anchor href attribute sink using location.search source
Again, we start the lab and see a simple looking blog:

Now, at the top right, we see a section to submit feedback. Let’s navigate to it and take a look:

As we can see, we can submit a feedback form, but we also have a clickable link to return to the previous page in the “Back” link at the bottom right. This has been coded as part of the page by the developer. To check that, we can look at the code for it:

It is simply a hyperlink that has an ID of backLink and then an attribute of href pointing to “/” - this simply takes us back to the home page.
The question is, how did this href attribute get there? It might be part of the original HTTP response from the server, in which case we can’t do a lot to change it. However, if we check out the script tag, we can see something more interesting:

This shows us that the element was actually placed there by jQuery which was manipulating the DOM after receiving the HTTP response from the server.
We have a function being defined and being executed straight away. We can see that we have a dollar sign ($) - this is part of the jQuery library. It is a selector that helps us select certain elements similiar to CSS. When we have the dollar sign selector, we have a parameter inside brackets with “#backLink”.
This is selecting the element with the ID of backLink - the element we just looked at (anchor tag). It then calls a jQuery function .attr which assigns that href attribute to the value given in the second parameter.
The value given is URLSearchParams which is a JavaScript class that takes in the param window.location.search (everything in the URL bar after the question mark. At the moment, it reads the following:

Then, it gets the value of the key returnPath (/).
In other words, it looks in the URL for the param with the key returnPath, takes the value (/) and manipulates the DOM so that the anchor tag has the href value set to that value being passed under the returnPath key in the query string (/).
What we can see is the href value is being directly determined by the param that is being passed as part of that query string under the returnPath key. We can manipulate that and control the value of the href attribute. What do we want to set it to?
It’s important to consider the sink and context we are injecting into. We are inside an href attribute. Can we execute JavaScript from inside an href attribute? Yes, we can!
If we have an anchor tag and inside the href we have “javascript:” followed by some JavaScript, that gets executed directly as can be seen below by a blog post:

In this case, when the user clicks on the anchor tag, it will execute directly the JavaScript that is contained in the href attribute.
This is considered bad practice for developers since developers are concerned that it does not allow for proper separation of concerns. We end up with JavaScript mixed in to our HTML which is a bad thing according to devs but it is not that bad.
For this lab, we want to grab the cookie. For this, we can simply change the returnPath to the following to alert the document.cookie:
javascript:alert(document.cookie)

It immediately tells us we solved the lab, without any popup actually occurring. Before creating the popup, let’s inspect the DOM:

Here, inside the href attribute, we now have JavaScript that is being executed. Now, once we click on that anchor tag, the JavaScript gets executed and should popup the document.cookie:


Lab 6 - DOM XSS in jQuery selector sink using a hashchange event
First, we start the lab as always and take a look at what we have got:

Initially, nothing sticks out at us. With this in mind, we can delve deeper and take a look at the source code:

As we can see above, there is some jQuery code - easy to notice as it is usually prefixed by the dollar sign ($).
What does this do? The dollar sign ($) is the jQuery selector. It is selecting the window and it is listening for a hashchange event. Now, what is a hashchange event?
When we think about how a URL works, it is possible to have a hashtag at the end of the URL to pass data to the page - common in bookmarking and is the intended functionality of this. Assuming the value following the hash changes, then a JavaScript function is called.
For example, we can set it to #123 for now:

It makes no visible difference to the page for now but it will trigger the JavaScript function. So, what does the function do?
Well, it creates a variable called “post” that assigns to the result of another jQuery selector. The second jQuery selector has the section.blog-list which refers to the HTML elements in the DOM that include a section with a class of blog-list as can be seen below:

Within that section of the document, it is looking for a h2 element - notice it uses a contains method. The contains method searches for an h2 element that contains the string that is provided as an argument for that contains method.
In this case, it is concatenating the results of a JavaScript function. This function is URL decoding the string found in window.location.hash.slice(1) - essentially, it is looking at the string starting with the hashtag.
You might be wondering about the “.slice” and why it is being used. If we open the Developer Console and simply grab the window.location.hash, it returns “#123” for us:

However, we are not interested in the hash character itself which is why we can use the slice method and start from the index of 1 onwards - it slices out anything that appears before index 1.
As you can see below, window.location.hash.slice(1) simply returns “123” without the hashtag:

In short, the JavaScript is looking for the h2 element that contains the value following the hash in the URL. Once it has that, it then calls scrollIntoView. If the element exists, then it calls post.get(0).scrollIntoView.
The idea is that jQuery is returning a jQuery object. We then call the .get method on that object, provide an index number and it will select a certain element. Then, scrollIntoView is used.
As an example of what it is doing, we can look at the source code and find an h2 tag element:

Above, we can see an h2 element that contains the string “The Digital Fairytale”. If we go back to the home page and change the hash value to this, the page will automatically scroll to that h2 element:

In other words, it is being used as a type of HTML bookmark.
Now, we have control over the argument that is passed to the jQuery contains method - when we change the value of the hash, we also change the argument that is passed to the jQuery contains method. The idea with a jQuery selector is that it should return an element from the page - we may assume we cannot really inject anything here.
Before going any further, it’s important to look at the code again. We have a jQuery selector and the value is being assigned to a variable called “post”. The next stage is to check if that post variable actually exists. If the selector does not return anything, then the value of post is undefined.
In the console, we can call the jQuery selector function using the value of “The Digital Fairytale” and this should obtain a match:

It does! The result is a jQuery object representing the selector. It has a length property of 1 - this essentially says the jQuery selector has 1 match - and we can expose the DOM element by calling the .get method.
We can do this by assigning it to a variable called post and then using the .get method with an index of 0:

Above, we see the DOM element exposed. We know this particular element exists. However, let’s try with a search term we don’t think exists such as a bunch of random characters:

Now, we can see that although it has no matches (length of 0), it still returns an object. Remember that the code is based around this post variable not existing, assuming the jQuery selector returns no matches, whereas we can clearly see that it does exist.
For example, if we run an if query, checking if post exists and if it does, tell it to return True:

It does exist and so true gets printed to the console. Additionally, if we check if post does not exist and ask it to print True, nothing appears in the console since post does exist and the statement is False. It is returning the jQuery search object regardless of whether there are any matches or not.
If we call post.get(0), we get an undefined error as the jQuery search object has a length of 0 - no element matched:

Therefore, if we call scrollIntoView, it won’t do anything since the element does not exist. An error occurs, but it does not break the page nor cause any alarming security issues:

Ok, so where is the vulnerability? If we take the contains method and start trying to include tags, then it starts to become scary.
For example, we can take the previous code and try injecting an h1 tag and then check out the post variable:

It appears to have a match since the length is 1 - however, there is no h1 tag with the arbitrary text on the page. Why is the jQuery object indicating there is a match? As stated, the length is 1 meaning we can exposed the DOM element with post.get(0):

Here, we get an h1 element and it contains our text “complexsecurity”. In other words, this contains method has created a DOM element. Is it on the page anywhere? It does not appear anywhere.
To check this, we can take a look at the parentElement:
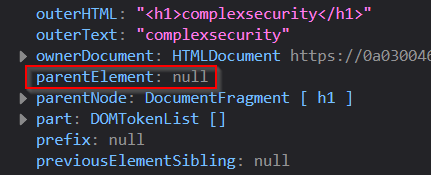
It appears to be null. This is a detached DOM element. It has been created but is not attached to the page - so far!
However, this is a valid DOM element so we can, for example, reassign the post variable to post.get(0):

To prove this is a fully functional DOM element that is not currently attached, we can attach it to the DOM by giving it a parent node.
To do this, we can look at the source code and identify an id that we can trigger off. For example, we see a div that has the id of academyLabHeader:

With this in mind, we can create a variable called myNode and assign it the element that has the ID of academyLabHeader:

Notice that our variable myNode now has a DOM node.
With this, we can append a child to this node using the .appendChild method and pass in our element that gets created by jQuery - post.

Now, we hope to see an h1 tag appear as a child of the academyLabHeader.
If we go back to the page in the browser, we can see that the text appears as an h1 tag and the node is now appearing on the page:

If we inject tags rather than a legitimate string, jQuery is actually creating a DOM node in the background and this causes the vulnerability.
How do we exploit this? Well, take an img element for example. It has a src attribute and based on the value of that attribute, it makes an HTTP request to grab the image data.
With this in mind, we can create a new element using JavaScript and pass img as a string:

Right now, it is just a blank image - we want to set a src attribute on the img element. To do that, we can reference the DOM node and use the .src method and set it as 0:

Notice what happens when we do this:

An HTTP request gets created. Immediately, when we set the src attribute on our newly created image element, a subsequent HTTP request gets sent looking for that image.
For example, the URL has the lab URL with /0 appended at the end:

Although we cannot exploit this vulnerability to append an element to the DOM, we can create a detached image element which creates a subsequent HTTP request. Then, when it receives a 404 response, we can trigger JavaScript to launch on error.
To do this, we can modify the previous jQuery code, changing the h1 tag to an img tag with a src of 0 (to make it error out) and then the onerror attribute that creates an alert box when the error occurs.
Immediately, once we do this, an alert appears:

We have created an image element - not attached to the DOM - that has a source attribute that triggers an HTTP request, an error gets sent back and then the alert appears.
You can also do this with the hashtag in the URL on the browser and the same thing occurs:

Right now, this is self XSS - we are changing the value of the hashtag - but we need this exploit to be automated. The users browser needs to be changing the hashtag with JavaScript so the browser gets the hashchange event and then executes the JavaScript.
One of the most obvious ways to do this is via an ifram that changes the hash value after loading. The user will get the regular page in the iframe and once that’s finished loading, the JavaScript will then change the value of that hash in response to the iframe loading.
For example, let’s look at the following:
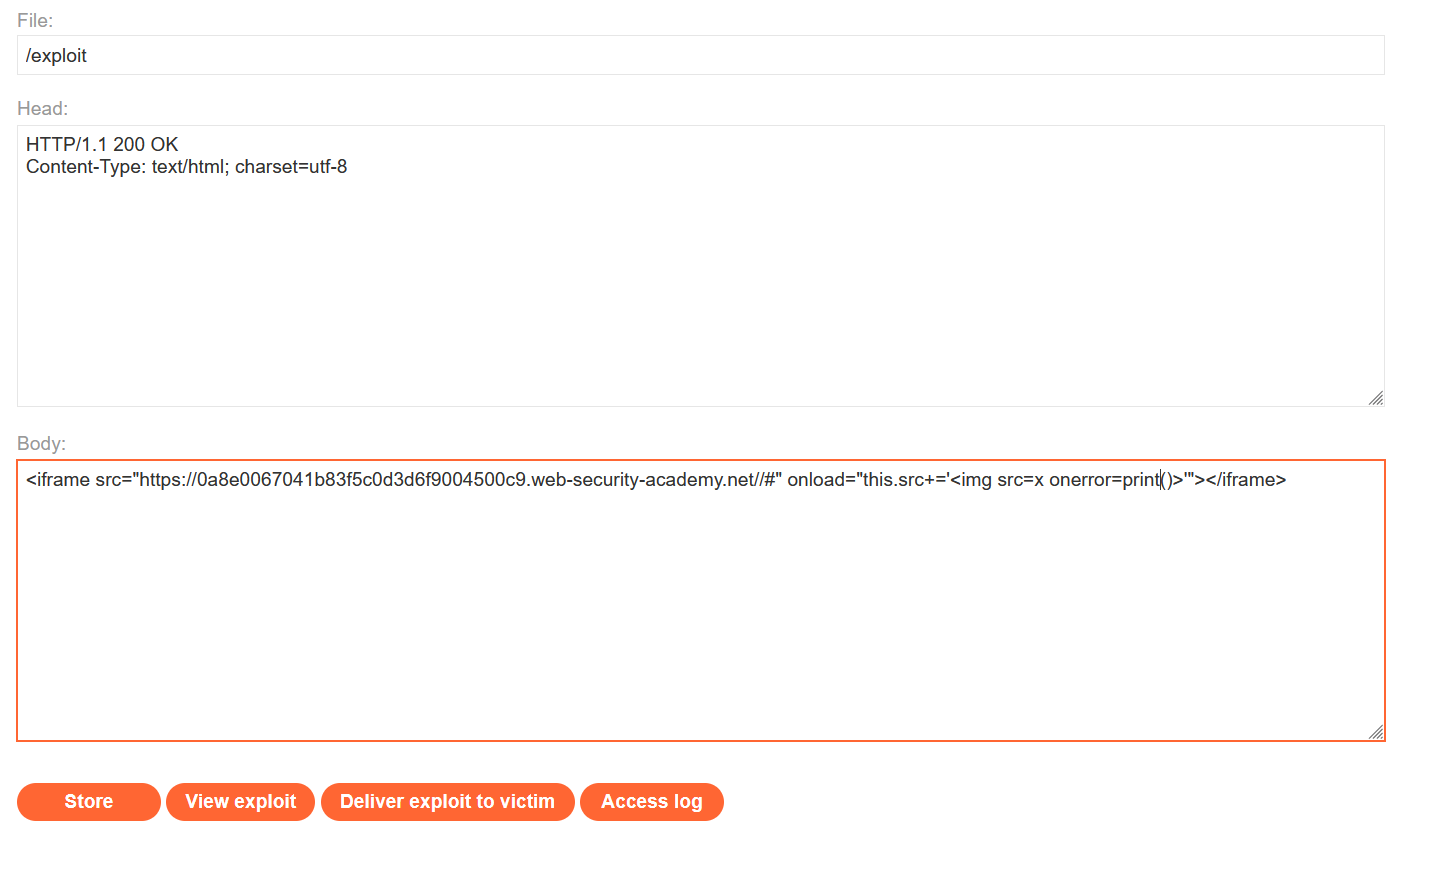
Here, we have an iframe that has the src with the URL of the lab with a hashtag at the end. Then, in response to the iframe loading, we can reference our own attribute (via this.src) and take the original source and append to it the value that follows the equals inside the single quotes which is “<img src=x onerror=print()>”.
Before delivering the exploit to the victim, we can check and see if this actually works by hitting the View exploit button:

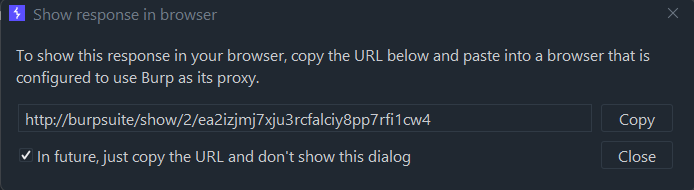
Once done, we receive the following:

As you can see, we get the print JavaScript function calls which brings up a print popup window. It works! With this, we can simply deliver the exploit to the victim and we see we successfully solve the lab:


Lab 7 - Reflected XSS into attribute with angle brackets HTML-encoded
Once the lab starts, we have a simple looking blog page again with the same search functionality:

One of the first things we want to do is to input a simple PoC payload and see where it appears on the page. For this example, I have simply used h1 tags:

Once searched, we can take a look at the DOM and see where that string appears:

Here, we have two matches - the first is inside an h1 tag (unlikely we can do anything) and the second appearance is inside an input field.
Our search term is appearing inside the value attribute of that input element - can we break out of that value attribute and create a new attribute? More importantly, it seems like our h1 tags don’t get encoded at all. However, if we take a look at the source code, we can see the following:

Here, we can see that the < and > symbols are both being encoded - script tags are a no go.
However, since we know we are inside a value attribute, we can try escaping this by inputting a double quote to close the value attribute early:

Perfect! Since we can confirm that the double quote is not encoded and that we can successfully close the attribute we are inside, we can now craft a malicious input to add an additional attribute.
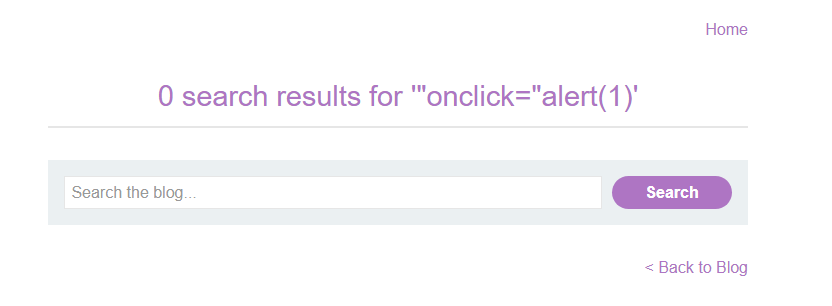
For this example, we can use the onclick attribute that creates an alert. This payload first closes the value attribute and then starts the onclick attribute. Finally, the closing double quote that we escaped before closes our new onclick attribute for us:

Once we send this payload, we can check the response in Burp Suite and see that the value attribute is closed successfully and a new attribute - onclick - is created for this input tag:

Now, whenever a user clicks on the search box to enter their search term, the onclick attribute will get executed and our JavaScript code also gets executed which in this case creates an alert popup box.
With this in mind, we can take this response from Burp Suite and ask it to show us in the browser:
Once done, we can see the home page with the search box and the payload we entered in those h1 tags:
Now, if you click on the search box itself to search like your normally would, the click will execute the malicious JavaScript and an alert will popup on the screen, successfully completing the lab:


Lab 8 - Stored XSS into anchor href attribute with double quotes HTML-encoded
Once spawned, we see a regular blog style home page:

Looking at a blog post and enumerating, we can spot that users have the ability to leave a comment:

A comment is something that will persist in the page - likely stored on a backend database somewhere. Every time we leave a comment, it means we are permanently changing the page. The entry is likely appended to a database somewhere and every time a new user visits the page, our comment will load up.
Before launching random payloads, we want to get an understanding of how the comments work by filling in some random dummy data. However, in the comment, name and website fields, we also include a < sign to check if they get encoded at all:

Once we submit this, we get a nice message telling us the comment was submitted:

Now, we can see that our comment is available to view on the page. More importantly, it seems like our < symbol does not get encoded but this does not necessarily mean it is vulnerable as it is important to understand the context:

However, another note is that if we click on the username of the commenter, we can visit the website of the poster as can be seen in the source code:

We see that the website value gets inputted into an anchor tag with an href attribute that points to the address of the website we provide.
One thing devs may not realize is that we do not have to specify a URL in an href attribute. It is possible to insert JavaScript instead. One thing to note is that we have complete control over the value of the href attribute.
With this in mind, we can create a new comment and see how it is possible to directly execute JavaScript from the href attribute as part of the anchor tag.
Here, we can provide dummy data, but this time, we use the website text input to input some JavaScript which will get inputted into that href attribute on the comment page:

Now, what does this do? Well, to execute JavaScript from within an href attribute, we can use the “javascript:” syntax. Many developers are not aware of this but we are! With this payload, we are simply popping up an alert box.
Once we post this comment, we can go back to the blog post itself and view the source code of the anchor attribute for our “blah” username:

Here, we can see that inside the href attribute we have the “javascript:” syntax and our alert box. Now, when we click on the anchor tag, the JavaScript will get executed:

With this done and the alert box popping, we successfully complete the lab:


Lab 9 - Reflected XSS into a JavaScript string with angle brackets HTML encoded
As always, we start the lab and get greeted with a simple blog:
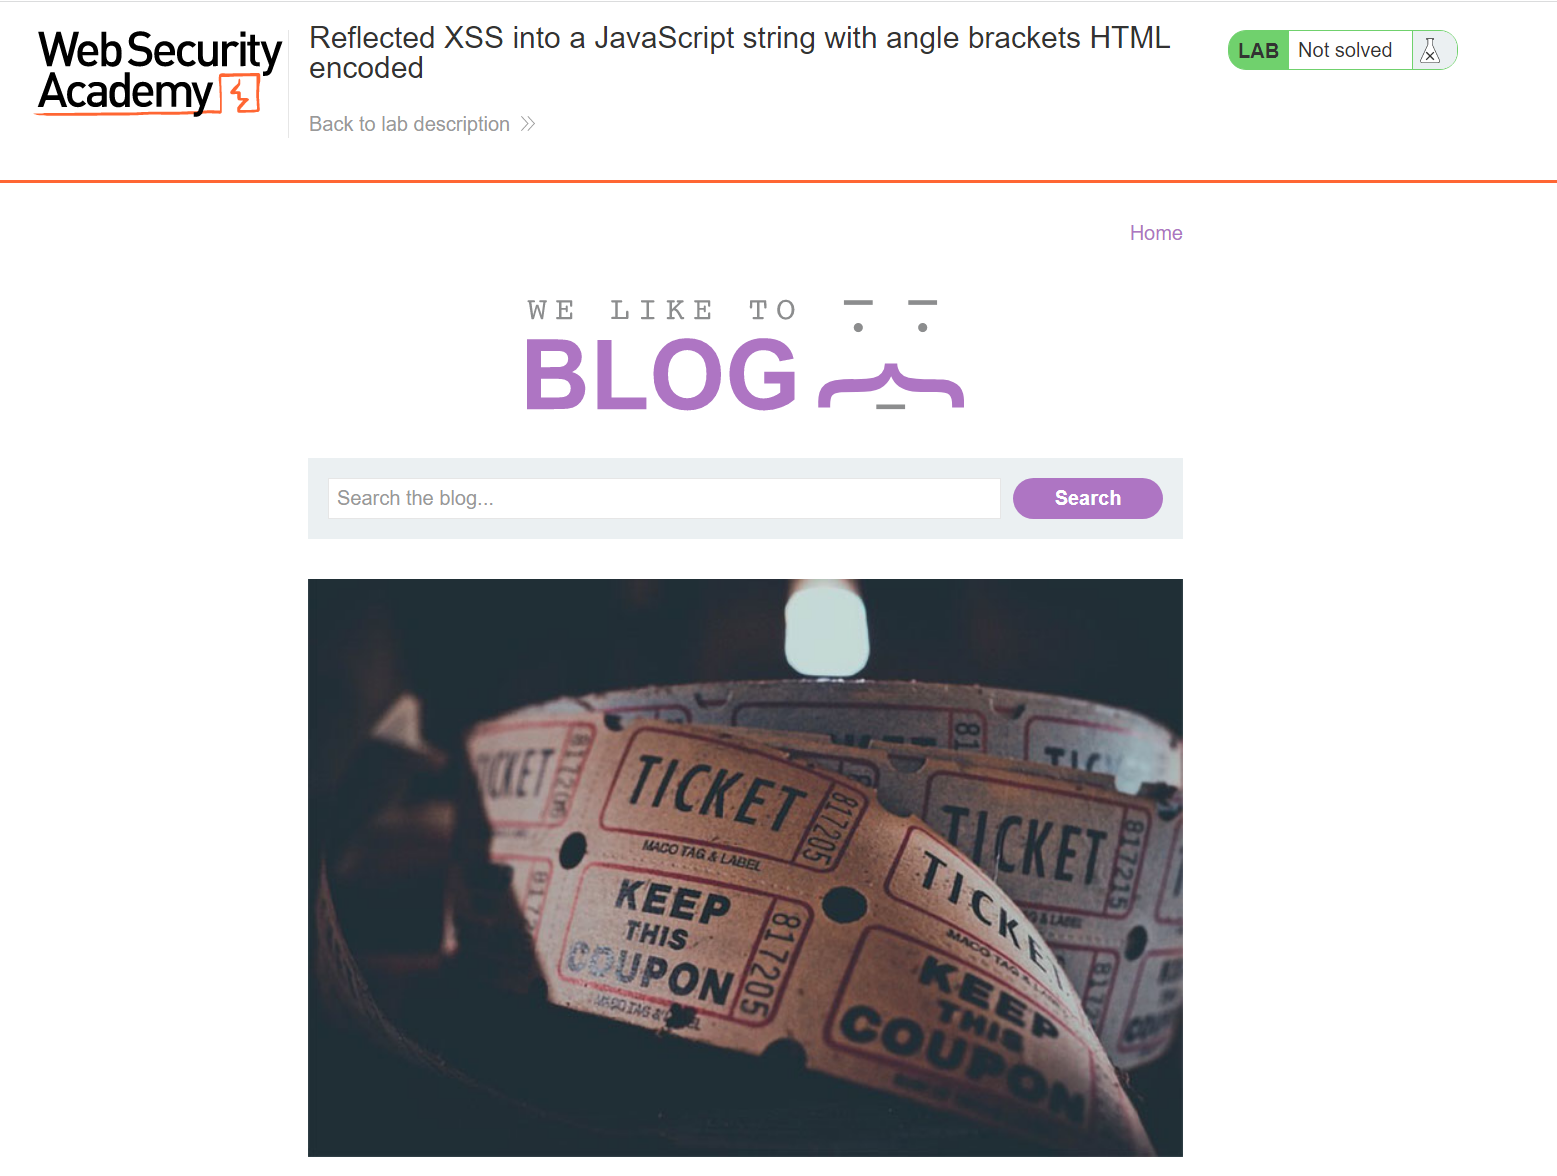
Here, we see the same search functionality as many labs before. The first thing we want to do is try and test if some key symbols like the < symbol get encoded and see where it gets reflected back to us on the page.
To do this, we can inject a simple payload like “<hello”:
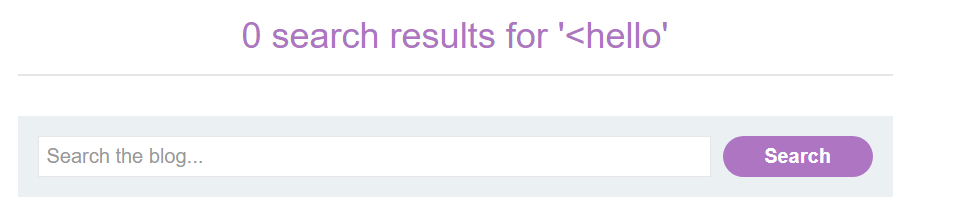
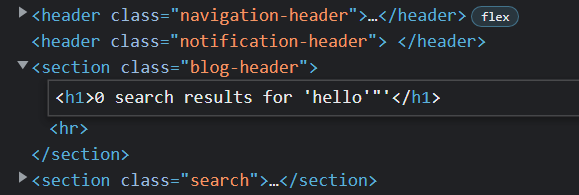
Here, we can check the DOM and see that our string appears 3 times on the page:

The first one is inside an h1 tag that appears to not encode the < symbol. However, if we click onto the tag, we will actually see that it does get encoded:

The first reflection is nothing but <hello - the less than symbol is encoded in the first reflection. Let’s check the second reflection:

Here, it is inside some single quotes that are defining a variable in JavaScript. Again, the less than symbol also gets encoded.
Finally, let’s check the third reflection:

Interestingly, it is inside an img tag and the reflection is in between the double quotes inside the src attribute.
We have 3 reflections:
First reflection is not inside anything
Second reflection is inside the single quotes of a JavaScript variable declaration
Third reflection is inside double quotes of a src attribute of an image tag
With it being inside both single and double quotes, it is a good idea to check if these symbols get encoded or not by injecting a new payload that includes a single and double quote:

Now, we can check the source code again. The first reflection as seen below shows us that the single and double quotes are not encoded in the first reflection. However, this is no use as it is inbetween header tags:
However, for the second reflection, we can see that it is inside the script tags. Additionally, the single and double quotes are not encoded.
Looking carefully, as the single quotes are not encoded, we can close the single quote ourselves and write a new payload:

As an example, let’s introduce a simple search term like the word “hello”:

Now, looking at the JavaScript code, we can see the following line which is the important line as it is where our payload gets injected into:

Whatever we provide in the search box gets injected in between these two single quotes. Additionally, we know that the single quotes are not encoded.
Since they are not encoded, we could inject a single quote to close it ourselves. As an example, we can define a new payload as such which we could enter:
hello’;;’abc123

This could be our payload.
We know that whatever we provide gets injected inside single quotes. If we provide the payload above, it will get reflected in between the single quotes as such:

Now this particular variable searchTerms is equal to "hello” and then we close that particular variable declaration. Afterwards, there is a new value called “abc123” which is a string.
However, if you look carefully, we have something in between the two semicolons which is free for us to use. This means we can write JavaScript code in between them.
As an example, between the two semicolons, we can write an alert(1) to create a popup box:

Now, we have a statement that declares the searchTerms as hello and then gets closed by our single quote. Then, we stop that statement with a semicolon, start a new statement that creates an alert, stop it with another semicolon and then define another string “abc123” to close off the code correctly.
With this payload in mind, we can try providing this payload to the search term parameter in the URL:

It works! A popup gets created and our payload works. If we look at the source code for the home page, we can see the JavaScript code that ran:
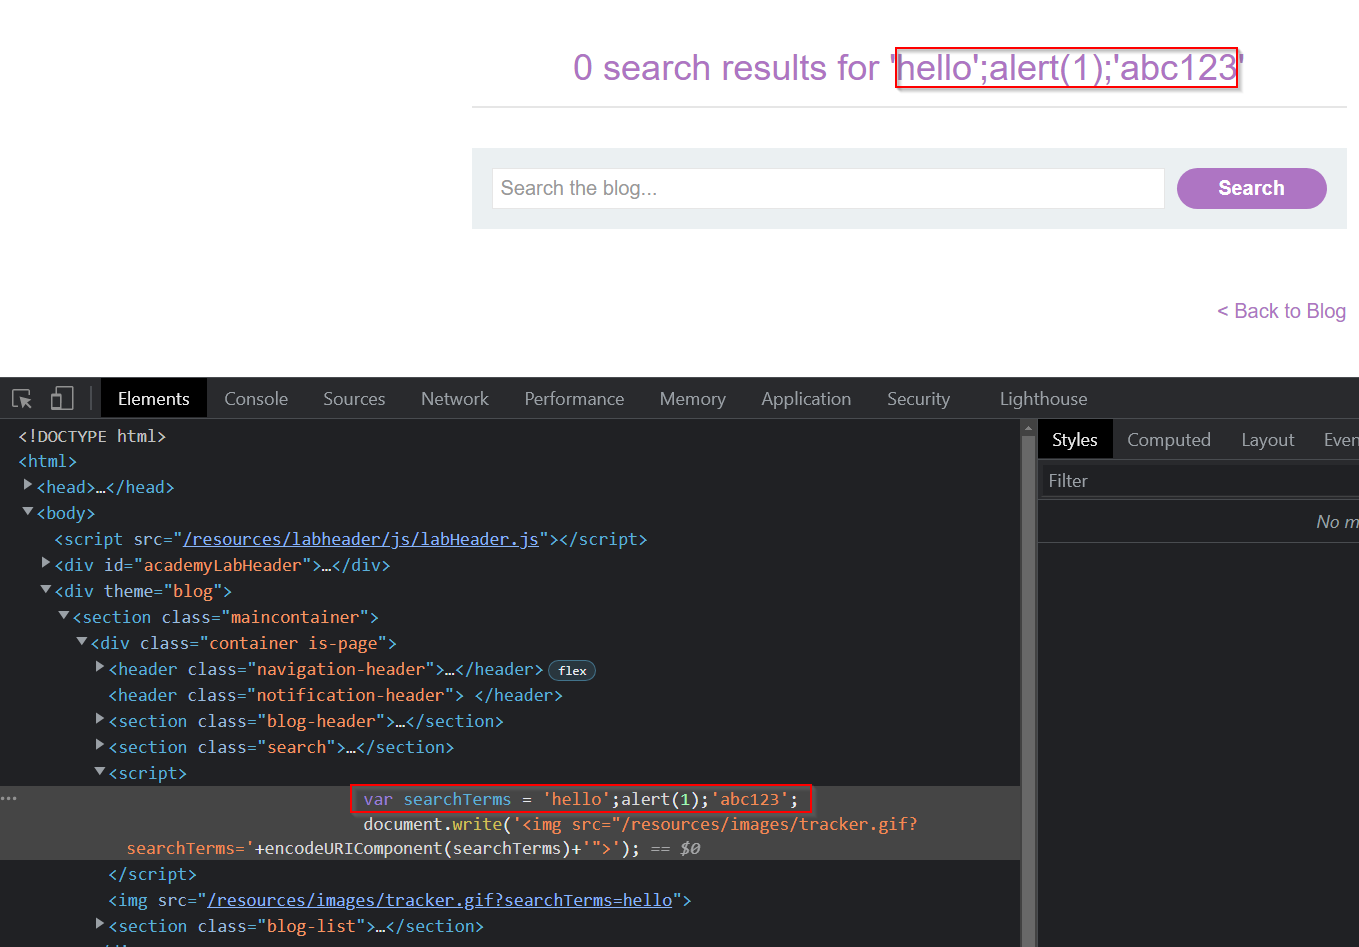
Above, we can see that we define a variable called searchTerms with the value of hello. Then, we create an alert box. Finally, we define another string of “abc123”.
Putting it all together is valid JavaScript and so our alert box pops up and we complete the lab successfully.