PortSwigger: All Authentication Labs Walkthrough

In this post, I will cover all of the Authentication labs located at PortSwigger Academy as well as providing some context regarding what authentication is and the vulnerabilities associated with authentication as a whole.
Authentication Vulnerabilities
Conceptually, authentication vulnerabilities are some of the simplest issues to understand. However, they can be among the most critical due to the obvious relationship between authentication and security. As well as potentially allowing attackers direct access to sensitive data and functionality, they also expose additional attack surfaces for further exploits.
What is Authentication?
Authentication was discussed a little bit in the Access Control Labs page but just to cover it again, authentication is the process of verifying the identity of a given user or client. In other words, it involves making sure that they really are who they claim to be. At least in part, websites are exposed to anyone who is connected to the internet by design.
Therefore, robust authentication mechanisms are an integral aspect of effective web security.
There are three authentication factors into which different types of authentication can be categorized:
Something you know, such as a password or the answer to a security question. These are sometimes referred to as “knowledge factors”
Something you have, such as a mobile phone or a security token. These are sometimes referred to as “possession factors”
Something you are or do, such as your biometrics or patterns of behaviour. These are sometimes referred to as “inherence factors”.
Authentication mechanisms rely on a range of technologies to verify one or more of these factors.
Authentication vs Authorization
Authentication is the process of verifying that a user is who they claim to be, whereas authorization involves verifying whether a user is allowed to do something. In the context of a website, authentication determines whether someone attempting to access the site with the username “Carlos123” really is the same person who created the account.
Once Carlos123 is authenticated, his permissions determine whether or not he is authorized, for example, to access personal information about other users or perform actions such as deleting another user’s account.
How do Authentication Vulnerabilities Arise?
Most vulnerabilities in authentication mechanisms arise in one of two ways:
The authentication mechanisms are weak because they fail to adequately protect against brute-force attacks
Logic flaws or poor coding in the implementation allow the authentication mechanisms to be bypassed entirely by an attacker. This is sometimes referred to as broken authentication.
In many areas of web dev, logic flaws will simply cause the website to behave unexpectedly, which may or may not be a security issue. However, as authentication is so critical to security, the likelihood that flawed authentication logic exposes the website to security issues is clearly elevated.
Impact of Vulnerable Authentication
The impact of authentication vulnerabilities can be very severe. Once an attacker has either bypassed authentication or has brute-forced their way into another user’s account, they have access to all the data and functionality that the compromised account has.
If they are able to compromise a high-privileged account, such as a system admin, they could take full control over the entire application and potentially gain access to internal infrastructure. Even compromising a low-privileged account might still grant an attacker access to data that they otherwise should not have, such as commercially sensitive business information.
Even if the account does not have access to any sensitive data, it might still allow the attacker to access additional pages, which provide a further attack surface. Often, certain high-severity attacks will not be possible from publicly accessible pages, but they may be possible from an internal page.
Vulnerabilities in Authentication Mechanisms
A website’s authentication system usually consists of several distinct mechanisms where vulnerabilities may occur. Some vulnerabilities are broadly applicable across all of these contexts, whereas others are more specific to the functionality provided.
Vulnerabilities in Password Based Logins
For websites that adopt a password-based login process, users either register an account themselves or they are assigned an account by an admin. This account is associated with a unique username and a secret password, which the user enters in a login form to authenticate themselves.
The fact that they know the secret password is taken as sufficient proof of the user’s identity. Consequently the security of the website would be compromised if an attacker is able to either obtain or guess the login credentials of another user.
Brute-Force Attacks
A brute-force attack is when an attacker uses a system of trial and error in an attempt to guess valid user credentials. These attacks are typically automated using wordlists of usernames and passwords. Automating this process, especially using dedicated tools, potentially enables an attacker to make vast numbers of login attempts at high speed.
Brute-forcing is not always just a case of making completely random guesses at usernames and passwords. By also using basic logic or publicly available knowledge, attackers can fine-tune brute-force attacks to make much more educated guesses. This considerably increases the efficiency of such attacks. Websites that rely on password-based login as their sole method of authenticating users can be highly vulnerable if they do not implement sufficient brute-force protection.
Brute-Forcing Usernames
Usernames are especially easy to guess if they conform to a recognizable pattern, such as an email address. For example, it is very common to see business logins in the format firstname.lastname@somecompany.com. However, even if there is no obvious pattern, sometimes even high-privileged accounts are created using predictable usernames, such as admin or administrator.
During auditing, check whether the website discloses potential usernames publicly. For example, are you able to access user profiles without logging in? Even if the actual content of the profiles is hidden, the name used in the profile is sometimes the same as the login username. You should also check HTTP responses to see if any email addresses are disclosed. Occasionally, responses contain emails addresses of high-privileged users like administrators and IT support.
Brute-Forcing Passwords
Passwords can similarly be brute-forced, with the difficulty varying based on the strength of the password. Many websites adopt some form of password policy, which forces users to create high-entropy passwords that are, theoretically at least, harder to crack using brute-force alone. This typically involves enforcing passwords with:
A min number of characters
A mixture of lower and uppercase letters
At least one special character
However, while high-entropy passwords are difficult for computers alone to crack, we can use a basic knowledge of human behaviour to exploit the vulnerabilities that users unwittingly introduce to this system. Rather than creating a strong password with a random combination of characters, users often take a password that they can remember and try to crowbar it into fitting the password policy.
For example, if “mypassword” is not allowed, users may try something like “Mypassword1” or “Myp4$$w0rd”.
In cases where the policy requires users to change their passwords on a regular basis, it is also common for users to just make minor, predictable changes to their preferred password. For example, Mypassword1! becomes Mypassword2! or Mypassword1?.
The knowledge of likely credentials and predictable patterns means that brute-force attacks can often be much more sophisticated, and therefore effective, than simply iterating through every possible combination of characters.
Username Enumeration
Username enumeration is when an attacker is able to observe changes in the website's behavior in order to identify whether a given username is valid.
Username enumeration typically occurs either on the login page, for example, when you enter a valid username but an incorrect password, or on registration forms when you enter a username that is already taken. This greatly reduces the time and effort required to brute-force a login because the attacker is able to quickly generate a shortlist of valid usernames.
While attempting to brute-force a login page, you should pay particular attention to any differences in:
Status codes: During a brute-force attack, the returned HTTP status code is likely to be the same for the vast majority of guesses because most of them will be wrong. If a guess returns a different status code, this is a strong indication that the username was correct. It is best practice to always return the same status code regardless of the outcome, but this practice is not always followed.
Error messages: Sometimes the returned error message is different depending on whether both the username AND password are incorrect or only the password was incorrect. It is best practice for websites to use identical, generic messages in both cases, but small typing errors sometimes creep in. Just one character out of place makes the two messages distinct, even in cases where the character is not visible on the rendered page.
Response Times: If most of the requests were handled with a similar response time, any that deviate from this suggest that something different was happening behind the scenes. This is another indication that the guessed username might be correct. For example, a website might only check whether the password is correct if the username is valid. This extra step might cause a slight increase in the response time. This may be subtle, but an attacker can make this delay more obvious by entering an excessively long password that the website takes noticeably longer to handle.
Vulnerabilities in Multi-Factor Authentication
Many websites rely exclusively on single-factor authentication using a password to authenticate users. However, some require users to prove their identity using multiple authentication factors.
Verifying biometric factors is impractical for most websites. However, it is increasingly common to see both mandatory and optional two-factor authentication (2FA) based on something you know and something you have. This usually requires users to enter both a traditional password and a temporary verification code from an out-of-band physical device in their possession.
While it is sometimes possible for an attacker to obtain a single knowledge-based factor, such as a password, being able to simultaneously obtain another factor from an out-of-band source is considerably less likely. For this reason, two-factor authentication is demonstrably more secure than single-factor authentication.
However, as with any security measure, it is only ever as secure as its implementation. Poorly implemented two-factor authentication can be beaten, or even bypassed entirely, just as single-factor authentication can.
It is also worth noting that the full benefits of multi-factor authentication are only achieved by verifying multiple different factors. Verifying the same factor in two different ways is not true two-factor authentication. Email-based 2FA is one such example.
Although the user has to provide a password and a verification code, accessing the code only relies on them knowing the login credentials for their email account. Therefore, the knowledge authentication factor is simply being verified twice.
Two-Factor Authentication Tokens
Verification codes are usually read by the user from a physical device of some kind. Many high-security websites now provide users with a dedicated device for this purpose, such as the RSA token or keypad device that you might use to access your online banking or work laptop.
In addition to being purpose-built for security, these dedicated devices also have the advantage of generating the verification code directly. It is also common for websites to use a dedicated mobile app, such as Google Authenticator, for the same reason.
On the other hand, some websites send verification codes to a user's mobile phone as a text message. While this is technically still verifying the factor of "something you have", it is open to abuse. Firstly, the code is being transmitted via SMS rather than being generated by the device itself. This creates the potential for the code to be intercepted. There is also a risk of SIM swapping, whereby an attacker fraudulently obtains a SIM card with the victim's phone number. The attacker would then receive all SMS messages sent to the victim, including the one containing their verification code.
Bypassing Two-Factor Authentication
At times, the implementation of two-factor authentication is flawed to the point where it can be bypassed entirely.
If the user is first prompted to enter a password, and then prompted to enter a verification code on a separate page, the user is effectively in a "logged in" state before they have entered the verification code. In this case, it is worth testing to see if you can directly skip to "logged-in only" pages after completing the first authentication step.
Occasionally, you will find that a website doesn't actually check whether or not you completed the second step before loading the page.
Vulnerabilities in Other Mechanisms
In addition to the basic login functionality, most websites provide supplementary functionality to allow users to manage their account. For example, users can typically change their password or reset their password when they forget it. These mechanisms can also introduce vulnerabilities that can be exploited by an attacker.
Websites usually take care to avoid well-known vulnerabilities in their login pages. But it is easy to overlook the fact that you need to take similar steps to ensure that related functionality is equally as robust. This is especially important in cases where an attacker is able to create their own account and, consequently, has easy access to study these additional pages.
Resetting Passwords via URL
A more robust method of resetting passwords is to send a unique URL to users that takes them to a password reset page. Less secure implementations of this method use a URL with an easily guessable parameter to identify which account is being reset, for example:
http://vulnerable-website.com/reset-password?user=victim-user
In this example, an attacker could change the user parameter to refer any username they have identified. They would then be taken straight to a page where they can potentially set a new password for this arbitrary user.
A better implementation of this process is to generate a high-entropy, hard-to-guess token and create the reset URL based on that. In the best case scenario, this URL should provide no hints about which user’s password is being reset:
http://vulnerable-website.com/reset-password?token=a0ba0d1cb3b63d13822572fcff1a241895d893f659164d4cc550b421ebdd48a8
When the user visits this URL, the system should check whether this token exists on the back-end and, if so, which user's password it is supposed to reset. This token should expire after a short period of time and be destroyed immediately after the password has been reset.
However, some websites fail to also validate the token again when the reset form is submitted. In this case, an attacker could simply visit the reset form from their own account, delete the token, and leverage this page to reset an arbitrary user's password.
Lab 1 - Username enumeration via different responses
For the first lab, we can start the lab and grab the URL provided to us and input it into our Scope settings in Burp Suite, to only intercept traffic for that site:

Once done, we can start to view the website and play around. Navigating to the website, we can see a simple blog site with the ability to view posts and what appears to be a my account page that likely requires a login:

As discussed in many previous labs in this PortSwigger series, the first step we want to do is map the application, click around and observe its natural functionality. After a short while testing the web app and seeing its capabilities, we generate a Site Map in Burp Suite and can look deeper:

Once thing we’re not able to do with this app is login as we have not been provided credentials and there is no option to register an account. Navigating to the My account link on the top right takes us to the login panel, but attempting to login with any credentials reveals an error message stating “Invalid username”.

Interestingly, this is a vulnerability itself as it is an overly verbose error message telling us that the username we entered does not exist. If we entered a valid username, it would likely tell us “Invalid password”. With this, it’s possible to enumerate valid users which is what this lab is about.
From here, we can grab the dummy POST request to the /login page made above (I used the wiener/peter credentials from previous labs) and check what it is sending:

We can see that it is a simple POST request, meaning the parameters are going to be sent in the body and not the URL itself which we can confirm by looking at the body of the request. In the body, we see two parameters being sent - username and password.
To play around deeper, let’s send this to Repeater:

Once in Repeater, we can verify its functionality by sending the Request and looking at the response. As seen above, we should expect to see the error string “Invalid username” which we do:

This is good. We can use this error message in conjunction with a Burp Intruder attack to enumerate potential usernames using a wordlist. To achieve this, we first send this POST /login request to Burp Intruder:

Burp will automatically highlight certain parameters in the request that it thinks we want to modify. Here, it selected the Cookie, username and password. However, for our purpose right now, we only want to select the username parameter.
Let’s use the Clear option on the right, then simply highlight the dummy username you entered and hit Add to select this parameter for brute forcing. It should appear like the following:

Another important thing to note is the Attack Type located at the top. For an attack like this, where we are attacking a single parameter, the Sniper attack type is good enough. The Sniper attack is useful for fuzzing a number of request parameters individually for common vulnerabilities.

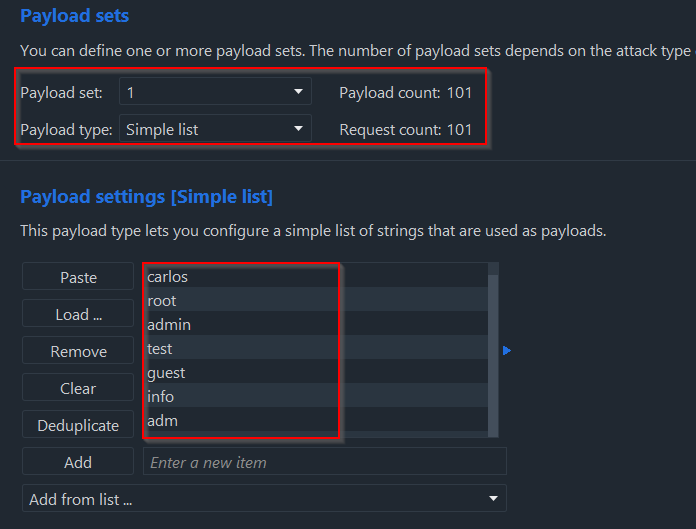
Now that we have the parameters set and the attack type selected, the next thing to configure is the Payload - i.e. what are we going to fuzz it with? For this lab, we can select a Simple List which simply allows us to import or paste a long list of potential usernames to use for this attack.
Hitting the “Load” button and loading the username wordlist provided by PortSwigger, it should populate the list for us:
Something else we can do is use the Grep Match feature. We can enter a string that we want Burp to look for in the responses so we can filter it much easier. In this case, we know that the error message we get when the username is wrong is “Invalid username”.
Using this, we can grep for this string and any response that contains it, will be flagged helping us narrow down the result we are looking for.

Once everything is set up, we simply hit “Start Attack” and let it do its thing. With the Community Edition, it will take longer to run, but be patient and it will complete in time.
After it has ran through every username, we can see the results and, more importantly, we can see an additional field titled “Invalid username” with a bunch of 1’s for each row.
The “1” indicates that the string we grepped for was found - in this case, if it has a 1, the username is invalid:

We can easily sort this column and look for any response that did not contain that string, indicating something different happened. Once we do, one result sticks out with the payload “guest”. Additionally, you can see that the length also changes very slightly which is another indicator.
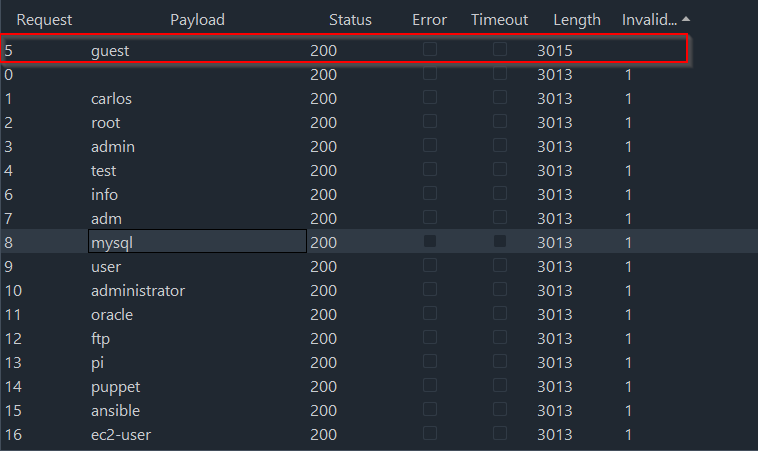
Checking the response of this request that sent “guest”, we see a different error message. It no longer provides the invalid username error, but instead tells us that we have an incorrect password. As stated before, this is an overly verbose error message, because we now know that “guest” is a valid user.

Now that we know the user is valid, we can brute force their password following the same steps, replacing the parameter to be fuzzed as the password:

Then, we need to change the list to the password list also provided by PortSwigger:

Once that is set, we can simply run the attack again and wait for it to succeed:

After completion, this time, we can sort by the Length column. We can see above that most responses return with a Length of 3102. If this value changes, it likely indicates that the payload sent had some sort of different effect on the application.
Once we sort by length, one immediately stands out - access.

This payload had a much shorter length of 199. If we take a look at the Response we got from this payload, we see the following:

Instead of a 200 OK message, we instead get a 302 Found response that indicates a redirection. This is especially good when fuzzing a login panel, as they will typically redirect you to your account page or some other account detail page after a successful login.
If we try logging in with these potential credentials (username: guest, password: access), we can see that we are successful and we complete the lab.

As a side note, it is possible to do this attack in one step, enumerating both the username and password at the same time. To do it this way, we would simply select both the username and password fields as fuzzing parameters:

Then, we would change the Attack type to a Cluster Bomb attack. This attack iterates through a different payload set for each defined position. Payloads are placed from each set in turn:

For payload 1 (the usernames), we simply load in the potential username wordlist provided by PortSwigger:

For payload 2 (the passwords), we load in the password list:

Then, we would start the attack. As you can see below, it tries the first password with every single username. It would then try the second password with every username and so on.

The reason we didn’t do this is because this would be a total of over 10,000 requests we would have to wait for it to do. With Burp Suite Professional, it’s doable in a small amount of time. However, for most of you running Community Edition, this attack would take a much longer time:

However, after waiting a couple of minutes using Burp Pro, we can see the 8590th request in my case, returned the same length of 199 from before, telling us payload 1 was guest and payload 2 was access. These are the same credentials we got from the previous attacks:


Lab 2 - 2FA simple bypass
After starting the lab, we can navigate to the home page. In this case, we see what appears to be a simple blog:
After mapping the application and observing how it functions (do this yourself by clicking around, signing in, signing out, etc..), we can see a generated site map that Burp Suite graciously gives us.

To delve deeper, once we login with the provided credentials (wiener:peter), we are greeted with a second login page asking for a 4 digit security code.

This code is sent to our email. Fortunately, PortSwigger provides a link to the email client for wiener which we can click on the top of the page as highlighted below:

Once we are in the email, we can see we receive a 4 digit security code for the 2FA request:

Having this code, we can simply paste it into the input box. Once we do that, we get logged in successfully and redirected to the my-account page:

Whilst we were doing all this, we should have Burp Suite running in the background. Looking under the HTTP History section, we can see all requests that we made. Below I have highlighted the most important ones that were necessary for the entire login process:

Let’s delve deeper and talk about the entire process before starting to hack it. Once again, these 5 important requests have been highlighted:

First, we simply request the login page (/login) by using a GET request. This is us simply clicking the my-account link on the top right as an unauthenticated user:

Next to login, we send a POST request to /login, specifying the username and password parameter in the body of the request. In this case, the username is wiener and the password is peter. Once sent and the server authenticates us, we get a 302 Found response:

The request after this is a GET request to another login panel located at /login2. This page is where the 2FA code prompt appears:

Then, if we successfully get the MFA code sent to us or some other way, we can then submit it using a POST request to /login2. Once authenticated again, we get another 302 Found response:

Finally, the server sends us back to the my-account page, this time as an authenticated user:

With this process now fully understood, we can start to take advantage of it. Remember the second request where we send a POST request to /login with the credentials? We can replace the username and password parameters with the values provided by PortSwigger (carlos:montoya):
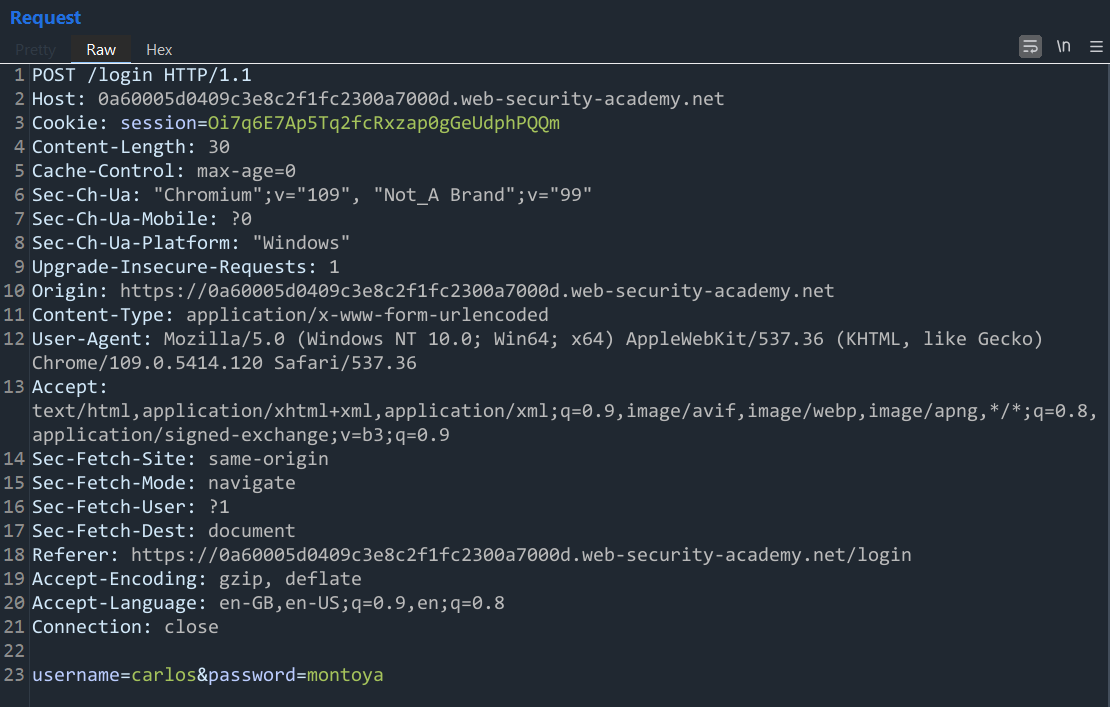
If we have valid credentials, what should we be looking for in the response of this POST /login request? We should be looking for a 302 Found response since that is the normal behaviour. Luckily for us, PortSwigger does not let us down and provides us with valid credentials. Therefore, we get a 302 Found response.

What’s the next step? We should expect to see a request to /login2. In this case, we do as can be seen below:

In my case, something went wrong and I received an Internal Server Error. However, if we use the browser GUI to perform the login as carlos, we get taken to the 4 digit security code page as expected:

Sadly, in this scenario, we did not compromise Carlos’s email account and therefore have no way of grabbing his 2FA code legitimately. However, in some cases (i.e. very badly implement web apps), the 2FA process itself can be bypassed by navigating to a page only accessible by authenticated users.
Why? Well, in a poorly configured process, after we login successfully the web app sees us an an authenticated user without passing the 2FA process. If we can somehow bypass the 2FA page and navigate to a page such as my-account manually, we can bypass the 2FA process but still get authenticated as carlos.
Remembering back to the entire process, after we submit a successful 2FA code, we get redirected to the my-account page via a simple GET request without any additional parameters.

What’s stopping us from just navigating to my-account after providing Carlos’s credentials? If we open the browser and simply change the URL from /login2 to /my-account, what happens? Let’s find out!

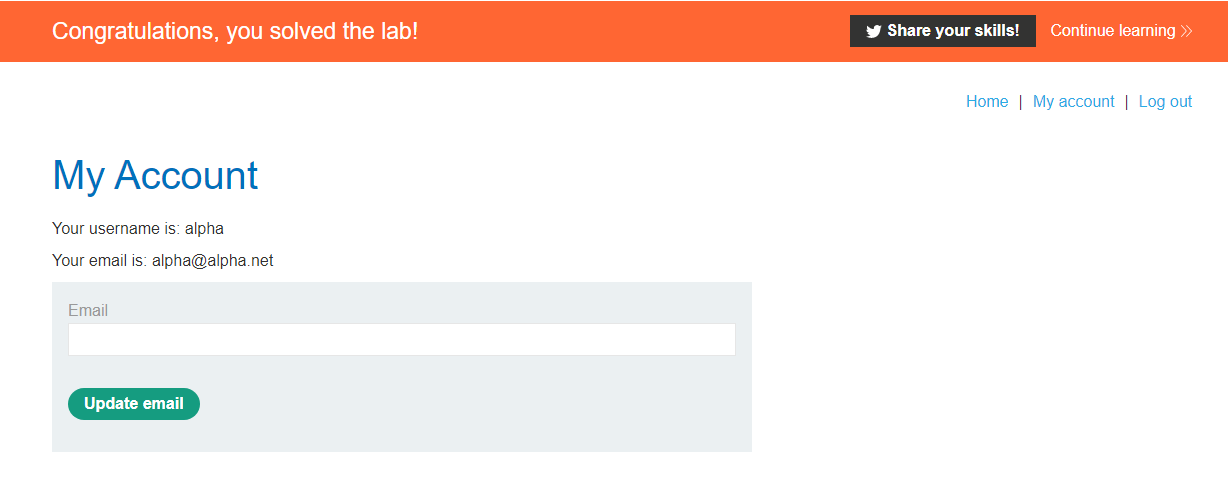
Once we change the URL manually and hit Enter, it works! We get into the my-account page as the Carlos user, therefore bypassing the 2FA process altogether due to its poor implementation.


Lab 3 - Password reset broken logic
As always, we start the lab and can navigate to the home page to start our mapping process. We are greeted with the familiar looking blog site:

After mapping the application, we are presented with the site map that Burp generates for us:

Knowing it’s an Authentication lab, we immediately focus in on the login panel. If we navigate to the login page, we can see a simple login page. However, more importantly, we see the option for any user that has forgotten their password - extremely common in real world web apps.

If we click this link, we are taken to another page that prompts us to enter our username or email address in order to reset our password:

Submitting the user “wiener” - since we have access to this user’s email - and clicking the Submit button, we see that it tells us to check our email for a reset password link:

If we navigate to the email by clicking the link provided by PortSwigger, we can see that it sends us a unique link to reset our password:

If we click this link, it takes us to a simple page asking us for the new password and for us to confirm the new password:

Once we submit the new password we want, it simply redirects us back to the home page, logging us out:

Now, let’s take a deeper look. If we look at our HTTP History, we can see that URL that was in the email, highlighted below in red:

Sending it to Repeater, we can see what the following request looked like:

As you can see above, this is a POST request. In the body, we see 4 main parameters:
temp-forgot-password-token
username
new-password-1
new-password-2
The temp-forgot-password-token is likely to be an issue. This is likely generated uniquely and randomly per client request and is unlikely to be able to be guessed.
However, the first thing we can try is simply changing the username from wiener to the user we want to target - in this case, carlos:

If we change it and send it using Repeater whilst keeping the temp-forgot-password-token as is, we can see that we receive a 302 Found response:

If we follow the redirection, we get taken back to the home page with a 200 OK response:

Nothing seems out of the ordinary here and checking the login with the new credentials as specified above (peter1), we can actually log in as Carlos. I’m not sure if this is intended or not as we didn’t change the temp-forgot-password-token at all.
However, if it is intended, then this is a huge problem as we can determine the web app doesn’t validate that the token is valid for the user requesting the password reset.
Moving on, if the previous method is not intended and was a bug on my part, then we can try the other technique. Seeing this token and seeing that we cannot generate one for Carlos’s without access to his email, what happens if we simply delete the token altogether?

Once we’ve deleted the token, changed the username to carlos and sent it forward using Repeater, we once again receive the 302 Found response indicating success:

If we follow this redirection, as normal, we get taken back to the home page with a 200 OK response, indicating no error happened:

Now, if we attempt to login using the credentials carlos:peter2, it works and we bypassed the token verification (if there was any) and successfully logged in as another user:


Lab 4 - Username enumeration via subtly different responses
For Lab 4, we start up the lab and navigate to the web app, seeing the familiar looking We Like to Blog page:

Navigating to the login panel, we see a simple login page, asking for a username and password - this time, with no forgot password option:

If we login with a wrong username and password, we see an error message indicating “Invalid username or password” - this is a much better error message than before as it does not disclose whether the username is valid or invalid so makes it harder to enumerate correct usernames although it is not fool proof as we will see.

If we look at the POST request we sent, it once again sets two parameters in the body of the request - username and password. Additionally, we can see that if we send a wrong username/password, we simply get a 200 OK response returned:

With this in mind, we can try and use Intruder to enumerate credentials again. As before, the first thing we do is clear the pre-set parameters and set our own. For starters, we simply choose to fuzz the username:

Once set, we navigate over to the Payloads section, choose a simple list payload type and paste in the username list provided by PortSwigger for these labs:

Remember a few minutes ago where I said this is not fool proof? Well, here we are. When we sent an invalid request, we can see the full error message that was returned to us (including the full stop):
Invalid username or password.

With this string, we can potentially find very small variations if any occur. To do this, we can use the Grep Extract feature of Intruder. First, we click Add under Grep Extract:

Once here, we simply click and drag to highlight the full error message in the response received before. This will populate all the fields in the top for us without us having to touch any of it:

Once selected, we save it and it should appear:

Now with this greppable string, we can run the attack as we normally would:

After a short while, the results are returned to us. In the above image, you can see we have a field in the table that we can filter by, which is our invalid string we provided under Grep Extract. If we filter by this, we can see that request 56 in this case goes to the top:

Now, you might initially look at it and wonder why it goes straight to the top. Is it alphabetical order? Does it like the number 56? Luckily for us, there is a better reason. If we look above under the “warning” column and look very closely at the string, there is a tiny difference - in this error message, there is no full stop (.)
Why? It’s an interesting question. Something must have changed. With this slight variation, it may be a tiny indicator that the username is actually valid. To test this, we can grab the same POST request, change the username to “alpha” and this time, set the fuzzing parameter to the password field:

Before firing off, remember we have to change the payload as well to the password list instead of the username list:

Once everything is in place, we can run the attack once more and wait patiently:

Immediately, we see slight variations in the Length, although nothing that stands out as majorly. However, if we sort by the Length field, one does stand out with a Length of 199:

If you look at the response to this payload, instead of the usual 200 OK response, we get a 302 Found response, likely indicating a successful login. To test this, we can take these enumerated credentials (alpha:joshua) and try logging in to the web app:
Perfect! We login successfully as the alpha username due to the web app sneakily trying to hide variations in the error message by one character. However, it is no match for Burp Suite and a keen hacker to spot these differences and gain access to a user account.

Lab 5 - Username enumeration via response timing
After a spawning the lab, we can navigate to the home page and see a terrifying demonic robot baby as well as the normal blog page:

Once again, like clockwork, we map the application with Burp Suite running and generate a site map for us to take a closer look at:
When we navigate to the login page, we can attempt to login a bunch of times to see if there is any sort of lockout policy. After entering a few wrong credentials, an error message occurs stating that we should try again in 30 minutes:

Delving further in, we can look at the HTTP History tab and highlight the different POST /login requests made before the lockout kicked in:

Above, there are 4 main POST requests I made to the website. The first one as seen above used the username wiener with the password of wrongpass1. Looking below, we can see the response that was generated due to these incorrect credentials:

Before the lockout occurs, the error message simply tells us that there is an invalid username or password. Going further, let’s look at the final request I made to the server - the one that generated the lockout policy of 30 minutes:

As we can see, it returns the same error message stating that too many incorrect login attempts were made. As proof, we can also see this in the browser as before:

From this analysis, we can determine that we likely have 3 login attempts before this lockout occurs. On the 4th attempt, it tells us to wait for 30 minutes before trying again.
We could potentially run an Intruder scan that runs 3 attempts, waits 30 minutes, does another 3 and so on. However, that would take hours, potentially days depending on how many accounts and credentials we were attempting. Is there some way we can possibly circumvent this login?
Luckily, there is. In this scenario, we can try using the X-Forwarded-For header with a different IP address to save us waiting 30 minutes.

Above, we simply insert the X-Forwarded-For header with a localhost IP of 127.127.127.127 (same as 127.0.0.1) with a password of “arewestillblocked”. Looking at the response, we don’t see the lockout message, but instead see the usual invalid username or password error - this is a good sign.
From here, we can test our theory of 3 requests. After making 3 of the same request to the server, it locks us out once again and tells us to wait 30 minutes again which we will not do:

Now, one of the key things to note when performing these type of authentication tests are the response times. It’s important to note that the user wiener does exist on the application as we were provided with the credentials.
If we change the X-Forwarded-For header to another IP address and use a simple, low character password of testing123, we can see the response time in milliseconds in the bottom right of the Repeater tab:

For this test, we can see that it took 73 milliseconds to return the response - very quick. However, what happens if change the password to a massive password with hundreds of characters?

Here, the response time increases dramatically - up to over 4 seconds long (4143 milliseconds). From this, we can determine that if the username is valid, then it is likely trying to process the password which is why as the password increases in size, the response time also increases.
What happens if we provide an invalid username? Does the value still increase as it checks the password?

Above, we changed the username to idontexist but kept the massive password. Interestingly, the response time did not stay at over 4000 milliseconds, but went back down to 95 milliseconds. Coincidence? Not at all.
We can guess that two checks are happening. First, the web app is checking if the username is valid on the back end. If the username is valid, it then tries to process the password field and log the user in. However, if the username is invalid, then the password field is skipped since there is no point in checking the password for a non-existent username.
Good idea in practice to save processing time, but bad since we can use this to our advantage to enumerate potential usernames.
With this knowledge, we can now use the username list provided by PortSwigger. If we paste it into a Notepad document, we can see that it is 101 lines long:

Remembering back there is a lockout mechanism that happens every 3 requests. To get around this, we can use that X-Forwarded-For header as used before. However, this time, we can change the IP every single request just to err on the side of caution.
To do this, I first generated a list of localhost IPs in the 127.0.0.0/8 subnet range using PowerShell ranging from 127.0.0.1 to 127.0.0.102:

Then, we send the POST /login request to Repeater, change the attack type to Pitchfork and then set the two parameters we want to fuzz - X-Forwarded-For and the username:

For payload 1, I simply pasted the IP list into Intruder to grab the 101 unique localhost IPs to bypass the lockout mechanism:

Then, for payload 2, I used the password list provided by PortSwigger:

Remember that if we use a valid username, the response time with a long password increases drastically and if we don’t have a valid username, the password field doesn’t get checked. With this in mind, to make this attack work, we can simply use a massive password as seen below to hopefully see a massive difference in response times:

With everything in place, we can run the attack and you will see the IP address is changing alongside the username just as intended:

By default, Intruder will not display the response times. However, if we go into the Columns section and check the Response received and Response completed options, we will be able to see them:

Filtering by response time, we can see that one request stands out. Most responses range from 90-100 on average whereas this response with the username “aq” returns a response time of 7622 milliseconds - a massive difference.

This tells us that the aq user is likely a valid username. From here, we can simply change the second fuzzing parameter from the username to the password field and change the username to aq:

Then, we change the second payload to the password list instead:

After a short while, we can see one request has a different length than the rest - that being with the payload of “daniel”:

Now that we have potential credentials, we can try logging in to the web app:

However, since it has not been 30 minutes, we still receive the lockout message. To circumvent this, we can simply intercept the response in Burp Proxy and add the X-Forwarded-For header:

Once we sent this forward, we get logged in as the “aq” user and get access to their account page and we complete the lab:


Lab 6 - Broken brute-force protection, IP block
Once we spawn the lab and navigate to the provided link, we see the simple blog web app:

After mapping the application and testing all the functionality (do this on your own), we can then filter our HTTP History to only show the highlighted items which, in this case, is the POST request to the /login page so we can delve deeper:

Looking above, we simply see a POST request to /login that provides two parameters - username and password. What does the normal response to a valid user account login look like? Let’s find out by looking below:

It returns a simple 302 Found response. With the previous lab, we saw a lockout mechanism that blocked us from attempting a log in after 3 unsuccessful login attempts. Is that the same with this lab? We need to find out by providing incorrect requests:

After 3 attempts again, we get an error message. However, this time it tells us to try again in 1 minute and not 30 minutes. Not as bad, but still not ideal for brute forcing. Let’s dig deeper:

Above, you can see every POST request that I made to the app. The first (bottom green) is the valid request that provided us with a 302 Found redirect after successful login. Below is the final request I sent (dark blue in image above) that triggered the try again in 1 minute message:

We know that the lockout occurs after 3 bad requests and the error message that accompanies it. What about an invalid request that does not trigger the lockout? What does that response look like:

Here, we can see that the error simply states an Incorrect password - this is good as it tells us that the username is valid and the password is incorrect. Overly verbose error messages are our friend!
The next line of thinking should be “can we circumvent this lockout?”. One of the first things to try is to see if a valid login request actually resets the cycle and allows us more logins than 3 before locking out. To test this, look at the image below where I sent 5 POST requests:

The bottom 2 (green and orange) were invalid request with the wrong password. They produced the normal error message stating Invalid password. Since we sent 2 invalid ones already, we assume that we only have 1 more invalid request before lockout occurs.
However, in this case, the 3rd request I sent (in light blue) was a valid request using the correct credentials as seen below:

However, looking above deeper into the top two requests (purple and yellow), there were 2 more invalid requests sent after the correct one. According to our current understanding, we should have only been able to send 1 more invalid request before being locked out.
In this case, we can see that the response length is the same as before (2988) and does not change, indicating that we were able to send 2 more invalid requests and not get locked out.
This confirms to us that a valid request in between our brute forcing attempt would reset the invalid counter back to 0 and allow us to continue brute forcing more passwords. Knowing this, we can try and manipulate this by first sending an invalid credential request and then a valid credential request, alternating every request to stop the lockout from occuring.
To do this effectively, we first need to gather how many usernames are provided to us in the wordlist - in this case it is 101:

Now, we can use a handy bit of BASH code to generate our new password list and our username list. I won’t go into detail about what it does as that can be done in your own time.
In short, the awk line reads the password list (passwords.txt) and inserts the word “peter” which is the valid password for wiener every second request, thereby alternating between a valid credential and an invalid credential.
The function at the end simply echoes out the carlos and wiener usernames to a usernames.txt file and does that 100 times for each username, alternating between the two usernames.

If we run this, we can see that it creates two new files - passwords_peter.txt and usernames.txt as seen below:

If we cat out the usernames.txt file, we can see that it does indeed alternate between carlos and wiener:

And if we cat out the passwords_peter.txt file, we can see that it inserts the password “peter” every second request:

In essence, if we provide both these payloads to Intruder, the process would be the following:
The first request would take the first username and first password which is our brute force attempt (carlos:123456)
The second request would then take the second username and second password which are valid (wiener:peter)
This would continue, alternating between valid and invalid to reset the lockout counter whilst still effectively brute forcing Carlos’s credentials.
To execute this attack, we can first send the POST request to Intruder and set the parameters to be fuzzed to the username and the password as we have done before:

For payload 1, we want this to be our new username list that alternates between carlos and wiener:

For payload 2, we want this to be our new password list that alternates between the brute forced password and the valid credential for wiener:

If you have Burp Suite Community Edition, you can run this attack. However if you have Burp Suite Professional, we need to add one more option. In the Resource Pool section of Intruder, we need to intentionally slow it down by setting the maximum concurrent requests to 1 and the delay between requests as 500 milliseconds.
This is because if we let it run as full speed, it does it so fast and concurrently that it still triggers the lockout policy. However, as stated above, Community Edition is intentionally slowed down already:

After everything is configured, we can run it and see the requests being made, alternating between valid and invalid credentials:

It will be hard to just sort by length or Status code since we are using a valid request for wiener which would show up more often. However, we can use the Filter Settings to filter for “carlos” and only show 3xx, 4xx or 5xx status codes (i.e. avoiding the 200 OK responses and only looking for a 302):

Once we apply the filter, one request comes back showing the password ashley with a 302 response code for the user carlos:

If we take these credentials and send a POST request to /login, we can see that a 302 response occurs, indicating a successful login:

If we right click the response and choose “Show response in browser” and paste the URL, we can see that we get logged in as carlos and sent to the My Account page, successfully completing this lab.


Lab 7 - Username enumeration via account lock
After spawning the lab, we can access the web page and see the blog page:

Clicking the My Account link in the top right leads us to a login panel:

Since we are not provided with any credentials for authenticated testing, we can try entering a dummy username and password and see what error message gets returned:

In this case, we get a simple error message stating that the username or password is incorrect - not telling us which is incorrect - this is good. Diving deeper, we can see this request in Burp Suite:

It simply provides the username and password in the body of the request. If we send this forward through Repeater, we can see the same error message we saw above in the browser in the source code:

The next step from here is to test whether there is an account lockout policy or not. To do this, we can use Burp Intruder as normal. Once we send the request to Intruder, we can decide where to add our payloads.
Now, normally we might add a payload to the username field or the password field or both. However, another method to test lockout policies is to add a parameter straight after the password as seen below:

From here, we can set the Payload type to “Null payloads” which generates payloads that are an empty string. and can be used to issue the base request many times over. In this case, we generated 100 payloads which will effectively send the same payload as above (test11:test11) over and over 100 times - testing for an account lockout:

We can then start the attack. You might be asking, what are we doing this for? What are we looking for? Essentially, we are looking to see if the response or error message changes at all after sending a certain amount of invalid requests with an invalid user.
If the error doesn’t change and the requests stay the same, we may be able to determine that there are no lockout policies in place - at least for an invalid user.

After the attack runs, every single request in the 100 request attack returns the same length and same response code indicating that the error doesn’t change. If we look at request 100, we can see this in action where the error message is the same “Invalid username or password” we saw before:

If we didn’t get locked out after 100 requests in less than a minute, it’s unlikely to exist at all - at least for an invalid user account. This should get us thinking - does it do the same for valid accounts? If an account is valid, can we do this same attack or does a lockout occur?
With the lab name, we can likely guess that there is a lockout policy on valid accounts and you can test this yourself. Or we can automate it using Intruder like the hackers we are!
For now, we can use Intruder to perform another attack. This time, we can specify two payload positions - one for the username itself and another after the password for the null payloads again:

For payload 1 - the usernames - we simply paste in the username list already provided by PortSwigger. Nothing special about this:

Now, for the second payload, we use the Null payloads and this time we specify 10. This means that for every username and password combination, it will run it 10 times (we could do 100 as we did above, but that would mean 10x the amount of requests and who wants to wait?):

After everything is set we run the attack and wait for the results:

Once the attack is run, as stated above, we are looking for any change in Length as that could indicate a lockout came into play or something else happened with that specific user/request. In this scenario, if we sort by Length, we can see that some requests made to the user “access” come back with a different length:

If we check the response for one of these requests, we can see that it tells us that we have made too many incorrect login attempts, likely revealing to us that this is a valid username - oops!
One good optional step is to verify what Burp Suite says. To do this, we can simply send a bunch of POST requests to the /login endpoint but this time specifying the user as “access” with a dummy password:

The first 3 requests (green, red, and orange) all come back with the error simply stating an incorrect username or password. However, the fourth request (blue) includes the error indicating a lockout policy.
From this analysis, we can determine that if a username is not valid, no lockout is policy since there is no need to check the password field since the user doesn’t exist. However, if a username does exist, they have 3 attempts to enter the correct password. If 3 attempts go by and no correct password is entered, the lockout policy of 1 minute gets activated to prevent brute force attacks - or at least attempt to prevent.
What’s the next step? Well, since we know the username, we can test and try to brute force the password. For this, we simply modify the Intruder payload by first changing the username to access and fuzzing the password parameter:

Once done, we simply change the payload to a simple list and paste in the password list provided to us:

If we wait for the attack to finish and then filter by length, we see some interesting results as seen below:

It seems to be that the requests with 3092 Length are the incorrect password attempts that we have at the start before lockout. Then, the rest of the requests sent (Length 3144) all have the same lockout error message telling us to wait. This then leaves the request with 199 Length to likely indicate a successful login.
To test this, we can check the first request of length 3144 and see that the response indicates the lockout error message:

Next, the 3092 Length request returns the normal incorrect credential error message:

Finally, the shortest length response (199) returns a 302 Found status code, likely indicating a successful login:

From here, we can try logging in with the found credentials and see they are successful, thus completing the lab:

Additionally, if you do not have Burp Suite Professional and want to speed up Intruder, you can use a free plugin called Turbo Intruder and configure it with the following Python code. This results in faster Intruder results but does require a little bit more work to get working.
I will cover Turbo Intruder in the next lab as an alternative so keep reading:


Lab 8 -2FA broken logic
Once again, we spawn the lab and navigate to the home page revealing a blog site:

Once we login with valid credentials provided to us, we are then directed to another page asking us to enter a 4 digit security code:

This code gets sent to our email. PortSwigger allows us to view the emails for the wiener user. Once we access the email, we are able to see that we are sent a security code without any link to click on, essentially asking us to copy and paste it into the app:

Once we do, we are then redirected to the My Account page, completing the authentication cycle:

So, how do we solve this? Well first, let’s perform some analysis and understand how this works. Below, I have highlighted 3 requests that are of importance.
The first one, as seen below, is the POST request to /login that simply contains the username and password parameter - this is our normal login page where we provide user credentials:

However, more importantly, the response from the server contains a Set-Cookie parameter that sets verify equal to wiener (i.e. our username). This is important and should be checked closer.
Checking the second request (highlighted in blue), we can see that it is a GET request to /login2, where it provides the Cookie that was just set. In this case, verify=wiener - again we should check this closer after our analysis:

Finally, we have a POST request to /login2 that contains the single parameter mfa-code which contains the value of the MFA code that was sent to us via email. Once again, we can see that we also send the Cookie to verify the user wiener:

Seeing this cookie that is set to the username, what happens if we simply change this verify value to carlos instead of wiener? To test this, we simply grab the GET /login2 request and set the verify equal to carlos instead of wiener:

Once edited, we resend the request using Repeater and check the response - it’s a 200 OK response. Scrolling further down the response, we can see the line that asks us for a 4-digit security code:

This seemed to work and we successfully bypassed the first authentication stage where we are able to request a MFA code for the Carlos user without submitting his credentials. However, now we need to actually submit a MFA code to get logged in.
To do this, we can use the handy Burp Intruder once again. To set it up, we simply setup the mfa-code value to fuzz:

Once set, there are multiple ways to set the payload. The easiest by far is using Burp Intruder’s built in “Numbers” payload type. This allows us to set a variety of options. For this lab, the options are set as follows:
From 0000 to 9999 will cover all 10,000 possible 4-digit 2FA codes
Step 1 will go through it sequentially starting at 0001, 0002 etc….
Min and max integer digits are set to 4, so it starts at 0001 instead of 1

Once set, we can run the attack and observe what happens. We can immediately see that a normal request that is invalid is returning a 200 status code with a Length of 3036:

Once the attack is finished, if we filter by length, we can see that one appears to have a length of 199, indicating something different has happened. The payload that triggered this new response was 0484:

If we take a look at the server’s Response, we can see that it is a 302 Found, likely redirecting us to the My Account page, indicating a successful login:

From here, we can right click the response and choose the “Show response in browser” option. This will provide us with a unique URL that we can copy and paste into our browser:

Once copied, we can simply navigate back to the browser, paste in the unique URL and we get directed to the My Account page signed in as the Carlos user - our attack worked!

Now, I promised last time I would show in detail the extension Turbo Intruder as it can be faster than Intruder in Burp Suite Community Edition. To install it, we simply need to navigate to the bAPP Store and search for it:

Once installed, we can simply find the POST /login2 request again in HTTP History, but this time right click it, hover over Extensions —> Turbo Intruder and Send to turbo intruder:

This will open up the Turbo Intruder window as follows:

It looks a little intimidating at first and less user friendly than the normal Intruder, however I promise it is not as difficult as it looks. First, as with normal Intruder, we need to set the parameter that we are going to fuzz. It’s slightly different in this window but still relatively simple.
Any parameter that we want to fuzz, we simply replace its current value with “%s” as can be seen below as we replace the mfa-code parameter:

Next, this is where it becomes more complex. Turbo Intruder uses Python code to perform its attack. Whilst you may not Python, the following code can be copied for this attack but if you plan to use Turbo Intruder again, you may need to modify it.

What is this code doing? Well, let’s explain it a little bit:
The script is designed to brute-force a four-digit MFA code by generating numbers from 0000 to 9999 and appending them to a base request. In more detail, here’s what it does.
The first function (queueRequests) takes two arguments - a target object and a wordlists object - but in this case only the target object is used. The function sets up a RequestEngine object that is responsible for sending HTTP requests. The RequestEngine is configured to send 25 concurrent connections, with each connection sending up to 100 requests before waiting for a response.
The pipeline option is set to False, meaning that each request will be sent individually rather than pipelined. The BURP engine is used to allow the script to run within the Turbo Intruder extension.
The for loop generates numbers from 0000 to 9999, formats them to be four digits long with leading zeroes, and queues a new request to the RequestEngine with the formatted number appended to the base request.
The last function (handleResponse) is called for each response received by the RequestEngine. In this case, it checks if the response status code is 302 and if so, adds the response to a table for further analysis. The “table” variable is not defined in this script, but is used in Turbo Intruder as a whole.
Makes sense? No? Don’t worry about it - this is much more than needed for this lab from PortSwigger but it’s always good to understand Python as a hacker since you can automate things like this!
If we then run it, we can see at the bottom of the window that it is making roughly 60 requests per second - much faster than Intruder normally would in Community Edition. In this case, you can see it has already tried 301 requests in 5 seconds:

After waiting a little longer, we can see a result appears in the table, indicating the payload used, the status code, and the length similiar to Intruder:


Lab 9 - Brute-forcing a stay-logged-in cookie
Cookie time! Once we start up the lab, we can navigate to the home page and see a blog type of website (as normal):

However, once we navigate to the login panel, this time we see an additional check box allowing us the option to stay logged in - also very common in modern web apps:

If we check this box and login as normal, we get directed to the My Account page - no 2FA or MFA this time which is good for us:

Okay, so as before, let’s do some analysis and see what the process to login looks like from Burp Suite’s perspective. Below, I have highlighted the two requests that are of interest.
The first one seen below (green request) is the initial POST request where we send our login credentials. However, this time, we have an additional parameter being sent over - stay-logged-in. In the response, we can see that if this option is checked, the server sets a cookie for us with what appears to be a random value:

If our credentials are correct, then we simply send a GET request to my-account and provide the stay-logged-in cookie set by the server along with a session cookie:

You might be wondering, how do we brute force this stay logged in cookie if it appears to be a completely random value? Well, is it completely random? Thankfully, Burp Suite has got our back. To the side of the Response, there will be an Inspector section that can help us.
If we hover over the stay-logged-in value and check the Inspector tab, Burp Suite does all the hard work for us and tell us that it is Base64 decoded and even decodes it for us - how nice!

And just to make sure since we never trust technology, we can check this for ourselves. If we send it over to Decoder and use the Decode from base64 option, we get the same value. So, this time, we can trust Burp Suite’s intuition:

Now, it still appears to be encoded in some way. With experience you will be able to identify this. To me, this instantly looks like an MD5 hash due to the length and the characters used. However, if you are not too sure, you can also use an online hash identifier tool to try and identify the algorithm:

As you can see, the online tool also identifies it as MD5 and even decodes it for us which is nice. The decoded value is peter - seem familiar?
If you want to feel even more like a hacker, we can check this by MD5 encoding the value “peter” using something like PowerShell and seeing if we get the same value back:

Once again, you might look at this PowerShell code and be like “what on earth is going on, i have no idea what any of that means”. That’s ok, you don’t need to understand everything right now. It comes with experience. If you want a very high level overview of what it is doing, here’s what it does:
It calculates the MD5 hash of the string "peter" using the MD5CryptoServiceProvider class and stores the resulting hash in $hash variable. The hash is then converted to lowercase and the dashes are removed.
So, what do we now right now? Well, we know that the stay-logged-in cookie is really just the username then a colon then the md5 hashed password value - not very secure as it seemed right?
From here, we can actually now brute force this stay-logged-in cookie using the same password list we have before with some variations. To do this, we first send the GET /my-account request to Intruder and set the parameter we want to fuzz as the stay logged in cookie:

Then, we specify the password list we want to use as we normally would:

But we can’t just send the password in cleartext. We have to do some processing to the password before it is actually sent as the cookie value. To do this, we can scroll down until we see the “Payload processing” section:

Once there, we can hit Add and do the following steps:
Hash it using MD5
Add the prefix “carlos:”
Base64 encode it
These are simply the steps we did but in reverse. Previously, we base64 decoded it, found the prefix of the username was added and then decoded the MD5 hash.
This time, we simply take the password, get its MD5 hash, prepend the username “carlos:” to the start of the MD5 and then base64 encode the entire payload:

Once these processing steps are set, we can run the attack and view it run:

Now, we see that the payload is now a Base64 string. If we wait for it to finish and sort by the length, we can see that one request appears to have a much higher Length value than the others. If we check the request that was sent, we can see the full payload that was sent:

From here, we can simply check the response and select the “Show response in browser option”:

Then, we can simply copy the URL and paste it into our browser, logging in as carlos via the cookie and completing the lab:

Additionally, we can try and decode this cookie doing the reverse. First, we take it to the Decoder and base64 decode it to reveal the password MD5 hash:

Once we have this MD5 hash, we can simply try using an online tool like Crackstation to see if we can crack it easily which in this case we can since it is a simple password:

However, it’s important to note that not all encoded passwords you find in the wild will be this easily cracked and you may have to play around with mutations and different wordlist with tools like Hashcat.

Lab 10 - Offline password cracking
Before starting, in order to complete this lab, you need to know a little bit about XSS. However, don’t worry, I will explain it here anyways! After we start the lab, we navigate to the home page and see the familiar blog app:

After we perform a successful login, we can do some analysis and see how that process actually works in Burp Suite. Below I have highlighted the two important requests that were made.
Here, we can see that we make a POST request to the login panel sending the username, password and the stay logged in value of on. If that value is set to on, the server then responds with a Stay Logged in cookie as in the previous lab:

Then, in the subsequent request, we can see that it uses that cookie to request the my-account page and grab the correct page for that user:

Once again, we can send this cookie to Decoder and base64 decode it to reveal the cookie’s true value as the username and an MD5 hash as before:

Looking deeper into the web app itself, we can see that the blog posts this time around have a comments section, allowing anyone to post a comment on a certain blog post:

Immediately, when we see functionality like this, we should try and see if we can perform an XSS attack. To test this, we can first try sending a simple comment that, if the code gets executed, would present either our comment or username in large text as indicated by the H1 tags of HTML.
We put the h1 tags in every available field to test as it may not always be the comment field that is vulnerable. In this scenario, the email and website fields required a certain format so I left them out for now:

Once we send this comment, we can see that our username does not execute the HTML code but instead just displays it back to us. However, the comment appears to be a much larger size - almost like an H1 tag in HTML:

This tells me that this comment field is likely vulnerable to XSS since no sanitization is being performed and we can execute code. Knowing this, we can navigate to the exploit server that PortSwigger provides for us and grab the URL:

Once we have the URL, we can craft a very malicious XSS payload in the comment field and use a random username such as CookieStealer:

So, what does this payload do? Let’s go through it:
This code is a JavaScript code snippet that redirects the current page to a URL constructed by concatenating the value of the document.cookie property with a hardcoded string. The resulting URL is then used as the value of the document.location property, which causes the browser to navigate to the new URL.
The hardcoded string in this code is 'https://exploit-0a7c00d703fe95c4c1b552d301f00012.exploit-server.net/', which is the base URL of a server that we control. By appending the value of document.cookie to this URL, we are attempting to steal the user's cookie information and send it to our own server for malicious purposes.
Let’s send it and see what happens:

We get the message indicating that our comment was submitted successfully. If we click the “Back to blog” link, we get what appears to be an error message:

However, it’s ok. Don’t freak out just yet. If we check the Logs of our exploit server, we can actually see the following GET request made to us that seems to contain a secret and the stay logged in cookie:

From our analysis, we know that it is a base64 encoded cookie, so we can first decode it using Burp Decoder:

Next, we also know that the second value is an MD5 hash of the user’s password. There are many ways to crack this password. One of the easiest is to use an online MD5 hash cracking tool to see if it can crack it successfully. In this case it does and we get the cleartext password “onceuponatime”.

However, if it was a more complex password, we may need to use something like Hashcat with a detailed wordlist. The following screenshot shows the command we would use to crack this specific hash using Hashcat and the provided portswigger password list:

If we wait for it to complete, it actually comes back as Exhausted. This essentially means that the password list we provided did not contain a match for the hash - i.e. it could not crack the password.

However, if we use a different wordlist, such as the world famous rockyou.txt, it might contain the password we are looking for. In this scenario, to save time since we already know what it is, we can search in rockyou.txt for the string “onceuponatime” and we can see it appears on line 116,187:

Since we know it exists, we can run Hashcat again and simply change the password list to rockyou.txt and wait:

After a few seconds, it successfully cracks this password since it found a match and we get the cleartext password - this is the process you would use if it was a more complex password.

With these new found credentials, we can now login to Carlos’s account and navigate to the My Account page:

From here, the goal is to deleted his account so we click on Delete Account and are presented with a confirmation page:

After confirming the password again and hitting the “Delete account!” button, we successfully delete his account and complete the lab:


Lab 11 - Password reset poisoning via middleware
Once we start up the lab as always, we navigate to the home page and see the blog:

Nothing new here. If we go to the login panel, we see a simple looking panel with the option to log in, but also the forgot password option:

If we click the Forgot password? link, we get taken to another page that asks us to enter our username or email:

If we enter the username wiener, it then tells us to check our email for a reset password link:

Once we navigate into the email using the exploit server PortSwigger provides, we can see an email with a link that it tells us to follow to reset our password:

Once we click this link, it takes us to the following page, asking us for a new password and then to confirm that new password:

Once submitted, it then redirects us back to the main page:

That’s the whole reset password process done. Now, let’s analyze it further using Burp Suite. Below, as usual, I have highlighted and segregated the following requests that are important to this process.
The first request (in orange) is simply the forgot-password where we enter the username or email of the account we want to change passwords for - remember this for later. The second request (in green) is much more interesting as we can see below:

As we can see above, this performs a GET request to /forgot-password whilst passing the parameter temp-forgot-password-token along with it. This token could be useful to us if we can grab carlos’s.
Now, before we go any further, a useful extension we can install is Param Miner. This essentially identifies any hidden parameters or headers that the server allows. To install it, it is available in the bAPP Store:

Now, if we take the POST request that actually changes the password (i.e. the one that contains the new password) and right-click it and select Param Miner —> Guess params —> Guess headers, it will tell us all the different headers that this server accepts.
Do this on your own and play around with it!

However, this will return that the server accepts the X-Forwarded-Host header. What does this do? Well, the X-Forwarded-Host header is an HTTP request header that is used to identify the original host name of a client in a proxied or load-balanced environment.
When a client sends a request to a server through a proxy or load balancer, the server may not be aware of the client's original host name, and may only see the host name of the proxy or load balancer. This can be problematic for applications that rely on the original host name, such as virtual hosting or authentication systems.
To address this issue, the X-Forwarded-Host header can be added to the HTTP request by the proxy or load balancer. This header contains the original host name of the client, allowing the server to correctly process the request and provide an appropriate response.
For example, if a client with the host name "example.com" sends a request to a server through a proxy with the host name "proxy.example.com", the X-Forwarded-Host header can be used to indicate that the original host name is "example.com". The server can then use this information to serve the appropriate content or perform authentication based on the correct host name.
With this in mind, let’s see if we can generate a temp token for the Carlos user by simply inputting his username into the forgot-password field:

Before we hit Submit, let’s turn on Burp Proxy and intercept this request. Once on, let’s submit it and see what happens:

Here, we can see that it goes through successfully and specifies the username carlos in the body of the request. Now, we can attach the X-Forwarded-Host header and actually point it to our exploit server:

Once we forward this one, it will take us to the familiar page telling us to check our email for a reset password link that we can click:

Obviously, we don’t have access to Carlos’s email to grab this link. However, that header that we injected pointing to our exploit server should have worked its magic. If we check the logs of our server, an interesting request will stick out at us:

Here, we can see that it sent us the forgot-password unique link for carlos, with that unique token. Why did we receive it? Well, the lab states that Carlos clicks any link he receives. What happened was that Carlos received an email to reset his password that contained a link to our exploit server and appended his token to it.
Then, when he clicked on it, that sent a GET request to our web server’s root page and provided the GET parameters including that temp token:

From here, we can simply grab the existing GET request we have in our HTTP history and replace that token with the one found in our web logs:

Once we do, we can send it forward and see what happens. As you can see below, we get a 200 OK response which is what we are looking for - a good sign!

Now, if we right click and choose to Show response in browser, we will be provided with a unique link that we can copy and paste:

Once we paste this into our browser, we will see the following page allowing us to specify a new password. However, this time, we are actually changing Carlos’s password thanks to changing that temp forgot password token:

We can change it to whatever we want. As a proof of concept, the below image shows that the request did go through and that I changed Carlos’s password to “yougothacked” to rub it in that we hacked him:

With this new password, we can then try and login as Carlos:

It works! We successfully reset Carlos’s password and we are able to login to his account using the newly changed password.

Lab 12 - Password brute-force via password change
Once we spawn the lab, since this is an Authentication based lab, we can skip the mapping process and go straight to the login panel where we see a simple login panel:

When we login successfully using the credentials provided (wiener:peter), we are presented with the My Account page:

However, there is an additional functionality on this page that was not present before - the ability to reset our password right in the web app itself. Let’s see what happens if we change our password via a short test:

It simply tells us that our password was changed successfully - nothing exciting or juicy yet. However, let’s not take it at face value. Looking deeper, we can analyze what happened in Burp Suite.
Highlighted below is the POST request that actually changed our password:

As you can see above, it sends 4 different parameters in the body:
username
current-password
new-password-1
new-password-2
These are all pretty self explanatory so no need to explain what they represent. If we send this response again in Repeater, we can observe the server’s response:

Again, nothing really of note. Just a simple message that tells us that the password change successfully.
The next step for me at this stage is to play around with the parameters that are sent. What happens if we change the current-password to one that we know is wrong and set the new-password-1 and new-password-2 to different passwords - what error do we receive?

It does! Here, the error comes back telling us that the current password is incorrect. Again, this is an overly verbose error message as we can use this in a future attack described later.
Now, let’s try and set the current password to the correct one (i.e. peter1 in this case) and keep the new-password-1 and new-password-2 values as different ones. Does the error change or stay the same?

The error actually changes. Instead of telling us the current password is wrong, it tells us that the new passwords do not match. Now, we know that there are three different possible scenarios that can happen. These are:
If the current password is correct and the new passwords match, it changes our password
If the current password is wrong and the new passwords do not match, it tells us our current password is wrong
If the current password is correct and the new passwords do not match, it tells us they don’t match
With this information, we can now attempt a brute force. To do this, we first send the POST request to Intruder and select the current-password value as the one we want to fuzz (we want to keep the new passwords as different values and not fuzz them):

Now, we simply want to select payload 1 as the normal password list we have used in previous labs:

As stated above, if the current password is correct and the new passwords do not match, it tells us they don’t match. We can use this to determine if our payload password is correct. To do this, we can use the Grep Match feature and tell it to grep for that do not match string - “New passwords do not match”.

Once all is configured, we can run the attack:

After it is finished, we can sort by the new column that greps for the string we want to find. In this case, 1 result appears that contains the string “New passwords do not match”:

Knowing what we know, this error message only appears if the current password is correct. Additionally, we can check the Response and see that there is a section that tells us our username is carlos:

Knowing that the password is monkey, we can simply login as the Carlos user and complete this lab:


Lab 13 - Broken brute-force protection, multiple credentials per request
If we navigate to the login panel, we once again see a very simple login panel:

In this lab, we are not provided with any authenticated account that we can log in with so let’s attempt a login with dummy credentials and enumerate what the error message says:

Here, we see that the error message doesn’t tell us if it’s a valid account or not. However, Burp Suite can come to the rescue and provide us with information. If we take a look at the POST request we just sent in the browser, we see something interesting:

We can see that this time, the credentials are not sent as we are used to, but are in fact wrapped in curly brackets and in what appears to be a key:value pair like in a programming language. If you are not sure what this is, this is JSON syntax.
Now, with JSON, it’s possible to include multiple values inside a certain name/key (i.e. password). This can be done by using a JSON string array. The format for a JSON string array would be as follows:
"password":[ "pass1", "pass2", "pass3"]
So, we need to find a way to translate our provided password list into JSON format. Now, we could do it manually. If you feel like manually adding double quotes and a comma to 101 lines, be my guest. But we’re hackers and we’re lazy. Automation is our life.
As of right now, the current wordlist of passwords provided is formatted in the following way:

An easy way to convert this list to JSON format is by using 4 lines of Python code - yes, 4 lines. These 4 lines would be the following:

If you’re not familiar with Python, I highly recommend getting into it - especially for hacking and automation tasks just like this. Anyways, what does this simple 4 line program do? Let’s analyze it:
The line “file1 = open('passwords-main.txt', 'r')” opens a file named passwords-main.txt in read mode and assigns the resulting file object to the variable file1.
The second line “Lines = file1.readlines()” reads all the lines of the file into a list and assigns the list to the variable Lines.
Next, the line “for line in Lines:” starts a loop that iterates over each line of the Lines list.
Finally, the most complex line “print(' "{}", '.format(line.strip()))” prints the current line with a specific format. The strip() method removes any leading or trailing whitespace from the line, and the format() method substitutes the formatted line into a string that contains double quotes and a comma.
The output of this script is a formatted list of all the lines in the passwords-main.txt file. Each line is surrounded by double quotes and followed by a comma, which makes it suitable for use in JSON.
Confused? It will be clear once we run the program as you can see below:

Above, we can see the results of the program. It’s an incredibly simple that essentially added double quotes round each string/word and then added a comma afterwards to match JSON syntax.
With this new JSON list of passwords printed out, we can hop back over to Burp Suite and send the POST request to the Repeater tab . Once there, we can simply paste this new list into the password key as the value as seen below:

Now, every single password is part of this request, meaning if one of these passwords is correct, then we will be logged in successfully (hopefully). However, before sending this request on, we need to make a couple of modifications near the end:

As seen above, we need to remove the comma from the last entry after moscow and then we also need to add an ending square bracket and an ending curly bracket to successfully close off the JSON syntax. Once that is done, we can fire off this request using Repeater:

As we can see, the response provides us with a 302 Found message and a redirect - this is good as it likely means a login was successful.
Now, from here, we cannot login using the browser since we don’t know what password was actually the right one since we used all of them in one go. Instead, we can use the “Show response in browser” option and copy the URL Burp Suite provides us:

With this URL, we can paste it into our browser and gain access to Carlos’s account by abusing JSON by sending multiple passwords at once in a single request, therefore bypassing any brute force control methods in place:


Lab 14 - 2FA bypass using a brute-force attack
Once we spawn the lab, we can navigate to the login panel and see what is there:

Here, we see a simple login panel as we have seen many times before. If we enter our valid credentials (carlos:montoya), it then takes us to another page, asking us for a 4 digit security code:

If we enter a wrong security code, it produces an error telling us it is an incorrect security code:

One thing to test for is to see if we get blocked from making unlimited attempts at brute forcing the security code. After we enter another security code, we get the same error, but this time it logs us back out and we have to sign in again:

We can see this more clearly in Burp Suite. The second time I submitted a wrong code (2222), it returns a 200 OK status code but takes us back to the login page where we have to enter our credentials again:

This is a problem since if we use brute force, it will only run through 2 attempts before getting redirected back to the login page. However, Burp Suite has a solution to this. It’s called Burp Macros. With Macros, we can tell every request to sign in. This will become clear as we go through this:
To configure these Macros, first we go into the Settings menu and find the Sessions tab to get to the Session handling rules:

Once there, we hit Add and get taken to the Session handling rule editor:

From here, we then navigate to the Scope tab and check the box that states “Include all URLs” - this will mean every request we send will use this Macro which is what we need for this particular lab:

Then, we go back to the Details tab, hit Add and choose the sub option “Run a macro”:

Once there, we hit the “Add” button under the Select macro section:

Now, in the Macro Recorder window, we want to select 3 requests that every subsequent request should do - these are highlighted below. We want to select the GET request to /login, then the POST request to /login and finally the GET request to /login2 - in that order. Make sure when you select them, you hold the CTRL key to select multiple:

Once selected hit OK and they should appear in the Macro editor in that order we selected them in:

Just to make sure we are doing it right, there should be a button in the bottom right called “Test macro”. Click it and observe what happens. If everything is working, the final response from the GET /login2 request should ask us for the 4 digit security code:

From here, we can keep hitting OK until we get back to the Session handling rule editor, which should now have a run macro Macro1 option in the Rule actions:

That should be our Macro set up. But what does it do? Well, it simply does those 3 actions that we selected for every subsequent request we now make. In essence, every request we make will start with asking for the login panel, then logging in by sending the credentials (carlos:montoya) and finally requesting the login2 page where it asks us to send the security code.
In short, we are making sure that the app never logs us out after those 2 wrong attempts so we can continue to brute force the 2FA code.
From here, we can send the POST /login2 request to Intruder and do the same thing we usually do - select the mfa-code to be the parameter we fuzz:

From here, we can select the Payload type as Numbers and use the following parameters:
From 0000 to 9999 (yes, the screenshot shows 4444 but I’m an idiot, so ignore my screenshots)
Step 1 to go through them sequentially
Set the min and max integer digits to 4 so it starts from 0001 instead of 1
Set the max fraction digits to 0 so no fractions occur

As before in a previous lab, with Burp Suite Professional, if we run the attack using the default threads and concurrent sessions, the attack goes too fast and it won’t work so we need to intentionally slow it down. To do this, we simply choose to create a new resource pool, giving it the maximum concurrent requests of 1:

Now, we can run the attack and wait for the results. As stated in the lab description by PortSwigger the verification code may reset while you're running your attack, therefore you may need to repeat this attack several times before you succeed.
If we get lucky on the first attempt, we can sort by status code and wait for a 302 Response. Luckily, we get one not too far into the test (the 700th request):

With this 2FA code in hand, we can check its Response and choose to show the response in browser by grabbing the unique URL Burp generates for us:

From there, we can simply paste it in our browser and hit Enter. Once done, it completes the verification process and takes us to the My Account page of the Carlos user:

And that’s it! Every authentication lab is now done and you’re now an expert on Authentication vulnerabilities.