PortSwigger: All Access Control Labs Walkthrough

In this post, I will cover the all of the Access Control labs located at PortSwigger Academy as well as providing some context regarding what it is and the vulnerabilities associated with it.

Access Control Vulnerabilities
What is access control? Well, access control refers to constraints that are put in place on who/what can perform attempted actions or access resources that they have requested. As a real life example from my previous freelance career, in the early days of my website I had a “hidden” directory containing all the resources and “sensitive” files from various contracted jobs (i.e. provided files, images, instruction documents, etc…) that was stupidly in the web root directory.
As I found out quite quickly, this had no authentication or any sort of access control, essentially allowing anyone to navigate to this easily guessable directory name and gain access to these sensitive company documents and contracts. This could have been especially bad when working on unreleased/unannounced projects. Luckily, nobody exploited this before I patched it. It’s not this website, don’t try and find it here :)
In the context of web apps, access control is dependent on authentication and session management.
Authentication identifies the user and confirms that they are who they say they are
Session management identifies which subsequent HTTP requests are being made by that same user
Access control determines whether the user is allowed to carry out the action that they are attempting to perform
Access control design decisions have to be made by humans, not technology, and the potential for errors is high (as in the example above). From a user perspective, access controls are divided into three main categories:
Vertical access controls
Horizontal access controls
Context-dependent access controls
Vertical Access Controls
Vertical access controls are mechanisms that restrict access to sensitive functionality that is not available to other types of users. With vertical access controls, different types of users have access to different application functions. For example, an admin might be able to modify or delete any user’s account, while an ordinary user has no access to these actions.
Vertical access controls can be more fine-grained implementations of security models designed to enforce business policies such as separation of duties and least privilege.
Horizontal Access Controls
Horizontal access controls are mechanisms that restrict access to resources to the users who are specifically allowed to access those resources. With horizontal access controls, different users have access to a subset of resources of the same type. For example, a banking application will allow a user to view transactions and make payments from their own accounts, but not the accounts of any other user.
Context-Dependent Access Controls
Context-dependent access controls restrict access to functionality and resources based upon the state of the application or the user’s interaction with it. Context-dependent access controls prevent a user performing actions in the wrong order. For example, a retail website might prevent users from modifying the contents of their shopping cart after they have made payment.
Basic Examples of Broken Access Controls
Broken access control vulnerabilities exist when a user can in fact access some resource or perform some action that they are not supposed to be able to access.
Vertical Privilege Escalation
If a user can gain access to functionality that they are not permitted to access, then this is vertical privilege escalation. For example, if a non-administrative user can gain access to an admin page where they can delete accounts or important files, that is vertical privilege escalation.
At its most basic, vertical privilege escalation arises when an application does not enforce any protection over sensitive functionality. For example, administrative functions might be linked from an admin’s welcome page but not from a user’s welcome page. However, a user might simply be able to access the admin functions by browsing directly to the relevant URL.
For example, a website might host sensitive functionality at:
https://test-website.com/administrative-panel
This might be accessible by any user, not only administrative users who have a link to the functionality in their user interface. In some cases, the administrative URL might be disclosed in other locations like the robots.txt file or sitemap.xml file.
Even if the URL isn't disclosed anywhere, an attacker may be able to use a wordlist to brute-force the location of the sensitive functionality.
In some cases, sensitive functionality is not robustly protected but is concealed by giving it a less predictable URL - called “security by obscurity”. Simply hiding sensitive functionality does not provide effective access control since users might still discover the obfuscated URL in various ways. For example, consider an application that hosts admin functions at:
https://test-website.com/thfydyttefhj-tshatydsfj
This is not guessable by an end user in a reasonable amount of time. However, the application might still leak the URL to users. For example, the URL might be disclosed in a certain JavaScript file loaded with the website that constructs the interface based on the user’s role ID - i.e. if the role ID is 1, it may related to the “admin” role and load the admin panel link at the top of the page.
Some applications determine the user’s access rights or role at login, and then store this information in a user-controllable location, such as a hidden field, cookie or preset query string parameter. The application makes subsequent access control decisions based on the submitted value. For example:
https://test-website.com/login/home.jsp?role=1
This approach is fundamentally insecure because a user can simply modify the value and gain access to functionality to which they are not authorized, such as administrative functions.
Platform Misconfiguration
Some applications enforce access controls at the platform layer by restricting access to specific URLs and HTTP methods based on the user’s role. For example, an app might configure rules like the following:
DENY: POST, /admin/deleteUser, managers
This rule denies access to the POST method on the URL /admin/deleteUser, for users in the managers group. Various things can go wrong in this situation, leading to access control bypasses.
Some app frameworks support various non-standard HTTP Headers that can be used to override the URL in the original request, such as X-Original-URL and X-Rewrite-URL. If a web app uses rigorous front-end controls to restrict access based on URL, but the app allows the URL to be overwritten via a request header, then it might be possible to bypass the access controls using a request like:
POST / HTTP 1.1
X-Original-URL: /admin/deleteUser
An alternative attack can arise in relation to the HTTP method used in the request. The front-end controls above restrict access based on the URL and HTTP method. Some web sites are tolerant of alternate HTTP request methods when performing an action. If an attacker can use the GET method or another to perform actions on a restricted URL, then they can circumvent the access control that is implemented at the platform layer.
Horizontal Privilege Escalation
Horizontal privilege escalation arises when a user is able to gain access to resources belonging to another user, instead of their own resources of that type. For example, if an employee should only be able to access their own employment and payroll records, but can in fact also access the records of others, then that is horizontal privilege escalation.
Horizontal privilege escalation attacks may use similiar types of exploit methods to vertical privilege escalation. For example, a user might ordinarily access their own account page using a URL like:
https://test-website.com/myaccount?id=123
If an attacker modifies the id parameter value to another number (i.e. 122), they might gain access to another user’s account page, with associated data and functions.
In some apps, the exploitable parameter does not have a predictable value. For example, an app might use a GUID to identify users. In this scenario, an attacker might be unable to guess/predict the identity for another user. However, the GUIDs belonging to other users might be disclosed elsewhere in the app where users are referenced, such as messages and reviews.
In some cases, an application does detect when the user is not permitted to access the resource, and returns a redirect to the login page. However, the response containing the redirect might still include some sensitive data belonging to the targeted user, so the attack is still successful.
Horizontal to Vertical Privilege Escalation
Often, a horizontal privilege escalation attack can be turned into a vertical one, by compromising a more privileged user. For example, a horizontal escalation might allow an attacekr to reset or capture the password belonging to another user.
If the attacker targets a user with administrative permissions and compromises their account, they can gain admin access and so perform vertical privilege escalation. Foe example, an attacker might be able to gain access to another user’s account page using the parameter tampering technique:
https://insecure-website.com/myaccount?id=122
If the target user is a user with admin privileges, then the attacker can gain access to an admin account page. This page might disclose the administrator’s password or provide a means of changing it, or might provide direct access to privileged functionality.
Insecure Direct Object References (IDOR)
IDOR is a subcategory of access control vulnerabilities. IDOR arises when an app uses user-supplied input to access objects directly and an attacker can modify the input to obtain unauthorized access.
Multi-Step Processes
Many web sites implement important functions (such as deleting a user) over a series of steps. This is often done when a variety of inputs or options need to be captured, or when the user needs to review and confirm details before the action is performed.
For example, administrative function to update user details might involve:
Load form containing details for a specific user
Submit changes
Review the changes and confirm
Sometimes, a website may implement rigorous access controls over some of these steps, but ignore others. For example, suppose access controls are directly applied to the first and second steps, but not to the third step.
Effectively, the website assumes the user will only reach step 3 if they have already completed the first two steps, which are properly controlled. However, an attacker can gain unauthorized access to the function by skipping the first two steps and directly submitting the request for the third step.
Location-Based Access Control
Some websites enforce access controls over resources based on the user’s geographical region. This can apply, for example, to banking applications or media services where state legislation or business restrictions apply. These access controls can often be circumvented by the use of web proxies, VPNs or manipulation of client-side geolocation mechanisms.
Prevention
Access control vulnerabilities can generally be prevented by taking a defense-in-depth approach and applying the following principles:
Never rely on obfuscation alone for access control
Unless a resource is intended to be publicly accessible, deny access by default
Where possible, use a single app-wide mechanism for enforcing access controls
At the code level, make it mandatory for developers to declare the access that is allowed for each resource, and deny access by default
Thoroughly audit and test access controls to ensure they work as intended
That covers the basics of access control and how to break it, but if you want more detail, then please read the following section. If not, you can move on to the labs and start playing around.

Detailed Breakdown of Access Control
Before diving straight into access control, it’s important to understand the fundamentals. Talking about fundamentals, there is no better place to start than with terminology that is required to understand this topic. Three of these covered here are:
Authentication
Session Management
Access Control
These 3 are interconnected/tied to each other, but are their own thing and have their own implementations. It’s important to understand the differences.
Authentication
Authentication is the mechanism used to identify the user and confirm who they say they are. For example, user Alice needs to log in to her account. The application needs a way to verify her identity before providing the information associated with her account. How does the app do this? Black magic? Sadly not, but it instead uses the classic form based authentication.
The application asks for her username and password. If Alice provides the correct username and password, the application then provides Alice with the associated account information and page.
Authentication is the ability to identify a user’s identity.

Session Management
Once you are authenticated, you don’t want to just stay on your account page. You might want to change your profile picture, update your email, change your password and so on. What do these things have in common? Typically, they are (or should be) all authenticated pages, meaning that if you are not authenticated, you should not be able to view the pages - this is where session management appears.
Instead of the app requesting your credentials for every authenticated page, the app deals with it. How does it do that? When you first input your credentials and are authenticated, it generates a unique token that is tied to your username that acts as a short lived password. This token verifies your identity every time you make a request.

In every request you send to the application, this token is also sent and dealt with in the back end. It’s vital to keep this token secret! If an attacker gets this token, it can compromise your entire account.
Session management is a way to verify a user’s identity across subsequent HTTP requests
Access Control
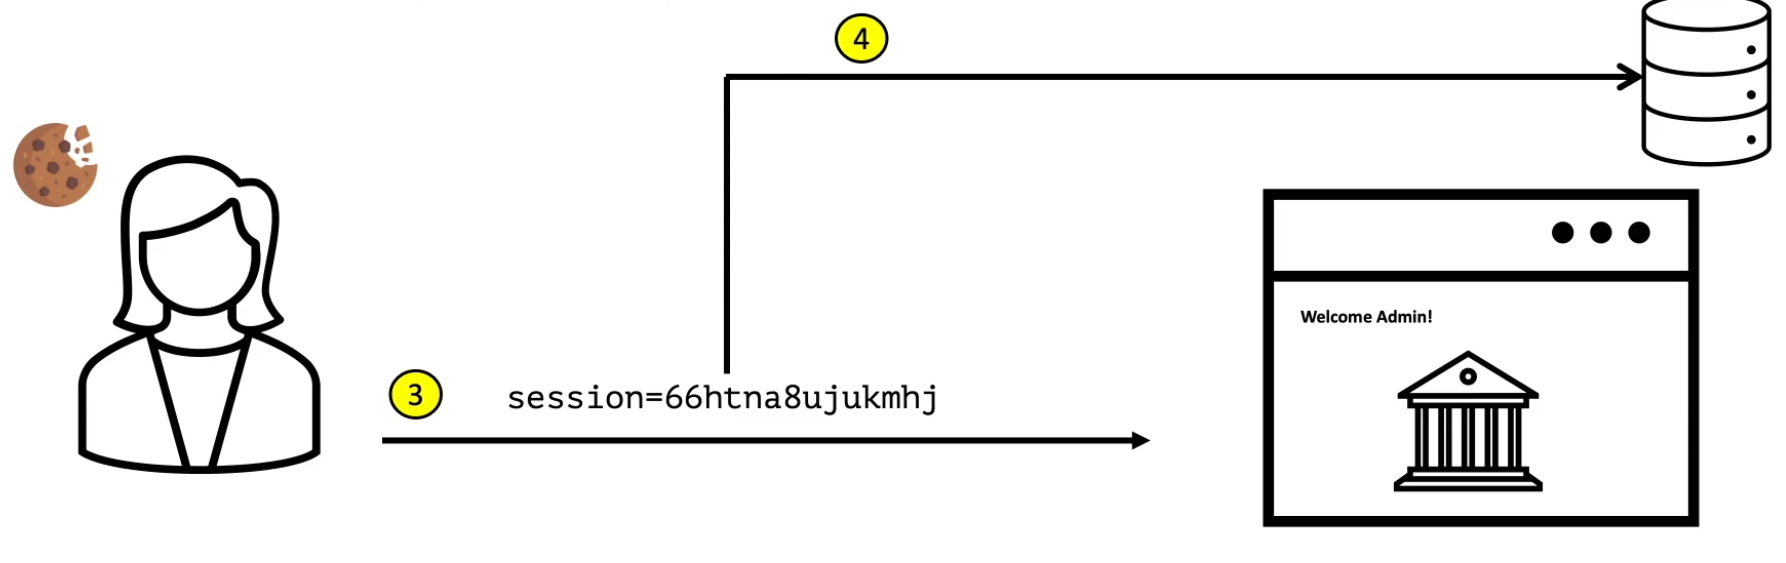
Once you are authenticated and have a token, you want to perform actions on the app. Every time you want to perform an action, the application must determine if you are allowed to carry it out - done using access control rules.
For example, Alice wants to perform a banking transaction. First, you session token gets passed to the app, it checks which user ID the session token is assigned to. Once identified, it checks the access control rules applied to that ID. If the user has access to the functionality they are requesting, the request goes through. Otherwise, it is denied.
There are 3 different types:
Vertical Access Control - restrict access to functions not available for other users in the organisation (i.e. admin user and regular user). A regular user should not be able to perform the same functions that an admin user can.
Horizontal Access Control - restricts users of the same privilege from accessing each other’s resources. Alice and Bob have the same privilege level (regular users). Bob should only be able to access his data and should not be able to access Alice’s data and vice-versa.
Context-Dependent Access Control - used to restrict access to functionality based on the state of the app or the user’s interaction. Imagine a multi-step process for deleting users. The first step is clicking on the Delete button. Once clicked, it initiates a request to the backend, asking you to confirm. If you do, you click Yes and it initiates a second request that deletes the user. CDAC prevents a user from performing actions in the wrong order (cannot delete a user without confirming it). Another example is a retail website preventing you from altering the contents of your shopping cart after the payment and order are confirmed.
So, that covers access control and what it is, but what is broken access control? What makes it broken? Broken Access Control vulnerabilities arise when users can act outside of their intended permissions. The impact varies depending on the type of vulnerability found. Some typical examples may lead to sensitive information disclosure, unauthorized access and modification or destruction of data.
As with access control, there are 3 different types of Broken Access Control:
Horizontal Privilege Escalation - occurs when an attacker gains access to resources belonging to another user of the same privilege level. For example, Alice wants to login to her banking account. She logs in and the app presents her with information. The way the application does this is by an “id” parameter added in the URL and comes from the client side. For example, Alice’s ID is 123. If an attacker decides to change the id from theirs (121) to Alice’s (123), you would gain access to Alice’s account.

Vertical Privilege Escalation - occurs when an attacker gains access to privileged functionality that they are not permitted to access. For example, an admin logins in and has access to the admin panel. The way access is handled is through a client side parameter called “admin”. When logging in, the application recognizes you are an admin, set the parameter to True and requests the admin panel page. An attacker could simply change the admin parameter from false to true and gain access to the admin panel.

Access Control Vulnerabilities in Multi-Step Processes - occur when access control rules are implemented on some of the steps, but ignored in others. Previously, in the delete users example, there were two steps - confirmation of the deletion and then the deletion step that actually deletes the user. Developers assume the user follows the intended sequence and therefore implement all the access control rules at the first step (you have to be authenticated and an admin to be able to perform confirmation). Since you can’t get to the actually deletion stage, no access control rules are implemented at the delete stage. However, you can request whatever you want using a proxy and if there are no access control rules on the second step, it becomes vulnerable.

These are the main three types, but to provide more context, here are some more examples:
Bypassing access control checks by modifying parameters in the URL or HTML page
Accessing the API with missing access controls on the POST, PUT and DELETE methods - implement access control on one method but forget to implement on another method
Manipulating metadata, such as replaying or tampering with JSON Web Tokens (JWTs) or a cookie
Exploiting CORS misconfiguration that allow API access from unauthorized/untrusted origins
Force browsing to authenticated pages as an unauthenticated user - try to enumerate and access resources not directly referenced in the application
You should now have an idea of access control and the vulnerabilities that can occur. But one question you might have is how do they occur? What makes them vulnerable? Well, usually, it is just a matter of forgetting to put an access control check in a function. An example of a vulnerable function can be found below:

First, there is a function called “deleteOrder” that takes a parameter called “id” coming from the client side. If the id is empty or null, it says the order is not found. If the order is not null, it gets the user that made the order and on line 8, it deletes that order. Line 9 logs the order was deleted.
The issue is on line 8 - it does not verify the order belongs to the currently logged-in user before deletion. Any authenticated user to the system is able to delete arbitrary orders including orders from other users.
How do you fix it? Check that the user ID belongs to the current logged in user. If it does, they are able to delete it. Otherwise, there should be a request denied response and it should be logged since it is an attack. Missing a simple check can be detrimental to your organization!
Access Control Security Methods
Previously, we discussed different types of access control, but what about the security methods? Well, first we have to define what an access control security model actually is.
It is a formally defined definition of a set of access control rules that is independent of technology or implementation platform. Access control security models are implemented within OS’s, network, database management systems and back office, app and web server software.
Various access control security models have been devised over the years to match access control policies to business or organisational rules and changes in technology.
The first of these is Programmatic Access Control. With this, a matrix of user privileges is stored in a database or similiar and access controls are applied programmatically with reference to this matrix. This approach to access control can include roles or groups or individual users, collections or workflows of processes and can be highly granular.
The next one is Discretionary Access Control (DAC). With this, access to resources or functions is constrained based upon users or named groups of users. Owners of resources or functions have the ability to assign or delegate access permissions to users. This model is highly granular with access rights defined to an individual resource or function and user. Consequently, the model can become very complex to design and manage.
Next is Mandatory Access Control (MAC). This is a centrally controlled system of access control in which access to some object by a subject is constrained. Significantly, unlike DAC, the users and owners of resources have no capability to delegate or modify access rights for their resources. This model is often associated with military clearance based systems.
Finally, we have Role-Based Access Control (RBAC). With RBAC, named roles are defined to which access privileges are assigned. Users are then assigned to single or multiple roles. RBAC provides enhanced management over other models and if properly designed, sufficient granularity to provide manageable access control in complex apps.
For example, the purchase clerk might be defined as a role with access permissions for a subset of purchase ledger functionality and resources. As employees leave or join an organisation then access control management is simplified to defining or revoking membership of the purchases clerk role.
RBAC is most effective when there are sufficient roles to properly invoke access controls but not so many as to make the model excessively complex.
Insecure Direct Object References (IDOR)
IDORs are a type of access control vulnerability that arise when an application uses user-supplied input to access objects directly. However, it is just one example of many access control implementation mistakes that can lead to access controls being circumvented.
IDOR vulnerabilities are most commonly associated with horizontal privilege escalation, but they can also arise in relation to vertical privilege escalation.
There are many examples of access control vulnerabilities where user-controlled parameter values are used to access resources or functions directly.
For example, consider a website that uses the following URL to access the customers account page, by retrieving information from the backend database:
https://insecure-website.com/customer-account?customer-number=12345
Here, the customer number is used directly as a record index in queries that are performed on the backend database. If no other controls are in place, an attacker can simply modify the customer number value, bypassing access controls to view the records of other customers.
An attacker might be able to perform horizontal and vertical privilege escalation by altering the user to one with additional privileges while bypassing access controls. Other possibilities include exploiting password leakage or modifying parameters once the attacker has landed in the user’s account page, for example.
IDOR vulnerabilities often arise when sensitive resources are located in static files on the server-side filesystem. For example, a website might save chat message transcripts to disk using an incrementing filename, and allow users to retrieve these by visiting a URL like the following:
https://insecure-website.com/statc/12345.txt
In this scenario, an attacker can modify the filename to retrieve a transcript created by another user and potentially obtain user credentials and other sensitive data.
Impact of Access Control Vulnerabilities
It’s a good idea to measure impact as part of the CIA Triad - Confidentiality, Integrity, and Availability.
In terms of Confidentiality with regards to access control, it is usually impacted because most access control vulnerabilities allow you to access other user’s data. If the access control vulnerability allows you to perform actions on behalf of other user’s, it would also impact Integrity. Finally, for Availability, if the vulnerability allows you to delete resources, then this also gets impacted.
Sometimes, when you gain access to an administrative account that has the ability to upload files, you can chain two vulnerabilities together. For example, a vertical privilege escalation vulnerability with a file upload vulnerability to gain RCE on the host OS.
Broken Access Control Vulnerabilities are rated as the most critical security risk facing web apps today. This means they are the most likely type to be found in applications and could have the most impact. If an attacker was to exploit it, it would lead to devastating consequences.

How to Find Access Control Vulnerabilities
How do you test if an application is vulnerable? Depending on the type of test, there are different methods. The two types are:
Black-box testing - tester is given little to no information about the system apart from the URL and scope of the engagement
White-box testing - tester is given complete access to the system including source code
There is a third category called grey-box, which is a combination of both - given limited information and access to the system. For example, the tester is also given accounts.
Black-Box Testing
With regards to black-box testing, the first thing to do is always map the application - visit the URL, walk through all links/pages accessible within the user context and make note of all the input vectors that could be used to make access control decisions in the back end (url parameters, hidden parameters, cookies, etc..).
While doing this, Burp should be listening and intercepting all the requests.
IMPORTANT: This is the MOST important step when it comes to testing an application.
Additionally, you want to do this for each privilege level. When preparing the rules of engagement (for grey/white), make sure to request two accounts at each privilege level. You want to request accounts of different privilege levels to test for things like vertical privilege escalation, but also want two accounts of each level to test for horizontal privilege escalation. Requesting these accounts helps speed up the pentest because without them, it becomes a matter of guesswork.
Once you understand how access control is implemented for each privilege level and the potential client side parameters that are used to make access control decisions in the back end, then it is a simply a matter of manipulating these parameters to confirm if they are vulnerable or not.
This can be extremely tedious as you want to do this for all the pages and all the parameters for each privilege level.
Instead of doing it manually, it’s a good idea to utilize some automation in the form of Burp Extensions such as Autorize to automate a portion of it.
White-Box Testing
The first thing to do is review the code to identify how access control is implemented in the application. If an app is doing access control properly, it usually will have a central application component that all requests go through that checks access control rules and that the application denies by default access to resources unless explicit rules are put in place to give a user access - proper way of doing it.
Things to look for are:
Violations of the principle of least privilege - look for situations where the system defaults to open instead of to close. You are looking for a system that does not deny access by default.
Missing or weak access control checks on functions/resources.
Missing access control rules on certain methods at the API level - might be access control rules on the HTTP GET method, but not on POST, PUT or DELETE methods
Look for instances where the app relies solely on client-side input to perform access control rules - not validating client-side input on the server-side. Anything coming from the client-side should be untrusted and considered dangerous and NEVER used to perform access control decisions.
If you see any potential issues, you want to validate them on a running application to verify that it is really vulnerable.
How to Exploit Access Control Vulnerabilities
Usually, this depends on the type of vulnerability you encounter. It is usually just a matter of manipulating the vulnerable parameter/field. Below are the Apprentice level labs for Access Control provided by PortSwigger that discusses many common access control vulnerabilities and how to exploit them.
Automated Exploitation Tools
Web App Vulnerability Scanners (WAVS) are automated tools that crawl the web app and look for vulnerabilities. Most scanners will likely miss access control vulnerabilities since each app has its own unique way of performing access control and requires human intervention.

However, some of them like Burp Suite, can be configured to do that. It’s usually a good idea to not use a scanner for Access Control vulnerabilities, but instead utilize the Autorize plugin in Burp Suite as an example to help with the process.
Autorize works by putting the session token of the low privileged users in the box on the right and then login as the high privilege user (admin) and browse through all the pages manually while all the requests get intercepted in the extension.

Autorize makes the request that we made in our browser but also makes two additional requests. The first is from an unauthenticated perspective - strips out the cookie and tries to make the request from an unauthenticated perspective to see if an access control rule is missing that does not require authentication in order to view the page.
The second request changes the currently logged in user session cookies with the low privileged user session cookies. This tests for if you can perform privileged functionality. The request should only be able to be performed from an administrator perspective and if you are able to perform from a low privileged user perspective, then it is a vulnerability.
It does this in many different ways, but the main one is the length of the request. If the length is different, the control rule could potentially be enforced. However, if the length is the same, the access control rule is bypassed (potentially).
How to Prevent Access Control Vulnerabilities
The most important thing is to use a security-centric design where access is verified first and ensure all requests go through an access control check. One of the positive patterns in the way access control is implemented is to build a centralized access control engine that all requests are forced to go through.
For example, Java has authorization filters that can be configured in the web.xml file that only allow certain directories and locations to be accessible by users of a specific privilege level.
The next positive pattern is a deny by default design. This automatically denies access to a request when a policy for it has not yet been set/configured. You can configure Java filters so that all requests go through your access control enforcement layer. If a new feature/functionality is added, that layer should automatically deny access to everyone unless specific access control rules are implemented to that feature.
You always want to apply the principal of least privilege throughout the entire application. Only give users access to the resources/privileges that they need in the application - not just at the code level, but at the configuration level as well. No web server should be running as root!
Additionally, consider using attribute or feature-based access control checks instead of role-based access control. It is dependent on the type of application you have. The benefit of using attribute or feature based access control is that it grants access not based on the user role, but based on the attributes of each system component. This type may be more useful if you have multi-tenant applications that allow specialized groups of users to have specialized features - this way, access control may need to be more granular and would be difficult to implement using RBAC.
Finally, access control checks should always be performed on the server side. Anything coming from the client side should be considered dangerous and untrusted and NOT be used to perform access control checks unless it is validated by the server side.

Lab 1 - Unprotected admin functionality
Now time for the fun bit. As discussed above, the first thing to do during a black-box test is to map out the application. Navigating to the home page reveals a basic looking shop:

From the home page, click around, view the products, click the My Account tab, try and log in or sign up, log back out, do everything you can. Once you think you are done, you can navigate back to Burp Suite that was running in the background and see the built out site map:

Immediately, nothing stands out or screams vulnerable. From here, it’s always a good idea to look at the source code and see if any JS files are loaded or any comments that may give us an idea of how it works in more detail:

Unfortunately, once again, nothing useful. Another area to try and find hidden directories or files is the robots.txt file:

As you can see above, the robots.txt file includes a disallow entry for a directory titled “/administrator-panel” which seems highly interesting. It seems as though it should only be available to administrative users, but we can try and navigate to it:

It works without any sort of authentication needed. From here, we can simply delete the carlos user and complete the lab.


Lab 2 - Unprotected admin functionality with unpredictable URL
Once again, we can navigate to the home page and see a simple looking shop:

As always, we click around and get an idea of how the website works - login, register, log out, check the products, source code, etc.. After clicking around, we can see the full sitemap in Burp:

Immediately, one thing should stand out - the admin-cki00b page which was not seen in the browser or clickable anywhere in the web page:

It seems to be an important page as indicated by the “admin” string in the page title. Maybe it is some sort of admin panel? What happens if we navigate to it?

Once again, we see the admin panel and the ability to delete the Carlos user. From here, you could delete the user and complete the lab immediately. But where did Burp find this URL? How did it find this page? We can try checking a robots.txt file as done in Lab 1, but no luck:

What about the source code of the page - maybe there is a developer comment?

There is no comments in the source code, but there does seem to be some sort of client-side code getting executed when the page loads as highlighted in red.
Now, you can immediately see an “href” link pointing to “/admin-cki00b” and you may immediately try navigating to it. But it’s more important to understand what this code is actually doing. Below is a description of what this full JavaScript code actually does:
This code defines a variable isAdmin and initializes it with the boolean value false. The next line contains an if statement that checks whether the value of isAdmin is truthy. Since isAdmin is currently set to false, the code inside the if block will not execute.
If isAdmin was truthy, the code inside the if block would execute. This code starts by selecting an HTML element with the class name "top-links" using the document.getElementsByClassName method, and accessing its first item at index 0.
Then, the code creates a new HTML anchor element using document.createElement and assigns it to the adminPanelTag variable. The anchor element is given an href attribute with the value "/admin-cki00b" and inner text of "Admin panel" using setAttribute and innerText, respectively.
Next, the appendChild method is used to add the adminPanelTag to the topLinksTag element as a child element. After that, a new HTML paragraph element is created using document.createElement and assigned to the pTag variable. The innerText of this element is set to a vertical bar character '|' using the innerText property. Finally, the pTag element is added as a child element of the topLinksTag element using appendChild.
In summary, if isAdmin is true, this code will add an "Admin panel" link and a vertical bar to an HTML element with the class name "top-links". If isAdmin is false, the code will not do anything.
If we navigate to it again and delete the Carlos user, we successfully complete the lab.


Lab 3 - User role controlled by request parameter
As always, we do the same methodology. First, we navigate to the home page and see a simple shop as always:

Then, we click around and observe its natural functionality as if we were an end user and populate a site map in Burp Suite:

With regards to access control and web app in general, some of the most important requests are POST requests that are made to the server. Checking the HTTP History, we see that there are 3 main POST requests we made to the application:

Checking the initial login request, we can see that we simply sent our username and password, but nothing that really identifies our access to certain resources like a role ID:

However, all is not lost. Remember that it is 2-way communication. One of the things most people miss is checking the HTTP responses and just assume that the only way forward is through the HTTP requests. Knowing this, we can send the POST /login request once again and observe the HTTP response in Burp Suite:

In the Response, we see an interesting parameter sent back to us - Set-Cookie - and this parameter includes another one called “Admin” that, for our user wiener, is set to False. What happens if we somehow manipulate this and set it to True? Will we get administrative privileges?
Burp Suite does not intercept server responses by default, but checking the box under “Intercept Server Responses” will allow us to intercept all HTTP responses.

Once checked, we can send the POST request to /login once more with nothing modified as of yet:

Finally, after forwarding many requests, we can stop on the HTTP Response and see the Set-Cookie parameter as before:

Now that we have intercepted the response, we can modify it before it is sent forward back to us. We can try modifying the “Admin” value to true.

After modified, we can forward it and check the browser itself to see if any changes were made. Navigating to the browser after all requests have been forwarded, we see a new clickable link on the website titled “Admin panel”, indicating that we modified it successfully and have given ourselves administrative privileges:

Finally, from there, we can click into the Admin panel and delete the Carlos user once more to complete this lab:


Lab 4 - User role can be modified in user profile
Navigating to the home page, we once again see the familiar shop home page:

Again, navigating around and clicking on various links and testing the normal functionality, we generate the site map in Burp Suite:

Once again, nothing stands out but we can try and access the /admin panel found by Burp Suite:

We get an error stating that the panel is only available if logged in as administrator so no luck there. It is likely that some kind of access control mechanism is in place to check if we have administrative privileges. Sometimes, these privileges can be sent in a POST request during login sequences so we can check any POST requests we sent:

Delving further into the POST /login request, we can see that it simply sends the username and password again with nothing indicating we can modify our access. Looking at the response as in the previous lab also doesn’t identify any sort of parameter we can change to True:

However, there is one crucial detail we missed. When navigating around, on the my-account page is an option to update our email. During mapping, I did not play with this feature:

If we try and update the email by sending a random email and intercepting its Request/Response in Burp Suite, we can see that the server responds with some JSON information, likely relating to our user:

Crucially, we see a “roleid” parameter that is set to 1. This screams vulnerable and it is likely that this is the thing controlling our access to the admin panel. To play around with these, we can intercept the request and modify the email to something like “hacker2@hacker.com”:

However, before sending it on, we can also try adding the JSON “roleid” parameter in our request and changing its value from 1 to 2 to test if it works:

However, sending it one, we get a JSON “Not Found” error in the browser - doesn’t seem right and we likely did something wrong.
NOTE: After coming back and reviewing this lab again, I forgot to add the “,” character after the email for valid JSON syntax. If you simply add the comma to make it valid syntax, it would work.

If we take a look back at the initial response received from the POST /login request, we can see there is more values than just the email and ID - there is also the username and apikey variables. Maybe the server requires that all of these parameters are set before letting us continue?

With this theory, we can test it by once again intercepting a request to change email and, instead of just adding the roleid parameter, we can try copy and pasting the entire JSON body across, changing the roleid from 1 to 2 once again:

After sending this across and stopping the Intercept, we can investigate the browser once again:

This time, we see that we have an extra link in the top right for the “Admin panel”. To finish this lab, we can simply go into the admin panel and delete the Carlos user, which will pop the congratulatory message up for us:


Lab 5 - User ID controlled by request parameter
Navigating to the home page, we see the same shop as always:

What’s the next step? That’s right, map out the application. As always, click around, and get used to how the website functions as a normal end user. After this, we can see the generate site map produced by Burp Suite:

As before, nothing stands out. However, we can look at the POST requests again and their responses to see if any parameters stand out:

Nothing does. However, remember from the last lab that the change-email function was vulnerable. What happens if we try and change the email this time and view the Request/Response in Burp Suite:

Unfortunately, this time, nothing appears vulnerable on the surface. However, remembering back to the theory discussed above, you always want to view the application as both an authenticated and unauthenticated user. Once we login, we are automatically redirected to the my-account page as standard with no additional parameters.
But, when we click the “My Account” link once we are already authenticated, the URL appends an additional parameter to the URL request - ?id=wiener - and this looks interesting:

If we grab this request and send it Repeater and view its Response, we see nothing out of the ordinary. It simply grabs the my-account page for the user specified in the ID - in this case wiener.

However, that is the problem. It is taking input from the client-side. Most importantly, it is grabbing the ID of the user from the client side in simple to understand format (i.e. it’s not a random string but just the username). Can we modify this and potentially have horizontal privilege escalation? We can try and change the value to carlos:

Nothing appears to change - on the surface. If we delve into the response further, it is a 200 OK response which indicates no errors occurred. Diving deeper into the response and scrolling down, we can actually see that it states our username is carlos:

It seems to have worked. Now, if we grab Carlos’s API key and submit it as the solution, we can complete this lab successfully:


Lab 6 - User ID controlled by request parameter with unpredictable user IDs
Navigating to the home page, we see what appears to be a simple blog with some blog posts that we can click into and view:

Once again, mapping the application and generating the site map in Burp Suite shows us the following:

Before, we saw a request to my-account with the id parameter and the value of the username in cleartext. However, here, we see the following request:

In this scenario, the ID is scrambled and is likely some sort of GUID, preventing us from simply guessing the GUIDs of every user on the application. As we look through Burp Suite’s results, we can see that under “blogs”, there are 3 userId parameters that stand out:

We know that the one starting “9c4” is ours as we see the GET request for my-account was using it. But what are the other two? For now we don’t know, but we can perform enumeration and find out. As Burp Suite found these GUIDs under the blogs section, we can try looking through the blogs for anything out of the ordinary or of interest to us.
On each blog post, there appears to be the author. Hovering over this author’s name reveals some sort of link that we can click on:

If we look at the source code for this link, we can see that is an <a> HTML tag points to the blogs page and filtering by that specific GUID string we saw earlier. With this in mind, we can likely conclude that the GUID here represents the wiener user (we can confirm as we signed in as wiener and saw the same GUID starting with “9c4”:

From here, we know Burp found 2 other GUIDs. Searching through the various blog posts across the site, we eventually stumble across a post made by the “carlos” user:

Since we know that the GUID is revealed in this <a> HTML tag, we can view the source code of it and reveal the GUID for the carlos user:

Going back to Burp, when we request the my-account page, we can pass the id parameter to it, specifying the GUID of the user we want to get the account page. We can try and change this id value to the GUID we just found for the carlos user:

Sending this request on and viewing the response, we don’t get an error. Further down the response, we see the sentence stating that we are the carlos user and we are given his API key:

As a proof of concept, we can also view this in the browser and see that we are indeed the carlos user and have imitated him without needing any sort of credentials:

From here, we can simply grab the API key and submit it as the solution to solve the lab:


Lab 7 - User ID controlled by request parameter with data leakage in redirect
Navigating to the home page, we see the all familiar shop page:

It should be muscle memory now - once again, we map the application and generate a Site Map in Burp Suite for us to look through:

This time, in the site map, we can see that the my-account page allows a parameter to be added called “id” that looks like it simply accepts the username of the account:

From the previous labs, we can try changing this value to another user - for example carlos - and observe what happens:

Before, we used to see a 200 OK response from the server. However, in this instance, we see that we get a 302 Found. In Burp Suite, we have the option to follow this redirection - it is located directly above the request in the Repeater tab:

If we follow this redirection, we see we make another request. However, this time, we simply make a GET request to the /login page, likely indicating that we need to login once again:

It seems some sort of access control is blocking us from accessing another account and we simply get redirected back the login page - likely because we have not authenticated as the carlos user. However, you might have noticed something weird.
Before we hit the button to follow the redirection, we saw what looked like a full HTTP page in the response. Analyzing this response, we can see what page was actually returned to us. On the surface, it looked like the initial my-account page for our current user (wiener), however scrolling down further, we can see it states that our name is “carlos”:

This indicates that although we get redirect back the login page, before it performs the redirection it does indeed provide us with the my-account page for the user we specify in the id parameter. Using this, we can grab the API key and submit it as the solution to complete this lab:


Lab 8 - User ID controlled by request parameter with password disclosure
After spawning the lab, we see the shop once again:

After navigating around, viewing the products, logging in, logging out, changing the email, etc… we are greeted with the following site map in Burp Suite:

In previous labs, there was an option to change the email address for the accounts. This is true in this scenario as well, but in addition, we also have a form allowing us to change the user’s password:

Since we are provided with the credentials, we know the password is peter. A simple thing to check is if the dots that censor the password are the same length. In this case, there are 5 dots, which matches the length of the password (peter). This could be a coincidence or it could help us enumerate potential passwords later down the line if we know the length.
Moving on, we can check the source code for this password field as it might simply hide the password using the “type=password” HTML parameter and include the password in cleartext:
And it does! We now have a way to grab cleartext passwords from an account. Now, we need to find a way to get into another account without knowing the password. From the previous labs, we saw that the URL with the “id” parameter has been extremely vulnerable - this scenario is no different. If we take a look at the my-account request, we see the same id parameter:

As before, what happens if we change this id to carlos?

We get a 200 OK response which indicates something good (at least for us). Scrolling through the source code, we once again see that we have horizontally moved to the carlos user and can see all his information. However, most importantly, since we know that the change password is vulnerable and shows the cleartext passwords in the source code, we can look for the value and grab carlos’s password:

Just as some proof, we can also do this in the browser, and we can see that the number of dots matches with the number of characters with his password:

Knowing that this works horizontally, what happens if we try and perform a vertical privilege escalation vulnerability by specifying the administrator user? Does it still work or are there additional access control methods in place?

After modifying the request by changing the id parameter to administrator, we can forward the request and hope for the best. Scrolling through the response, it worked, and we can see the my-account page for the administrator user, allowing us to then grab their password in cleartext from the source code:

With this cleartext password, we can simply now login (legitimately):

Once logged in, we do the usual and mess with Carlos by deleting his account and completing the lab:


Lab 9 - Insecure Direct Object References
We're on the final lab and we can see the familiar shop:

One more time and we’re done. Let’s map the application and gather information on how it performs when used normally by an end user:

Interestingly, with this scenario, there is a different page that stands out - chat. This immediately interests us and navigating to the page reveals a live chat:

The bot is a bit aggressive but no matter - we can try and exploit it anyways. The most interesting part of this page is the option to download the transcript. If we click on this button, we can see a popup appear asking us to save the file called “2.txt”:

What’s interesting about this is it is not a detailed filename or random filename at all. With a number as low as this, it’s likely possible that this is vulnerable to an IDOR attack. With this theory in mind, we can try and intercept this request to download the transcript:

As you can see above, it products a GET request to the /download-transcript page with the filename 2.txt as we enumerated already. As discussed above, with what seems to be a sequential file naming scheme, what happens if we increment this number by 1 up to 3 and send it on?
We get an error stating “No transcript”. Whilst this is an error, it’s not a bad error like 500 but instead likely indicates that there is no file called 3.txt - likely because there is not a 3rd user that has interacted with the live chat service yet. However, what happens if we decrement and go down to 1.txt?

We can a 200 OK response. Even better, in the response, we can see the filename that we would download. Reading through the transcript, it seems like a user is asking for the live chat service to check if their password is correct. Mistakenly, the user provides their password in cleartext and the bot confirms that their password is correct.
Before we try and login with this password, it’s important to understand something first. Typically, in web apps or anywhere, the user ID of 0 or 1 refers to the administrator or some sort of administrative level account. Knowing this, we can roughly guess that our user (wiener) had an ID of 2 from the filename of 2.txt.
Moving forwards, it’s likely that the ID of 1 is for another user and ID of 0 is the admin. To test this, we can try submitting the carlos user with the password we gathered from the live chat transcript and try to login:

It works and we successfully log in as carlos. For this lab, no extra steps are necessary and immediately upon logging in as carlos, we get the popup message indicating that we completed the lab:


Lab 10 - URL-Based Access Control
Navigating to the home page, we see the all too familiar shop:

As always with the black box test, we simply map out the application, browsing around, making sign in requests, you know the deal. Once done, we can take a deeper look at the site map in Burp Suite:

However, there is one thing on the web page that is not present in Burp’s generated site map and that is the /admin panel. Looking at the top right of the application, we can see a link to an admin panel:

With this link, we can try and navigate to it in hopes we can just get access:

However, we are met with an Access denied image. This likely means that we are dealing with some sort of access control in place to stop any user from accessing administrative functionality. To delve further, we can access it in Burp Suite and see what a normal request/response looks like:

To test for this URL based access control circumvention vulnerability, we can try to add a non-standard HTTP header such as X-Original-URL and tell it to visit a made up directory name for testing purposes. In this case, I choose (/randomdirectory123):

This tells the request to overwrite the URL at the very top next to the GET request (i.e. replaces / with /randomdirectory123) and tries to access whatever the value is. In this case, it is trying to access the directory randomdirectory123.
We know for certain that this directory does not exist, so we should be on the lookout for an error like 404 Not Found. What happens when we send this request?

Bingo! We get a Not Found error. If we see something like a 404 Not Found error, it indicates that the application supports this non standard header as it has overwritten the original request for the root (/) and instead tried to access the randomdirectory123 directory.
If validation is done on the front end and the app allows you to use a non-standard header to overwrite the directory you want to visit, then you might be able to bypass the access control and access the admin panel.
From here, we know there is an admin panel since we clicked on it before. We can replace the X-Original-URL value with /admin this time:

With this set, we can try and send this request and observe the response to see if anything changes:

Luckily for us, we get a 200 OK response, indicating that it likely worked. Scrolling through the source code, you can see it is the full admin panel, with the functionality to delete the carlos user. To make this easier, we can right click on the Response and tell Burp Suite to “Show response in browser”:

Opening the unique link Burp Suite gives us reveals the admin panel with the functionality to delete the two users - Carlos and Wiener:

We should just be able to click on the Delete link for Carlos and complete the lab right? Let’s try it:

Unfortunately not, we get the same Access denied error. But why? Well, when we make this request to delete the user, it goes to the URL /admin/delete?username=carlos. However, in order to get to the /admin panel, we inserted an additional HTTP header - one that is not added by default - so any subsequent requests that we make that are through the admin panel are not going to work unless we add that same Header again.
From here, we know that the link to delete Carlos is the one mentioned above. Let’s try and simply add that whole URL to the X-Original-URL header whilst specifying the root in the original GET request as below:

If we send this forward, we get a response telling us that we are missing a parameter called username:

Hm…. strange because we definitely did include it, so why is it not working? It’s because the header X-Original-URL does not accept URL parameters and therefore is essentially just sending “/admin/delete” which requires a parameter titled username.
To fix this, we can simply modify this request a little bit. First, we can append the username parameter to the original request on line 1 so the request becomes /?username=carlos. Then, we can modify the X-Original-URL value to just be /admin/delete and remove any trace of parameters from the header.

What does this create? Well, now the request is for the root directory with the username parameter added on. However, because we added the X-Original-URL header, that root directory (/) essentially gets swapped out for the value we specify (/admin/delete), so the full URL actually sent to the web server becomes the URL we need to delete the user:
/admin/delete?username=carlos
Let’s try sending this modified request forward:

Interestingly, we now get a different HTTP response - this time being a 302 Found response indicating that it worked. If we follow the redirection, we get the same access denied error:

Why? As discussed above, if we look at the request, it wants to go back to the /admin panel. However, the request is missing the X-Original-URL header that we used to bypass the access control, therefore we get the same access denied error.
But, if we navigate back to the home page of the site, we see the congratulatory banner, indicating that our exploit worked and the Carlos user was successfully deleted:

You could perform an additional confirmation of the deletion by following the same steps to gain access to the /admin panel again and confirm that there is no longer a Carlos user. Try this on your own.

Lab 11 - Method-Based Access Control
After we spawn the lab, we navigate to the web page and find the standard looking shop as always:

Then, as with any black-box test as discussed above, we map out the application - clicking around, logging in, logging out, etc… you should know by now. After clicking and doing everything we can see on the surface, Burp Suite generates a nice view for us:

What’s different about this lab is that we are actually provided administrator credentials to get an idea of how the web app functions - think of this test like a grey-box test, where we are given user account credentials.
If we log in as the administrator user, we get redirected to the my-account page and we see the following as the administrator user:

Let’s assume that the update email function has been tested and we are only focused on testing access control vulnerabilities. In that case, we should check out the admin panel. Navigating to it reveals what appears to be some sort of drop down menu with the ability to upgrade or downgrade the users privilege level.

If we select the user carlos (we don’t want to select the wiener user as that is another account that was given to us we should keep in our back pocket) and hit the “Upgrade user” button, we can see below that the word in brackets changes from NORMAL to ADMIN, likely indicating we just made Carlos an administrative user:

With this functionality now mapped and intercepted by Burp, we can try and see what the other account we were given has access to. The credentials for this account are wiener:peter.

As you can see above, we see a similiar looking my account page, but on the top right, we have no link to the Admin panel, which should be the case as we are not an administrative user and just a normal end user.
Now, if we go back and look at the site map in Burp Suite, we should see more populated results and some more pages that did not appear on the surface but did appear after we went back through after authenticating ourselves.

We saw earlier that we could modify the privilege level of accounts when authenticated as the administrator user. We can find that request in Burp Suite - it was a POST request made to the /admin-roles URL as we can see below:

Of note in this request is the POST request itself, but more importantly, the last line. This last line specifies the parameters. In this case, there is both a username and action parameter - the user is carlos and the action is to upgrade.
Finally, we also see a session cookie that has been set that allows the admin to navigate the site without having to login every page as highlighted below:

Remember, we also authenticated as the user “wiener”. Do they also have a session cookie? We can check by finding the request made to the my-account page under the id of wiener:

As you saw above, any user that logs in gets given a cookie. This is standard for web sites nowadays. Now, if we have the request to upgrade a user of web page captured already and it contains the session cookie of the administrator, what happens if we change that session cookie to a normal privileged user like wiener?
First, we can send the POST /admin-roles request through to Repeater:

Once there, we can grab the cookie found from the my-account request for wiener’s account and replace the session value with it. Now, our cookie starts with JC instead of BH as we changed it:

Now that we’ve changed the session cookie but kept the same administrative level request to upgrade a user, we can try sending it to see if access controls have been implemented properly:

As you can see above, once we send it, the server sends us back a 401 Unauthorized response, indicating that there is likely some sort of access control blocking a normal user from upgrading accounts to administrative level - as there should be.
However, it’s important to note and test that these access controls are in place across all HTTP methods and not just implemented in the one mainly used for that specific request. However, instead of changing this manually and potentially making an error since we are only human, we can get Burp to do it for us.
In Burp Suite, if we right click the modified request (cookie starts with JC), we should see an option available for changing the request method:

Once we click that, Burp Suite will automatically change this POST request to a GET request with all the same functionality. It has simply replaced POST with GET and provided the /admin-roles page with the username and action parameters previously found in the body of the request:

If we send this request, do we still get a 401 Unauthorized error? Let’s find out:

We don’t, but instead we get a 302 Found - this is a really good indicator of our exploit working. What happens if we follow the redirection?

We get taken to the admin page, with a 401 Unauthorized error again. What likely happened is that our request went through to upgrade the Carlos user, but because we used a session cookie for the wiener user, there was likely some additional access control mechanisms stopping us from altering another user.
We can test this theory by trying to change our own users permissions with our own cookie. To do this, we simply change the username parameter value to our username - wiener:

After we have modified it, we can send it over:

Once again, we see the 302 Found message indicating something good happened. If we follow the redirection this time, what happens?

This time, we get redirected to the admin page, but with a 200 OK response which is a very good sign. To see if it worked, we should be able to see the drop down menu in the source code of the admin panel and see if our user has become an admin. Scrolling down we see the following:

This confirms that our attack worked and our user - wiener - has now been given administrative privileges. To test this worked, we can go back to the website and refresh our account page:

Now, we see the banner saying we solved the lab, but more importantly, we see we are logged in as wiener and on the top right, we have a navigation bar link for the admin panel

Lab 12 - Multi-step Process with no access control
Once we load the lab, we can navigate to the home page and see a simple looking shop (the same one as always):

As with the previous lab (lab 11), we can map the application - do this on your own and generate a site map in Burp Suite. However, once again, we have administrator credentials to see all the application’s functionality. As before, once we are logged in as administrator, we can navigate to the admin panel and see the following:

This appears to be the same form as lab 11 that allows us to upgrade a users privilege level from normal to admin. However, if we hit “Upgrade user” on the Carlos account this time, we get a second step in this process asking us if we are sure we want to upgrade them to an Admin:

This is called a multi-step process since there are multiple steps to perform to upgrade a user. After doing this, we can try and login as the normal wiener user and also poke around:

With mapping done, we can look at the first request that was sent to upgrade Carlos to an admin. It was a POST request sent to /admin-roles with the parameters username set to carlos and action set to upgrade as can be seen below:

The second step in the process is to the same path (/admin-roles) with a POST request, but with this request, we add another parameter called “confirmed” allowing us to check we really want to upgrade that user:

As in the previous lab, these two requests above contain a session cookie for the administrator user. If we want to test for this vulnerability, we can grab a request made by the authentication wiener user and grab their session cookie:

Once we have wiener’s cookie, we can replace the session value in the POST /admin-roles first process request and see what happens:

We get an expected 401 Unauthorized error. This means that proper access control rules are put on this specific step. However, we always want to make sure they are implemented in each step of the process. To test this, we can simply modify the cookie of the second request that confirms the upgrade:

As you can see above, this time we get a 302 Found message. What happens if we follow redirection?

Now, we get a 401 Unauthorized. This is strange. It may be because we are trying to upgrade a user that is not us (i.e. we have wiener’s cookie, but trying to upgrade carlos). To test this theory, we can try and upgrade ourselves by changing the username parameter to wiener.
In order to make sure the first step is not vulnerable, we can try changing the username to wiener in the first request:

Sending this again, we get the same 401 Unauthorized request as expected - proper access controls are implemented on this first step:

However, what happens if we grab that second step in the process and modify the user to wiener. To do this, we first simply modify the request:

Then we send it and watch what happens:

As before, we can see that we get a 302 Found response. However, this time, if we follow the redirection, we can see we get taken to the /admin page with a 200 OK response - this is a really good indicator that it worked.

If we now go back to the website, the banner appears telling us we completed the lab meaning we successfully gave the wiener user administrative level privileges.

Lab 13 - Referer-Based Access Control
Once we load the lab, we can navigate to the home page and see a shopping site:

I’ll leave it up to you to map the application as you should be comfortable by now. However, once again, make sure to map the web app when signed is as the administrator user and the wiener user to get more coverage. When looking in as the administrator, you will see the following:

Checking out the admin panel, we see the same form that allows us to upgrade a users privilege from NORMAL to ADMIN with the press of a button:

Let’s capture a request to upgrade the Carlos user by simply upgrading him in the web app and capture the request with Burp in the background:

Finally, before looking at the results, we log in as the wiener user and check what functionality they have as well. Looking below, it seems they only have the option to change their email and not modify other users privilege levels (as they should):

Once we are comfortable we have found everything on the surface, we can check the HTTP History tab in Burp Suite and see all the requests we just made:

The one that should stand out for us is the GET request to /admin roles with the parameters “username” and “action” as we could possibly manipulate this request to give wiener admin privileges through broken access control:

As you can see above, a normal request to change a users privilege with the session cookie from the administrator user results in a 302 Found response that likely redirects to the admin page after successful execution.
As we did in previous labs, we can try and modify this cookie to that of a lower privilege user - wiener - and see if the request still works. To grab wiener’s cookie, we can look for the request made to the my-account page with the ID of wiener:

Once we have this lower-level cookie, we can simply grab the same GET admin-roles request for updating carlos and paste the cookie in, replacing the administrator’s:

After modification, let’s send it to the server and see what returns:

As seen above, we get the same 302 Found message - interesting. However, taking a deeper dive and looking at where it redirects us, we are taken back to the /admin panel and get a response 401 Unauthorized. This could be because we are not allowed to change a different user’s level or could be an access control mechanism.

Let’s assume it is the first one for now and try changing the username to our own - i.e. match the session cookie to the username by changing it to wiener. Once forwarded, we can see a 302 Found response again:

This is a good sign, but let’s see where the redirection takes us before getting excited:

This time, we get a 200 OK response as seen above - even better sign. If we check the source code by looking further down, we can see the admin panel, and inside the option tags, we can see an option called “wiener (ADMIN)” indicating that our user now has administrative privilege:

It’s easy to just go “oh that worked, I’ve completed the lab”. While yes, we did complete it, do you know why it worked and what the access control mechanism was? If not, it’s a good idea to stay around a little longer and I’ll explain it.
First, we have to understand what the Referer header is. The Referer HTTP request header contains the absolute or partial address from which a resource has been requested. In the below screenshot, we can see that the GET request to /admin-roles to change privilege levels came from the /admin panel itself.

Why is this important? Well, if we look up at the very top, when we initially signed in as wiener, we had no access to the /admin page. The developers assume (wrongfully) that the /admin page is only accessible to users with the correct privilege.
However, the problem in assuming this is that if we are given an admin account for testing, we can grab deeper pages inside /admin (such as /admin-roles) and bypass having to access the /admin page at all as a lower user.
What’s effectively happening is that the web app is using the Referer header as access control and only allows users to access /admin-roles, if they have already gained access to /admin. The problem, as described above, is that we can simply use the Referer header to say that we came from /admin even if we didn’t and bypass the access control mechanism altogether.
To prove this, let’s take the same /admin-roles request as before and remove the Referer header altogether - this simply tells the web app we didn’t come from anywhere and want to directly access that specified page:

As you can see above, without the Referer header, we simply get a 401 Unauthorized error as we have not authenticated through the /admin panel, therefore the web app denies us access to further admin level functionality embedded under the /admin page.
Finally, to verify we solved the lab, if we go back to the web page and refresh, we can see that the wiener user now has access to the admin panel showing that our access control bypass worked using the Referer header:
