PortSwigger: Expert Level Cross Site Scripting Labs

In this post, I will cover the Expert level Cross Site Scripting labs located at PortSwigger Academy and will continue the series from the practitioner and apprentice level labs in the previous posts.

Lab 1 - Reflected XSS with event handlers and href attributes blocked
Once we start the lab and navigate to the home page, we can see the same search functionality in many labs before:

With the search functionality, we try injecting a left angle bracket and then some random string such as the following:

We see tag not allowed which is expected. Now, to find the tags that are actually allowed, we can use Burp Intruder once again by first sending the GET request we just made and selection the position to be the keyword after the angle bracket:

Then, we can select the payload type as a simple list and paste in all of the tags available from the PortSwigger XSS cheat sheet:

Once done, we can start the attack and let it run:

Now, for this lab, we need to be aware that all events are blocked - things like onclick, onmouseover, onselect - but anchor href attributes are also blocked.
So, the following type of stuff is out of the question for this lab:

After a short while, we get a list of whitelisted tags that bypass the WAF:

Here, we get 5 tags returned to us with a status code of 200:
a
animate
image
svg
title
Using these tags, we need to somehow construct a payload. One thing to note is that SVG tags accepts HTML tags inside them - as we did with previous labs. It is possible to write HTML tags inside SVG tags.
As an example, you could create an svg tag and inside the tag, you could use HTML tags inside such as the anchor tag:
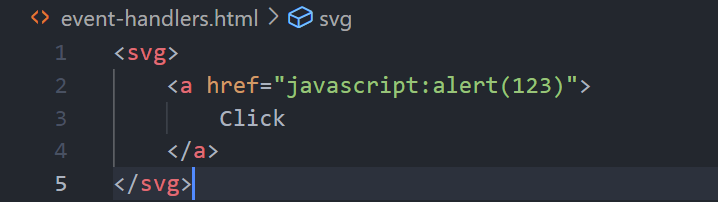
However, we have a problem. The anchor tag with the href attribute is blocked. Somehow we need to separate the href attribute with the anchor tag. To do this, we can use the animate attribute which is also whitelisted.
Let’s take a look at the documentation for animate:

This tells us that it provides a way to animate an attribute of an element over time. Most importantly, we have something known as “attributeName” - this is essentially the name you want to add to the anchor tag that this will sit inside and, for this lab, we want to add the href attribute.
Additionally, the “values” allows us to give the value for that href attribute. With this in mind, we can construct the full payload as follows:

Now, there is a problem - there is nothing to click on! Even if we add some simply text inside the a tags of the SVG tag, SVG tags do not allow plain text. To add text, we have to use something called text tags.
As a test, we can see if text is able to be used in the search functionality by providing the following payload:

Once we send it, let’s view the response:

Amazingly, it is not blocked as we get a 200 OK response. As a side note, I said earlier that normal text inside SVG will not get rendered to the page. To confirm this, we can take a look at the documentation.

Now, whenever you are using the text tag inside SVG tags, you also need to provide X and Y coordinates as per the documentation:

So, with the theory covered, we can modify our payload to include these text tags along with their X and Y coordinates:

As a local PoC, if we open this HTML file on our localhost, we can see a simple Click link:

And, if we click it, does it create an alert box? Well, of course it does:

With this done, we can grab the final payload and paste it into the search functionality:

Once injected, the “Click” text appears on the page above the search box:

Finally, if we click the enticing “Click” link, the alert pops up and we successfully complete the lab:


Lab 2 - Reflected XSS in a JavaScript URL with some characters blocked
So, as we start the lab, we see the same looking blog page:

As with previous labs, if we navigate into one of these blog posts, we can see that there is a comments section with functionality to provide our own comment:

Doesn’t seem too hard right? Well, good luck! I spent a long time trying various payloads, bypass methods, filter evasion techniques and everything covered in the XSS labs so far - nothing worked.
I was lost. I couldn’t solve it - and that’s ok! It’s a learning process and it’s not shameful to look at the solution for a certain lab as the point of these labs is to learn. So, that’s what I did.
Now, the solution is - to be polite - less than satisfactory. It provides the solution but really lacks on why it works:

So, it tells us that the lab will be solved using their payload when we click the Back to Blog button at the bottom of the page. Ok, so let’s go and take a look at that Back to Blog button and analyze the code used to generate it:

Not easy to understand right? As a first step, we can take this code inside the anchor tag and beautify it to make it a little easier to read:

Great! Much easier to read. But what on god’s green earth is it doing? Why is it not just a simple anchor tag back to “/”?
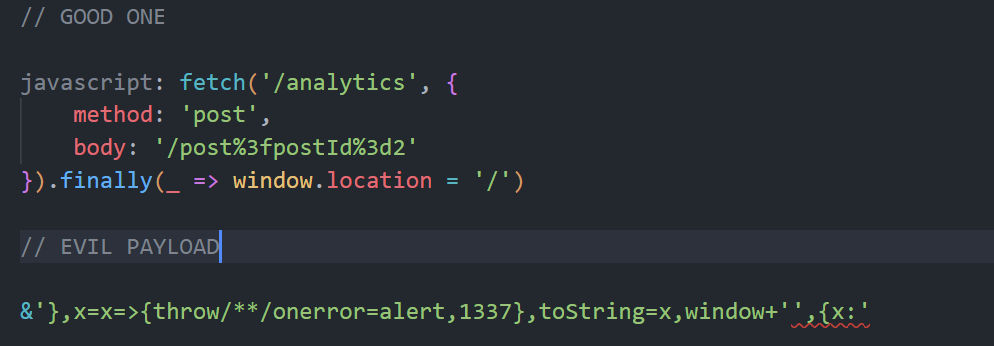
Well, in short, this sends a POST request to the URL “/analytics” with the following options:
The HTTP method used is set to POST
The request body contains the string “/post?postId=2" (I decoded it for easy reading) and it represents the page you are on essentially - the blog post you clicked on
After the POST request is sent, the “.finally()” method is called with an arrow function as its argument. An arrow function is a shorthand way to define a function. The => symbol is the arrow function's "fat arrow" syntax, which separates the function parameters from the function body.
The finally() method is a built-in method on Promises in JavaScript that allows you to specify a callback function to be called when the Promise settles, either with a resolved value or with a rejected value.
Here, the arrow function passed to .finally() sets the “window.location” property to “/”, which redirects the user to the root URL of the website.
I hope that makes more sense now.
Now, with that out of the way, it’s important to note that we can directly inject into the body section by using the browser as we have access to the postID query sent. With this in mind, let’s grab PortSwigger’s payload and paste it into VS Code for analysis:
Now this is where it gets difficult to explain, but I promise it is simpler than it looks. Let’s break it down.
The first part of our payload - &’}, - this will end the options for fetch and prepare us for the start of our injection after the comma.
The second part of our payload - x=x=>{throw/**/onerror=alert,1337}, - is an arrow function. First of all, it creates a variable called “x” and saving it with the input of “x” to the arrow function of whatever is inside the curly brackets. Inside the arrow function, the curly brackets are simply a way to set the bounds of the arrow functions statements.
The statement inside the curly brackets throws an error. Now, spaces are not allowed (they will get transformed into + signs) so instead we can use the start and end of a multiline comment using the /* and */ syntax to force a space without using the space character.
Then, it executes the onerror=alert - it’s important to note this entire thing is done in a way so they do not use the parentheses (which are blocked). We should be familiar with onerror=alert from previous labs. After the alert is called, the 1337 string is simply what will appear in the alert - similiar to alert(1337) for example. As said previously, this is done a way to not use the brackets.
Keeping up? So far, we have a variable x that is saved as the throw error. Now, we need to figure out how we can actually execute “x”. This is where the next line comes into play.
The next part - toString = x - sets the toString function equal to “x” which is equal to that throw on error stuff. This means that if we can execute toString, then the onerror statement will run.
Next, this statement - window + ‘‘, - tries to concatenate window with an empty string. Because it is concatenation, it will try to run the toString function on the window, which when it runs toString, it will execute “x” which will throw the error. Pretty cool right?
The rest of the code - {x:’ - is to simply clean up and make the whole syntactically correct.
If we input that payload after the postId query parameter, and beautify the JavaScript, it should become much easier to read and you should, ideally, be able to understand what it is doing now - may require a few more times to fully understand:

So in summary, the injected payload modifies the original POST request by appending an XSS payload to the body parameter. The payload defines a new function that sets the onerror property to the alert function, which causes any JavaScript errors on the page to trigger a popup alert box. The throw statement in the function deliberately causes an error with the message "1337", which triggers the popup alert box.
Now, with this theory completed, let’s try running this payload by pasting it into the URL:

After submission however, nothing happens. However, if we view the source code for the anchor tag that should take us back to the blog, we can see that our payload was injected successfully:

Now, if we click the Back to Blog button, an alert should appear meaning this insane payload actually worked:

And with that, we complete the lab! I hope this helped you to fully understand why this payload worked and what it was actually doing.