Burp Suite Basics Room

The link for this lab is located here: https://tryhackme.com/room/rpburpsuite
This room is designed for you to learn the basics and major components of Burp Suite, the de facto tool to use when performing web app testing.
Word of Warning!
In this room, I will be skipping the Installation and Certificate Installation parts as they are skippable for my currentlly deployed virtual machine. Feel free to visit TryHackMe if you do not know how to set up Burp Suite before beginning.

Task 4 - Overview
Throughout this room, we'll take a look at all components of Burp Suite. Here's a quick overview of each section:
Proxy - what allows us to funnel traffic throughout Burp Suite for further analysis
Target - how we set the scope of project, create site map of the app
Intruder - used for field fuzzing, credential stuffing and more
Repeater - can repeat requests previously made with/without modification
Sequencer - analyzes randomness present in parts of web app, testing session cookies
Decoder - perform various transforms on pieces of data, decoding/encoding to various bases or URL encoding
Comparer - compare different responses or other pieces of data, similiar to Linux tool diff
Extender - add components such as tool integreations, additional scan definitions and more
Scanner - automated web vulnerability scanner, only in Burp Suite Pro
Questions
Q1: Which tool in Burp Suite can we use to perform a 'diff' on responses and other pieces of data?
A: ComparerQ2: What tool could we use to analyze randomness in different pieces of data such as password reset tokens?
A: SequencerQ3: Which tool can we use to set the scope of our project?
A: TargetQ4: While only available in the premium versions of Burp Suite, which tool can we use to automatically identify different vulnerabilities in the application we are examining?
A: ScannerQ5: Encoding or decoding data can be particularly useful when examining URL parameters or protections on a form, which tool allows us to do just that?
A: DecoderQ6: Which tool allows us to redirect our web traffic into Burp for further examination?
A: ProxyQ7: Simple in concept but powerful in execution, which tool allows us to reissue requests?
A: RepeaterQ8: With four modes, which tool in Burp can we use for a variety of purposes such as field fuzzing?
A: IntruderQ9: Last but certainly not least, which tool allows us to modify Burp Suite via the addition of extensions?Last but certainly not least, which tool allows us to modify Burp Suite via the addition of extensions?
A: Extender
Task 5 - Engage Dark Mode
To turn on Dark Mode inside Burp Suite, first go to the "User Options" tab and then the "Display" sub-tab

Then, click on the "Theme" drop down menu and choose "Dark"


Task 6 - Proxy
Proxy servers by definition allow us to relay traffic through an alternative route to the internet. This is done for a variety of reasons ranging from educational filtering to accessing content that may be region locked or banned. Using a proxy for web app testing allows us to view and modify traffic inline at a granular level.
By default, Burp Suite will be set to "intercept" our traffic which means a couple of things:
Requests will by default require our authorization to be sent
We can modify the requests in-line similiar to a MitM attack and send them on
We can drop requests we don't want to send
We can send requests to other tools like Repeater and Intruder for modification and manipulation to induce vulnerabilities
Questions
Q2: By default, Burp Suite proxy listens on only one interface. What is it?
A: We can check this by going to the Proxy tab and then the sub-interface of options. By default, we can see it is using 127.0.0.1:8080
In Burp Suite, navigate to the "Intercept" sub-tab of the proxy section and turn "Intercept On"

Return to the browser and navigate to the website hosted on the VM we deployed. The page appears to be continuously loading. Change back to Burp Suite and we will see we have a request waiting in the "Intercept" tab.
Q4: Which shortcut allows us to forward the request to Repeater?
A: Hitting right-click in the Intercept tab where the request is, we can see a list of available options. Next to the "Send to Repeater" option you can see a shortcut of CTRL-R
Q5: How about if we wanted to forward our request to Intruder?
A: Looking at the same menu, we can see that CTRL-I would send it to Intruder
Burp Suite saves the history of requests sent through the proxy along with their details. This is useful when we need to have proof of actions or modify/resent a previous request.
Q6: What is the name of the first section wherein general web requests (GET/POST) are saved?
A: Under the proxy tab, there is a sub-tab labelled "HTTP History" which, when viewed, shows us our previous requests
Q7: What is the name of the second section of our saved history in Burp Suite?
A: Looking at the same section, we can see another tab called "WebSockets History"
Move over to the "Options" section of the Proxy tab and scroll down to "Intercept Client Requests". Here, you can apply further fine-grained rules to define which requests we want to intercept. The most useful out of the default rules is our only AND rule
Q8: What is it's match type?
A: Looking at the specified section, we can see that the match type specified is URL
Q9: What is it's relationship?
A: Again, the same section reveals that the relationship is "Is in target scope"
Note: In this situation, enabling this match rule can be incredibly useful following target definition as we can leave intercept on permanently as it won't disturb other sites outside the scope.

Task 7 - Target Definition
The "Target" tab in Burp allows us to perform arguably some of the most important parts of web app pen testing - defining the scope, viewing a site map and specifying our issue definitions.
When starting a web app test, you will likely be provided a few things:
The application URL
A list of the different user roles within the application
Various test accounts and associated credentials for those accounts
A list of pieces/forms in the application which are out-of-scope for testing
From the supplied information, you can start building the scope within Burp Suite - something which is incredibly important in the case we are planning on performing any automated testing.
Typically, this is done in a tiered approach wherein we work our way up from the lowest privileged account browsing the site as a normal user. Browsing like this to discover the full extent of the site is commonly referenced as the "happy path".
Following the creation of a site map via browsing the happy path, we can go through and start removing various items from the scope. These items typically fit onto one of the following criteria:
The item has been designated as out of scope from the client
Automated exploitation of the item would cause a huge mess
Automated exploitation of the item would lead to damaging and potentially crashing the web app
Once any restricted or dangerous items are removed from the scope, we can move onto other areas of testing.
Questions
Before leaving the Proxy tab, switch "Intercept off". Next, navigate to the Target tab in Burp Suite and open the web app via the IP provided. In the Target tab, find the target site and right click and select "Add to scope"
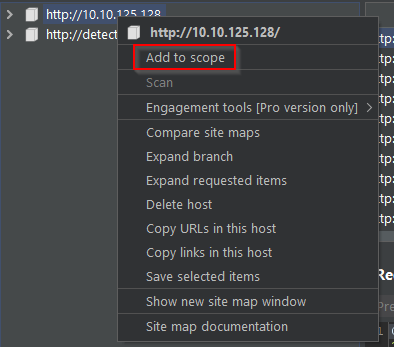
Clicking "Add to scope" triggers a pop-up. This stops Burp from sending out-of-scope items to our site map - select "Yes" to the pop-up

Browse around the rest of the application to build out the page structure in the target tab. Once most of the pages have been visited, return to Burp Suite and expand the various levels of the application directory.
Q5: What do we call this representation of the collective web application?
A: Site MapQ6: What is the term for browsing the application as a normal user prior to examining it further?
A: Happy PathWithin the target tab, you may have noticed a sub-tab for "Issue Definitions" - click into it

The issue definitions found here are how Burp Suite defines issues within reporting. While getting started, these issue defintions can be particularly helpful for understanding and categorizing various findings we might have.
Q7: Which poisoning issue arises when an application behind a cache process input that is not included in the cache key?
A: Looking through the definitions, we stumble upon one that matches this description - Web Cache Poisoning

Task 8 - Repeater
Repeater allows us to repeat requests we have already made. These requests can be reissued as-is or with modifications. In contrast to Intruder, Repeater is typically used for the purposes of experimentation or more fine-tuned exploitation wherein automation may not be desired.
To start, click "Login" on the website in the top left corner in order to navigate to the login page

Try logging in with invalid credentials
Questions
Q2: What error is generated when login fails?
A: Typing wrong credentials reveals a string for an error message - Invalid email or password
Even though we didn't send it to Repeater initially via intercept, we can still find the request in the history. Switch to the "HTTP" sub-tab of Proxy. Look through the requests to find the failed login. Then, right click it and send it to Repeater and Intruder

Once it is in Repeater, try adjusting the request such that we are sending a single quote (') as both the email and password.
Q4: What error is generated from this request?
A: Changing both credentials to (') reveals a SQLITE_ERROR on the main page

Now we've leveraged Repeater to gain proof of SQL Injection, we can try and leave a zero-star review. First, click on the Contact Us button on the top-right of the website
Next, click on "Customer Feedback"

With the Burp proxy on, submit some feedback. Once this is done, find the POST request in the HTTP History tab and send it to Repeater.

Q8: What field do we have to modify in order to submit a zero-star review?
A: Looking at the request, we can see one field that fits this description and is most likely to be the stars - rating
To submit a zero-star review, we simply change this number to zero and forward the request.


Task 9 - Intruder
Intruder can be used for many things ranging from fuzzing to brute-forcing. At its core, Intruder serves one purpose: automation
While Repeater best handles expirementation or one-off testing, Intruder is meant for repeat testing once a proof of concept has been established. Some common uses are as follows:
Enuemrating identifies such as usernames, cycling through predictable session/password recovery tokens, and attempting simple password guessing
Harvesting useful data from user profiles or other pages of interest via grepping our responses
Fuzzing for vulnerabilities such as SQL injection, cross-site scripting (XSS) and file path traversal
To accomplish these tasks, Intruder has four different attack types:
Sniper - Cycles through selected positions, putting the next available payload (item from wordlist) in each position in turn. This uses only one set of payloads
Battering Ram - Uses only one set of payloads but puts every payload into every selected position
Pitchfork - Allows us to use multiple payload sets (one per position selected) and iterate through both payload set simultaneously. If we selected two positions, we can provide a username and password payload list. Intruder then cycles through the combinations of usernames and passwords, resulting in a total number of combinations equalling the smallest payload set provided.
Cluster Bomb - Allows us to use multiple payload sets and iterate through all combinations of the payloads. If we selected two positions, we can provide a username and password payload list. Intruder then cycles through the combinations of usernames and passwords, resulting in a total number of combinations equalling usernames x passwords.
Questions
Q1: Which attack type allows us to select multiple payload sets (one per position) and iterate through them simultaneously?
A: PitchforkQ2: How about the attack type which allows us to use one payload set in every single position we have selected simultaneously?
A: Battering RamQ3: Which attack type allows us to select multiple payload sets (one per position) and iterate through all possible combinations?
A: Cluster BombQ4: Which attack type allows us to cycle through our payload set, putting the next available payload in each position in turn?
A: SniperNext, download the wordlist attached to this room - found here
Return to the Intruder in Burp. In the last task, we passed the failed login attempt to both Repeater and Intruder for further examination. Open up the sub-tab "Positions" in the Intruder tab and verify that "Sniper" is selected as our attack type.

Burp attempts to automatically highlight possible fields of interest for Intruder. Hit "Clear" on the right-hand side to clear all selected fields.

Next, highlight the email field between the double quotes and hit "Add" to select the email as a position for the payloads.

Next, switch to the "Payloads" sub-tab of Intruder. Once there, hit "Load" and select the wordlist you previously downloaded.

Scroll down and unchcek "URL-encode these characters". For SQL Injection, you do NOT want to have the characters sent in the payloads to be encoded as they otherwise won't be recognized by SQL.

Finally, click "Start Attack".
Q12: What is the first payload that returns a 200 status code, showing we have successfully bypassed authentication?
A: Looking at the attacks, we can see one output that has a status of 200. Looking closer at it reveals that the payload is a' OR 1=1--

Task 10 - Sequencer
Sequencer represents a core tool in a proper web application pentest. Sequencer is a tool for analyzing the quality of randomness in an application's sessions tokens and other important data items that are otherwise intended to be unpredictable. Some commonly analyzed items include:
Session tokens
Anti-CSRF (Cross-Site Request Forgery) tokens
Password reset tokens (sent with password resets that in theory uniquely tie users with their password reset requests)
Questions
First, switch over to the HTTP History sub-tab of Proxy. Then, parse through the various responses we received from Juice Shop until you find one that includes a "Set-Cookie" header

Once you found a request, right-click and "Send to Sequencer". Then, change over to Sequencer tab and select "Start live capture"

Let Sequencer run and collect ~10,000 requests. Once it hits roughly that amount hit "Pause" and then "Analyze Now".

Parse through the results.
Q6: What is the effective estimated entropy measured in?
A: Looking at the "Summary" reveals that it is measured in bits
Q7: In order to find the usable bits of entropy we often have to make some adjustments to have a normalized dataset. What item is converted in this process?
A: Navigating to the "Bit-level analysis" page, we will see that tokens are converted in this process
Feel free to read through the remaining results of the token analysis

Task 11 - Decoder and Comparer
Decoder is a tool that allows us to perform various transforms on pieces of data. These transforms vary from decoding/encoding to various bases or URL encoding. We chain these transforms together and Decoder will automatically spawn an additional tier each time we select a decoder, encoder or hash.
Similiarly, Comparer is a tool used to compare different responses or other pieces of data such as site maps or proxy histories - very similiar to Linux tool "diff"
Some common uses for Comparer are as follows:
When looking for username enumeration conditions, you can compare responses to failed logins using valid and invalid usernames, looking for subtle differences in responses
When an Intruder attack has resulted in some very large responses with different lengths than the base response, you can compare these to quickly see where the differences lie.
When comparing the site maps or Proxy history entries generated by different types of users, you can compare pairs of similar requests to see where the differences lie that give rise to different application behavior. This may reveal possible access control issues in the application wherein lower privileged users can access pages they really shouldn't be able to.
When testing for blind SQL injection bugs using Boolean condition injection and other similar tests, you can compare two responses to see whether injecting different conditions has resulted in a relevant difference in responses.
Questions
First, let's take a look at Decoder. Previously, we discovered the scoreboard within the site JavaScript. Return to the "Target" tab and find the API endpoint highlighted in the following request

Copy the first line of that request and paste it into Decoder. Next, select "Decode as..." URL

Q3: What character does the %20 in the request we copied into Decoder decode as?
A: As we can see in the output, it results in a space
Q4: Decoder also has a 'Magic' mode where it will automatically attempt to decode the input it is provided. What is this mode called?
A: Looking at the "Decode as" options, we can see an option called "Smart Decode"
Q5: What can we load into Comparer to see differences in what various user roles can access?
A: Site MapsQ6: Comparer can perform a diff against two different metrics, which one allows us to examine the data loaded in as-is rather than breaking it down into bytes?
A: At the bottom right of the "Comparer" tab, we can see a metric called "Words"

Task 12 - Extender
Extender allows us to add components such as tool integrations, additional scan definitions and more. Some of the most popular extensions are:
Logger++ - adds enhanced logging to all requests and responses from all Burp Suite tools (enable before you need it)
Request Smuggler - allows you to attempt to smuggle requests to backend servers
Autorize - useful for authentication testing in web app tests. These tests typically revolve around navigating to restricted pages or issuing restricted GET requests with the session cookies of low-privileged users
Burp Teams Server - allows for collaboration on Burp projects
Retire.js - adds scanner checks for outdated JavaScript libraries that contain vulnerabilities (premimum extension)
J2EEScan - adds scanner test coverage for J2EE applications (premium extension)
Request Timer - captures response times for requests made by all Burp tools, useful for discovering timing attack vectors
A prerequisite for many of the extensions offered for Burp is Jython - the Java implementation of Python
Questions
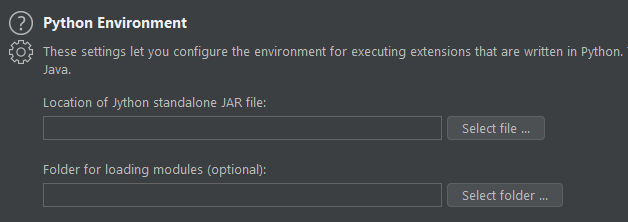
To start, go over to the "Options" sub-tab of the "Extender" tab

Scroll down until you reach the "Python Environment" section
Download the standalone version of Jython from here

Return back to Burp Suite and hit "Select File" under the Python environment subsection for Jython standalone and navigate to where you downloaded it and select it

Burp is now configured for installing extensions. Switch to the BApp Store sub-tab of Extender and look through various extensions offered
Q6: Which extensions allows us to bookmark various requests?
A: Searching through the extensions for keywords of bookmarks leads us to the "Bookmarks" extensions

Task 13 - Burp Suite Pro
The most powerful feature in Burp Suite - Burp Suite Scanner - allows you to passively and actively scan and spider the website for vulnerabilities. You can launch these scans from the dashboard and let them run in the background while you examine the web app.

Commonly used in manual tests, Burp Collaborator Client allows us to gain insight into issues that may otherwise seem to produce no output. Often during testing, we may come across items which either due to timing/slowness of the web app or a lack of any reaction are likely vulnerable but do NOT produce any sure-fire indicators.
With Collaborator, we can produce out-of-band alerts via generating payloads that reach back to Burp Suite's servers for us

Questions
For this task, download the file located on TryHackMe's website for this room.
Q1: Download the report attached to this task. What is the only critical issue?
A: Cross-origin resource sharing: arbitrary origin trusted
Q2: How many "Certain" low issue did Burp find?
A: 12

Congratulations!
Thanks for reading this write-up and learning with me. If you want to learn more about Burp Suite, PortSwigger have a mostly free online Web Security Academy which is excellent for learning more about web exploitation techniques and putting them to the test. You can find the Academy here